I have finished my base and started on the oven, and after 4 rows both sides realized I didn’t have fireclay in my high temp mortar mix. The supply store had given me pre-mixed (dry) high temp mortar (Heat Stop 50). Although the order stated “Clay”, they graciously substituted Heat Cast 40 when I pointed out the error.
Now I am a little gun shy about using “Heat Cast 40”, as it does not say anything about being clay, listed as castable refractory. Is Heat Stop 40 a substitute for fireclay or should I try and find the real deal - Fireclay.
I live in northern Michigan and the closest supplier for fireclay is about 3 hours by car. I can order online but shipping cost and most important delivery times will put the build into the middle of October before I receive the product. Your thoughts are appreciated, thanks
So…it sounds like you got a bit turned around with your materials. The good news is that the dry, pre-mixed Heat Stop 50 is in fact a mortar mix that BrickWood recommends for the high temp mortar. The bad news is that you exchanged it for Heat Cast 40, which is a molding material rather than a mortar material. (You can actually mold firebrick itself out of Heat Cast 40!) The four courses you already laid using Heat Stop 50 are done a-okay according to spec.
So, what now? Your best bet considering your circumstances, although I recognize it will be awkward, would be to throw yourself on the good graces of your supplier and exchange the Heat Cast 40 for Heat Stop 50. Because fireclay is relatively inaccessible where you live, I’m guessing that you made a considerable investment in those materials.
The other alternative would be to do this, in the following order:
Make a day out of it and make the 3 hour drive to the fireclay supplier. Call ahead so they have it set aside for you.
Then return the Heat Cast 40 for an outright refund. If they want a restocking fee, you’d be better off letting that go.
Even with the drive and whatever ding you might endure for the return, I think you’ll come out ahead because the homemade high temp mix is so much less expensive.
I know that the various ins and outs of refractory materials can be confusing, and I sympathize. I also know how it feels to know that cold weather and the end of masonry season for mere mortals like us is just a month away, and I hope this advice helps get you on track.
Good luck, and let me know what you decide and how this comes out for you. We’re in your corner!
Thanks for the quick response. I already have the ingredients less the fireclay. Also, I removed the 4 rows from both sides and was abele to save the majority of the bricks. I am enjoying the project and since I have the time involve I want to do the best job now rather than redo something done the road.
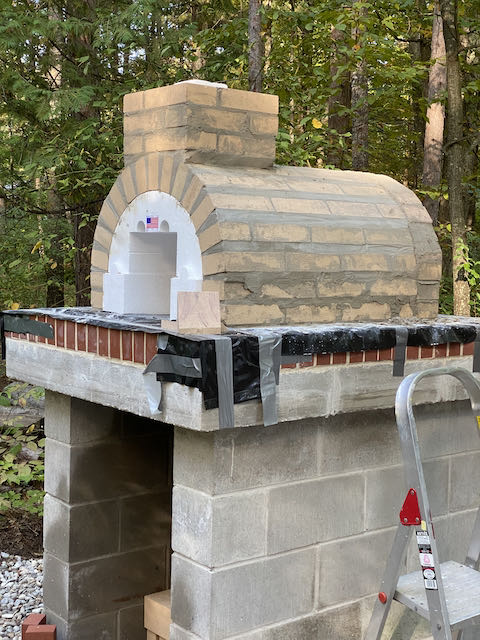
Well I got back to work after receiving my two 50# bags of fireclay and I have the stove completed. I am happy with my work, since my career was in finance and real estate, not mason work. A couple of photos show where I am in the process.
A couple of questions on timing and finish. Since the stove is done and and laid-up can I pull out the form after 5-days even though I don’t have the insulation or stucco installed? I read another post and think that was what you were saying, just want to be clear. Also, can I fire the oven at this point as well, may run out of time due to weather, just trying to complete items as I am waiting on an additional box of insulation. I should have purchased it a while ago, kept being on the fence.
On the finish, I am planning a stucco only shell on the oven, my wife and I like that look. Just want to understand how to finish the front and the chimney. I am planning on leaving the firebrick exposed on the front edges to accommodate the door. So not the whole edge but most of it. I am guessing I will need to wrap or place at least one layer of insulation in the arch area to protect the stucco from the brick heat. Also,if you are going to only use stucco, I am not sure how to finish the open edge of insulation, which the directions indicate is 1" back from the front edge, although in my case it will most likely be about 1" around on the front arch. Seems like this edge of stucco might be vulnerable to heat from the brick and door, as you would need to lay it right on the brick.
I have the same basic question on the chimney, I would like to stucco that as well. I am using the DuraTech chimney with the draft section. I want to place a poured chimney cap, 1" thick on the top of the chimney to anchor the stove pipe down to the brick. I will make an 8" hole in the center for the DuraTech pipe, but I believe I need a storm collar to keep water out of the pipe hole, is that correct? I live near the Great Lakes and we get some serious winter and fall storms, with rain coming down sideways. The chimney cap will cover the open end of the insulation blanket. I plan on using Heat Stop 50 to make the cap, if you think that would work.
Just to clarify I am using three coats of stucco, base coat (1/2" mortar mix), brown coat, (1/2" mortar mix) and a finish coat (1/8-1/4" Quikcrete base coat finish -white). My brick and block suplier suggested these mixes and said to add an additional shovel full per 80# bag of cement to richen the mix for strength.
Thanks for your help along the way, I have been watching a ton of wood fired pizza videos and I am excited to try my oven.
Hey, Jim, that’s looking great! I’m glad you got your oven interior finished, and it does look really, really good, front and back. The BrickWood designs were made for people like us. I’m not a tradesperson, either; but building my oven from the first shovelful of dirt to the final swipe of stucco patch just increased my respect for the trades and the immensely talented people who work them.
So, here’s my responses:
You can definitely pull out the form, and it will be easier to do so now. Once the arch is set up, the form no longer supports it.
Firing is a grey area. The purpose of the six burns is to set up your high temp mortar and drive out moisture from the firebrick and joints. The reason it ramps up from a couple of sticks to a sustained fire is to allow the structure to expand and contract without any sudden shifts that would produce cracks. In a normal sequence this is something you do once you are fully insulated and have an outer shell in place, so that the heat from the curing fire is retained over a period of many hours and produces that gradual ramp up and ramp down. My advice, even knowing how eager you are to move things along, is to wait until your insulation and stucco are in place. You’re doing this for the long haul, and extra days invested now will result in a structure that is likely to be in service long after you are.
That’s one of the ambiguities! So…I would recommend that you leave the arch and the chimney face fully exposed. They both get really hot when you have the full 900°F+ pizza oven environment going. The door will be framed in the arch when it is in place.
The way you will want to finish:
Apply your double layer of mineral fiber insulation, which will end up being four layers rather than the standard two.
Apply the chicken wire matrix. You are bringing it all the way across the face and opening of the oven.
Use a pair of needlenose pliers to pull small “tufts” of the insulation out and into the outside edge of the arch. Do not detach them from the blanket, just pull them out a bit and ensure they stay under the chicken wire.
Apply your stucco. When you reach the edge of the arch on your first stucco layer, “feather” it to cover just the edge of the firebrick and the tufts of insulation. Your goal is to cover the gap between the insulating blanket and the firebrick, something like an inch at most.
When you nip the chicken wire after the first coat of stucco, fold the ends back over the feathered joint you made. You’ll be covering those ends with the second and third coats, and they will provide a sufficient matrix to hold the stucco in place.
I think you have a sound plan for the chimney cap. Look at the DuraTech kit, and note that it has a base-plate. Plan ahead a bit, and you could embed four bolts into your poured cap to receive the base-plate and help with anchoring and sealing. After looking at a Dura storm collar and the reasons you might use it, I don’t think it will help for your application. The stove pipe goes through the base-plate, and if I recall correctly is sealed all the way around, which will keep water out. It’s also easy (and good practice) to keep the damper closed, which will keep out any water that works its way around the DuraTech cap at the top of the chimney. The silicone high temp sealant joining the base-plate to the cap you plan to pour would seal at the bottom, and if you add the bolts will keep your chimney from being casualties of a Great Lakes storm.
Hope all this is helpful, and I know you’re going to enjoy your oven when it is finished!