Hi all. First time poster. I could not find an answer to the following question on the forum.
I am about to lay down the frame brick. I have been unable to find the recommended size 8x2 1/14x3 5/8. I have 7 1/2x2 1/2x3 1/2.
I understand I will need to adjust (decrease) the amount of mortar to adjust for the difference between 2 1/4 and 2 1/2, but I am wondering what affect the 8 vs 7 1/2 inches will have and what adjustment I will need to make?
Seems like the result of this size difference is the firebrick floor will be larger by 1/2 inch in each direction. Is this going to throw off how the firebrick lays out on the floor? Is the adjustment simply going to be in cutting the firebrick to fill in the gaps?
Brick size is something that we all have had to fudge. Construction companies can procure a specified size for large projects, but the rest of us have to shop around and make adjustments.
The effect on your frame will be minimal—it will make the interior space one inch larger in both dimensions. (You have to multiply by 2 here.) You will want to make sure your frame bricks are still aligned to the outside edges of your slab.
It’s really going to have almost no effect on the firebrick for the hearth, nor on the amount of materials you will use. The Mattone Barile arch is designed to lay on the transition between the firebrick and the outer frame bricks, so you won’t see it, either.
When you get to the hearth, you lay your herringbone pattern in the space that you actually have, and fill in small triangular gaps along the edges with scraps of brick that you cut along the way. You’re just packing the hearth brick as tightly as you can, and the result might be slightly larger triangles. You’re using scraps, so there’s nothing to worry about there, either.
You’re already on top of the depth difference, so my take on it is that you will be fine. Hope you’ll check in again to let us know how things came out!
Matt, I have a follow-up question if you do not mind.
In our design, we are now thinking of putting a wood veneer on the sides of the slab. We would prefer to bring the frame brick out so it extends 1/2 or 3/4 inch over the slab so it is flush with the wood facing. If we do that, then that would further extend the size of the area of the firebrick floor by another 1 - 1 1/2 inches in each direction. In essence, my frame brick shrinks from 7 1/2 inches to between 6 3/4 to 7 inches if we let it overhang the slab.
Do you see any issues with this design and approach?
Kirk, my very rough guess is that you have about ¾ of the width of a firebrick to play with here. As long as your hearth firebrick transitions inside the footprint of the arch, and that some of the arch weight is supported by the frame brick (which is mortared in and transfers the load to the slab, vs. the hearth which is not mortared and sits on top of sand)… I think you can do that. If you can do ½-inch veneer rather than ¾-inch, I’d prefer that.
And, I very much like what you’re thinking overall.
I laid out the frame brick with a 1/2 inch overhang, placed the foam mold in place, and measured how much of the oven brick would rest on the frame brick. If I measured correctly, 1 inch of the oven would rest on each of the left and right sides and more on the front and back. Is this going to provide enough weight transfer to the frame brick?
Yes. Pay careful attention to the “bed” of mortar you lay under the first course of firebrick for the arch. You don’t want to get sloppy with it, but be sure you lay enough so that it can work its way into the loose edges of the hearth itself. That should be enough to ensure you have a firm foundation for the barrel arch.
The other side of this is not to overdo it and actively press mortar into those loose firebrick—they are dry fit tightly in already, but you want to avoid mortaring them in.
Hope this gets you on your way, and that you’ll update us when you are through these steps!
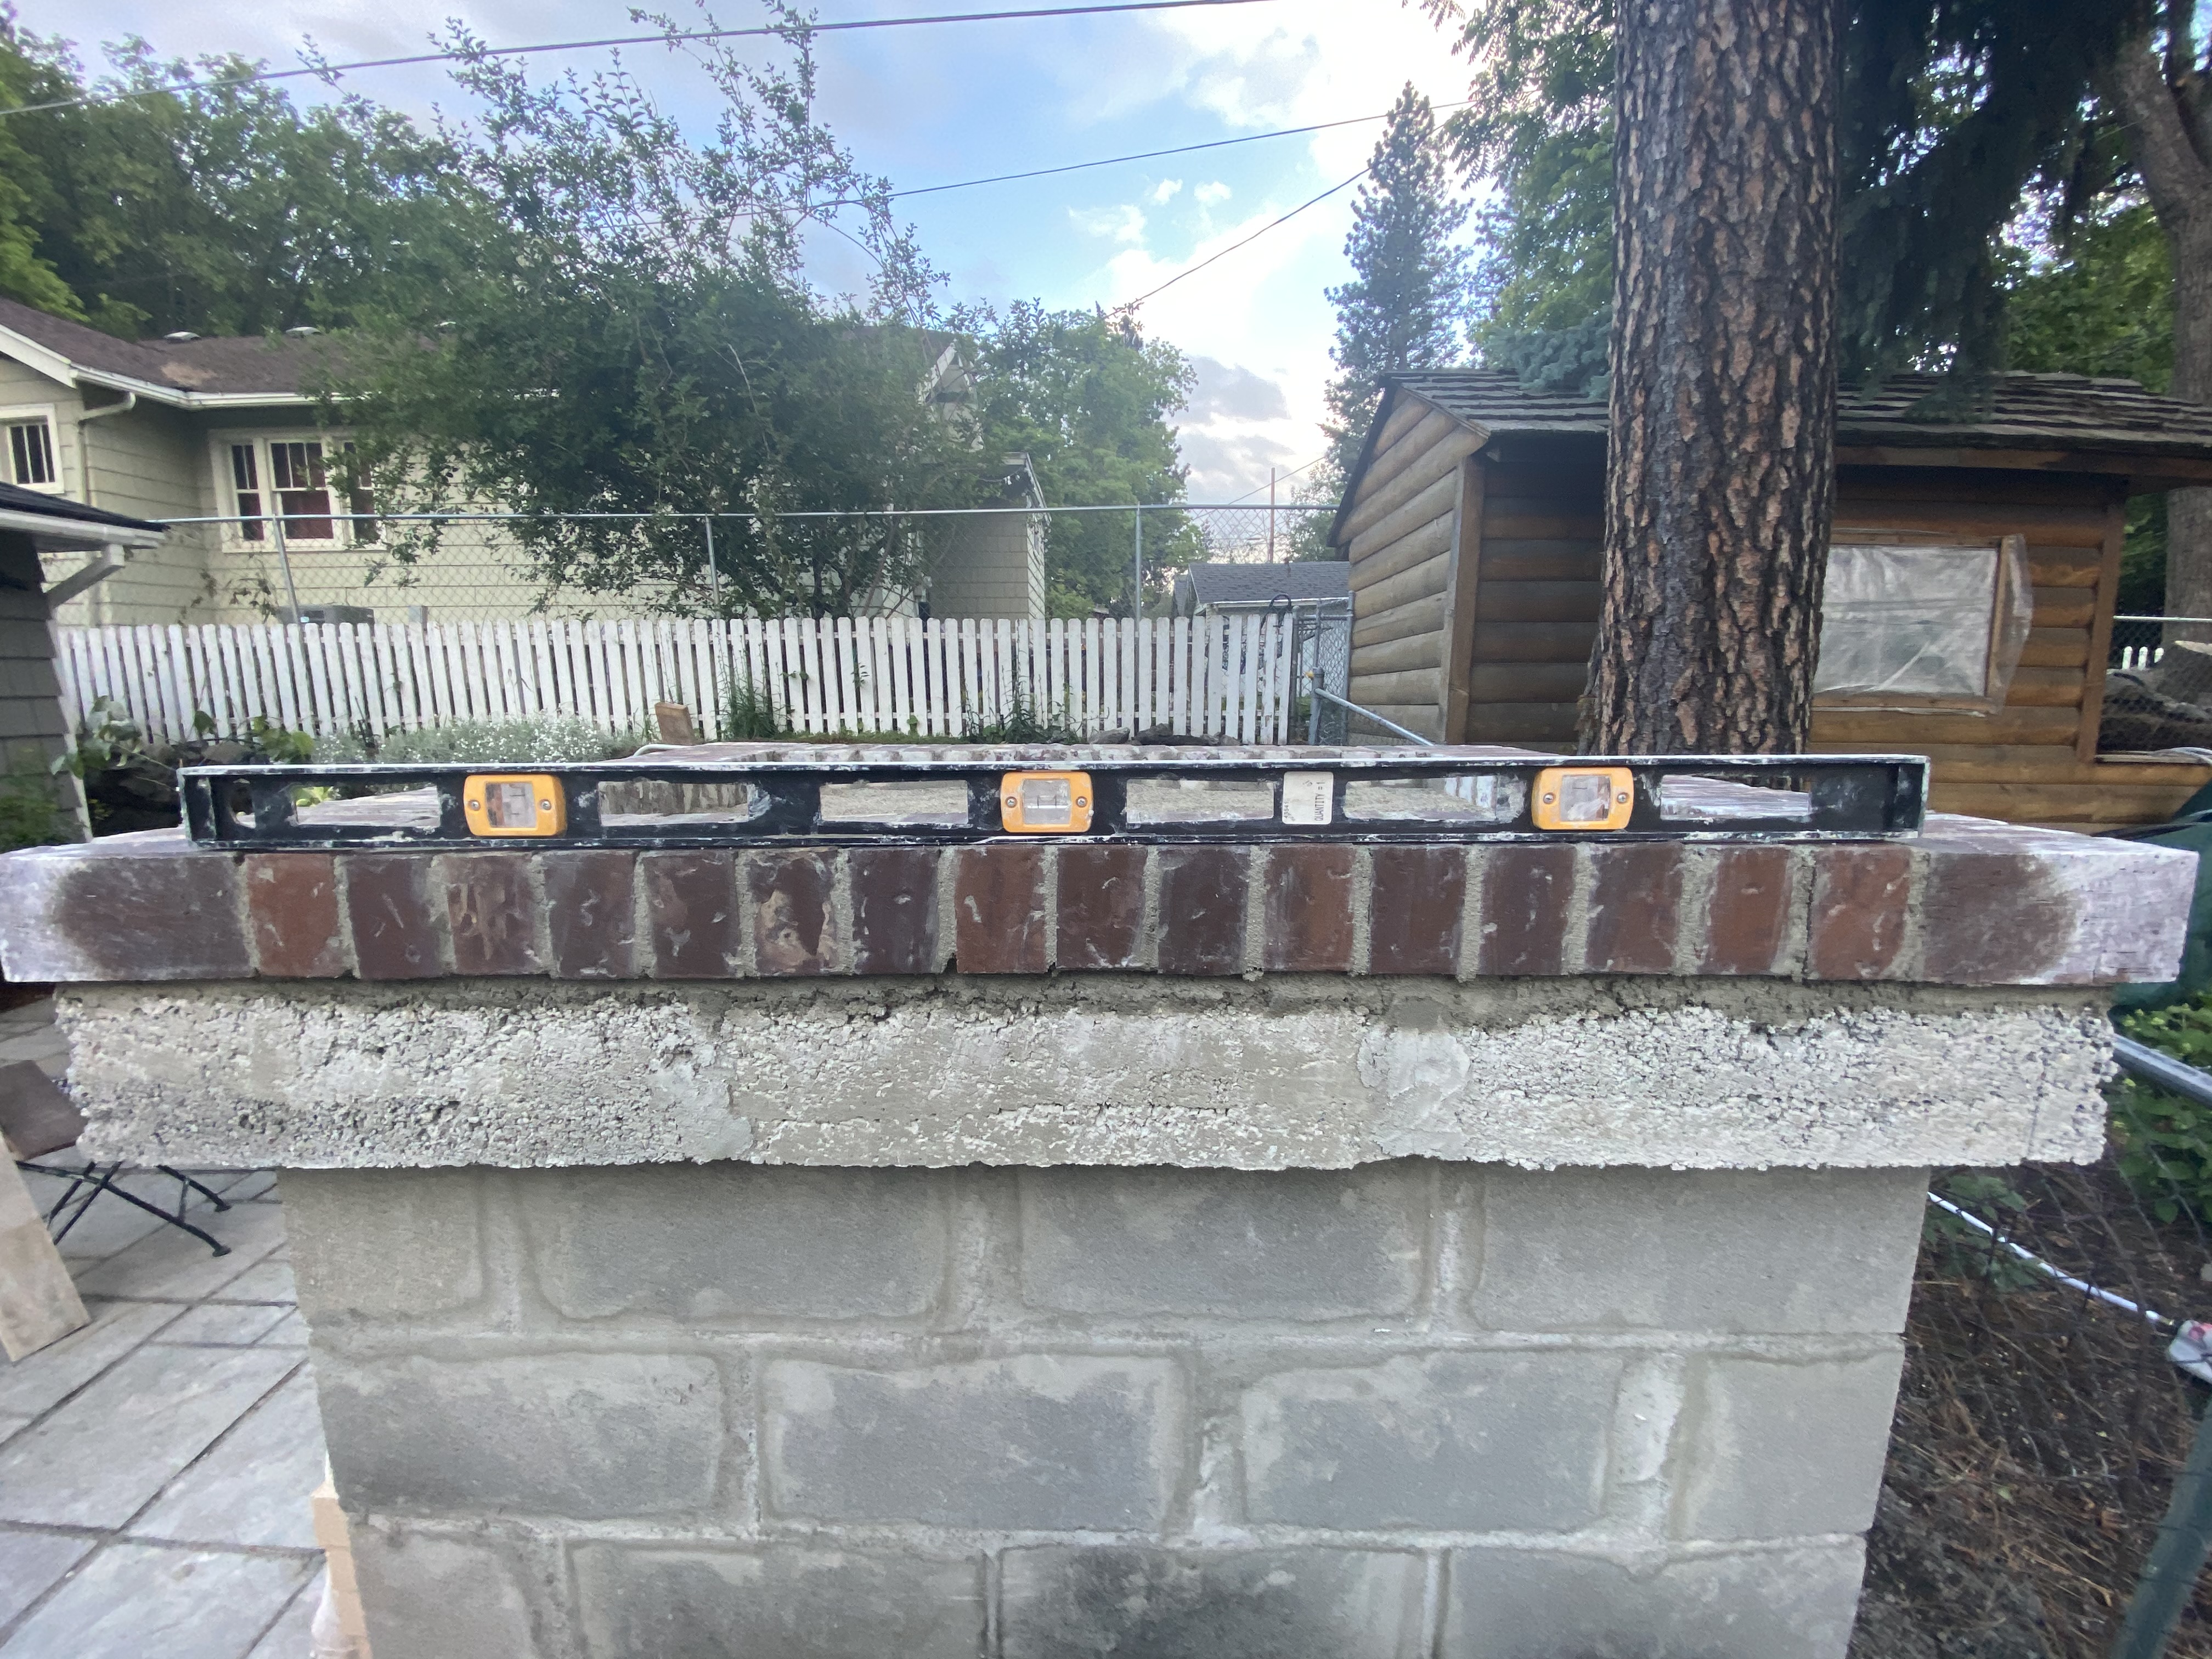
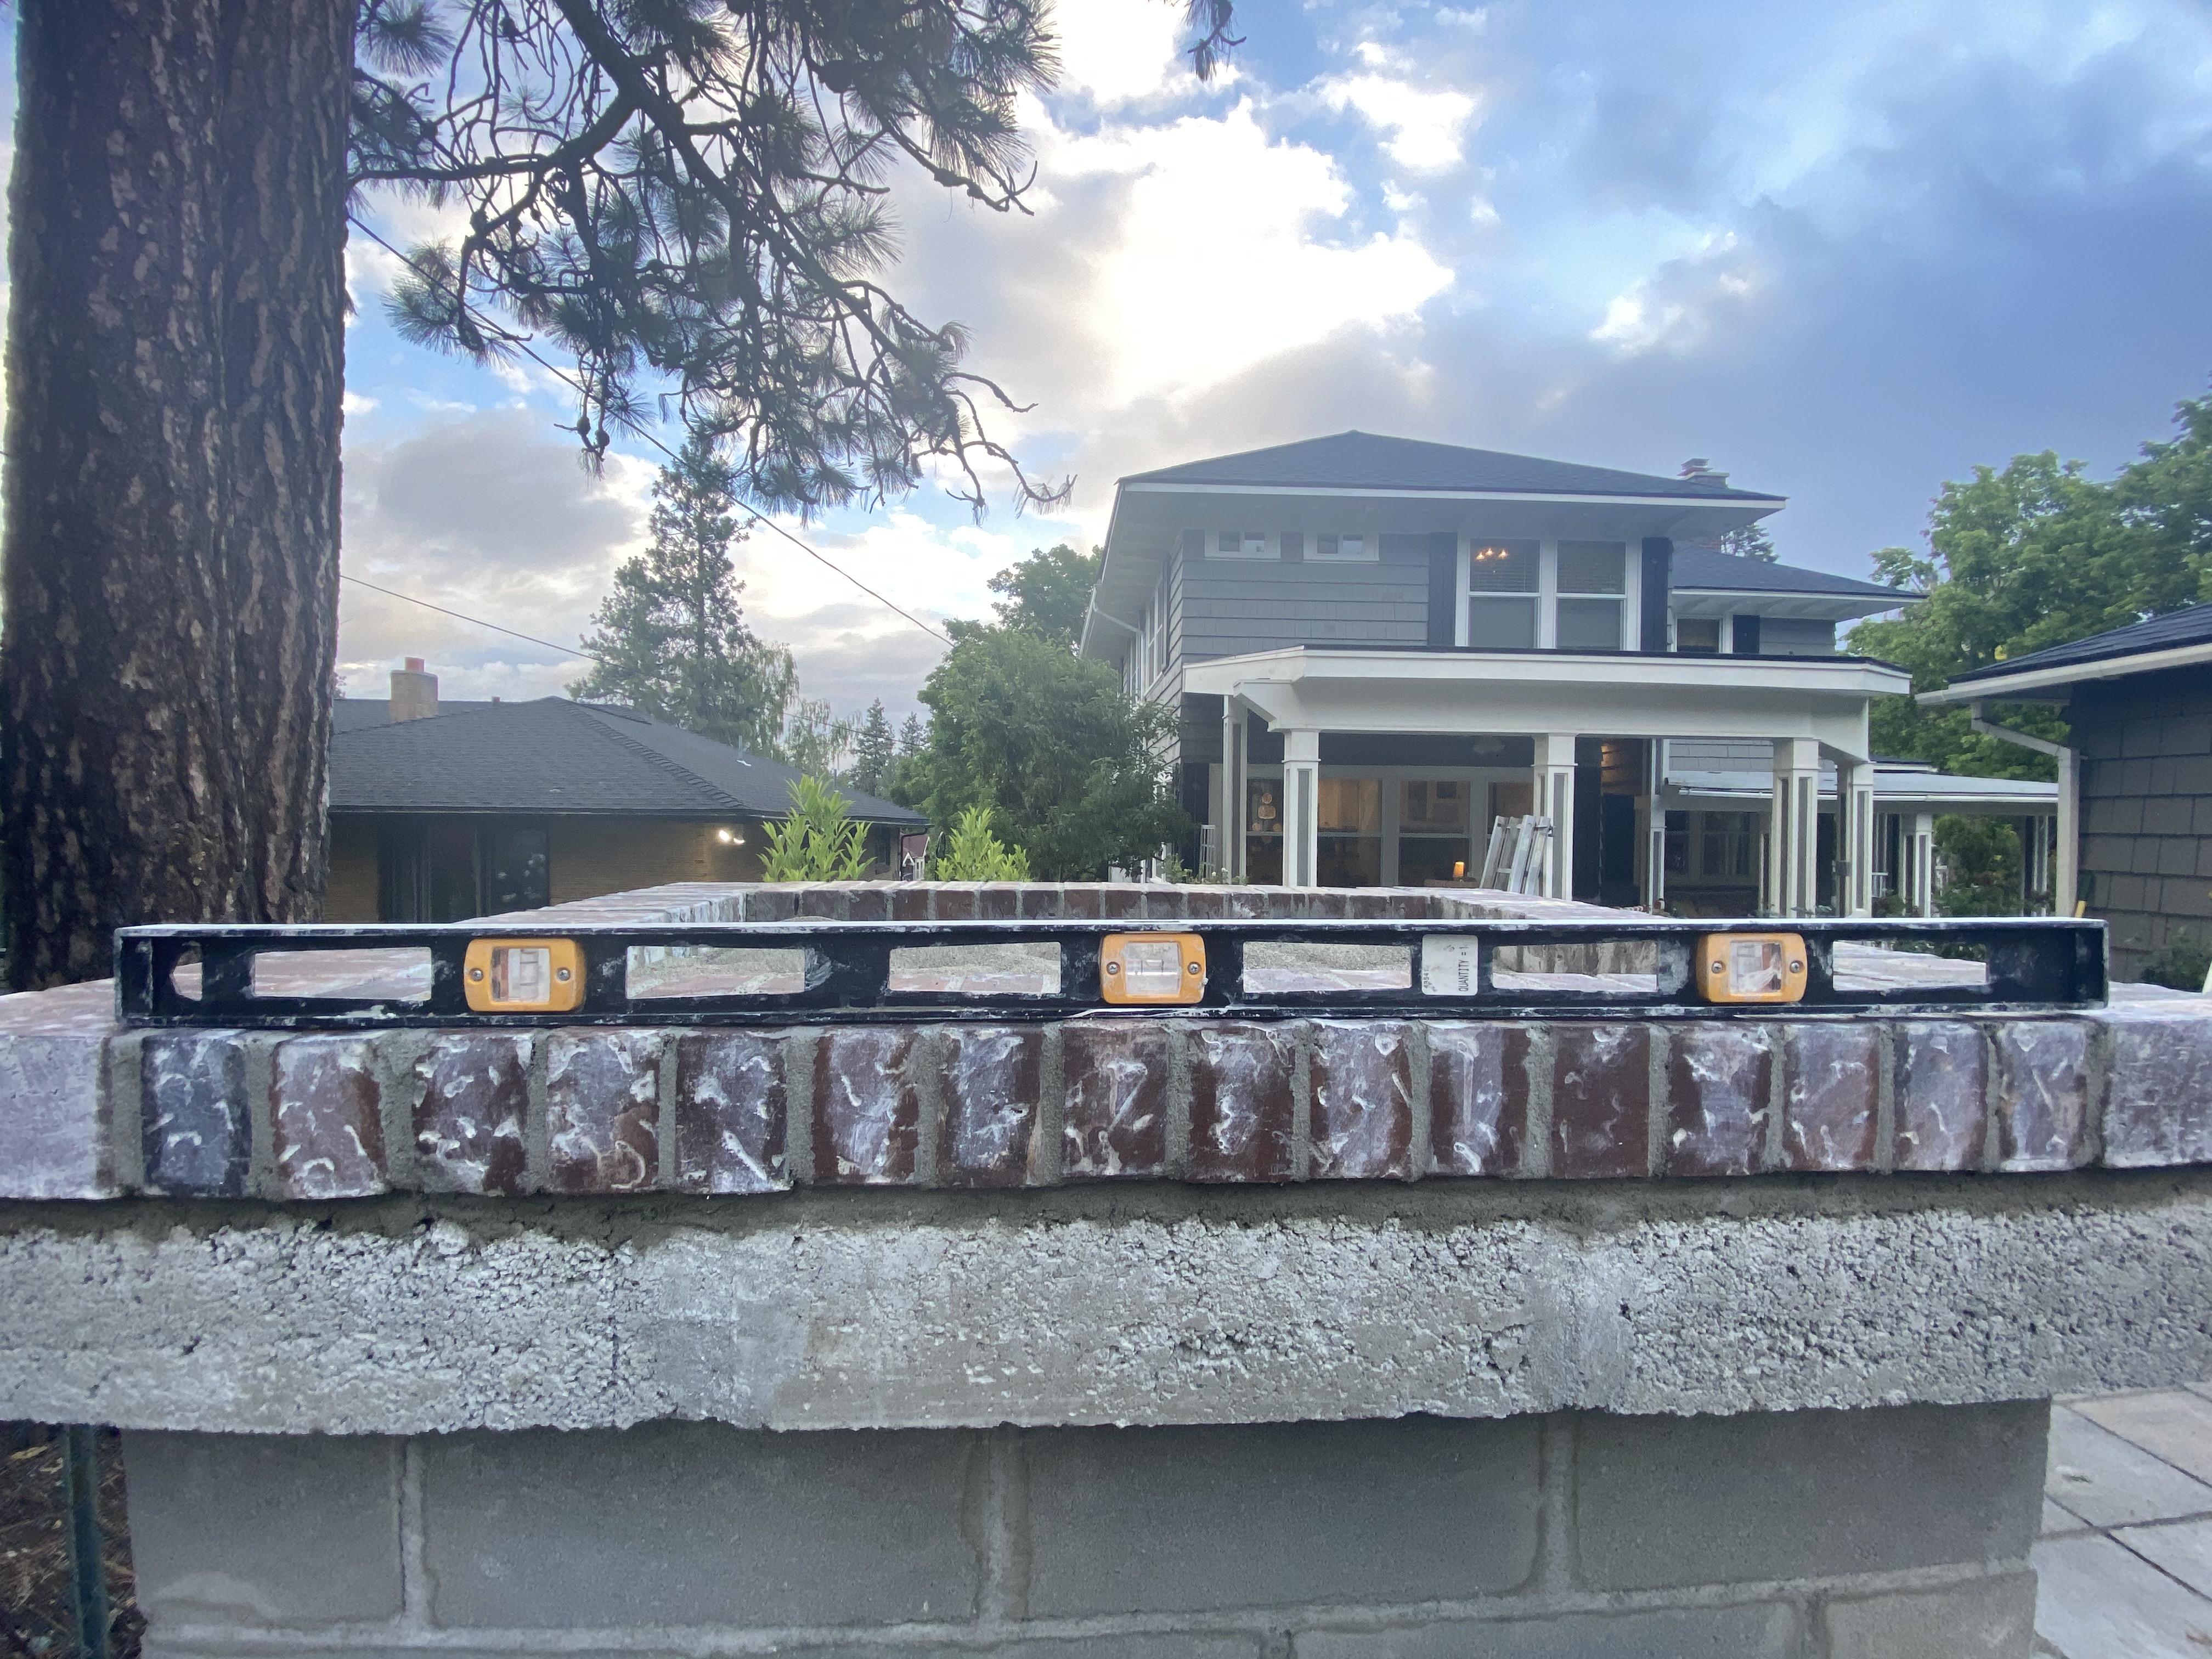
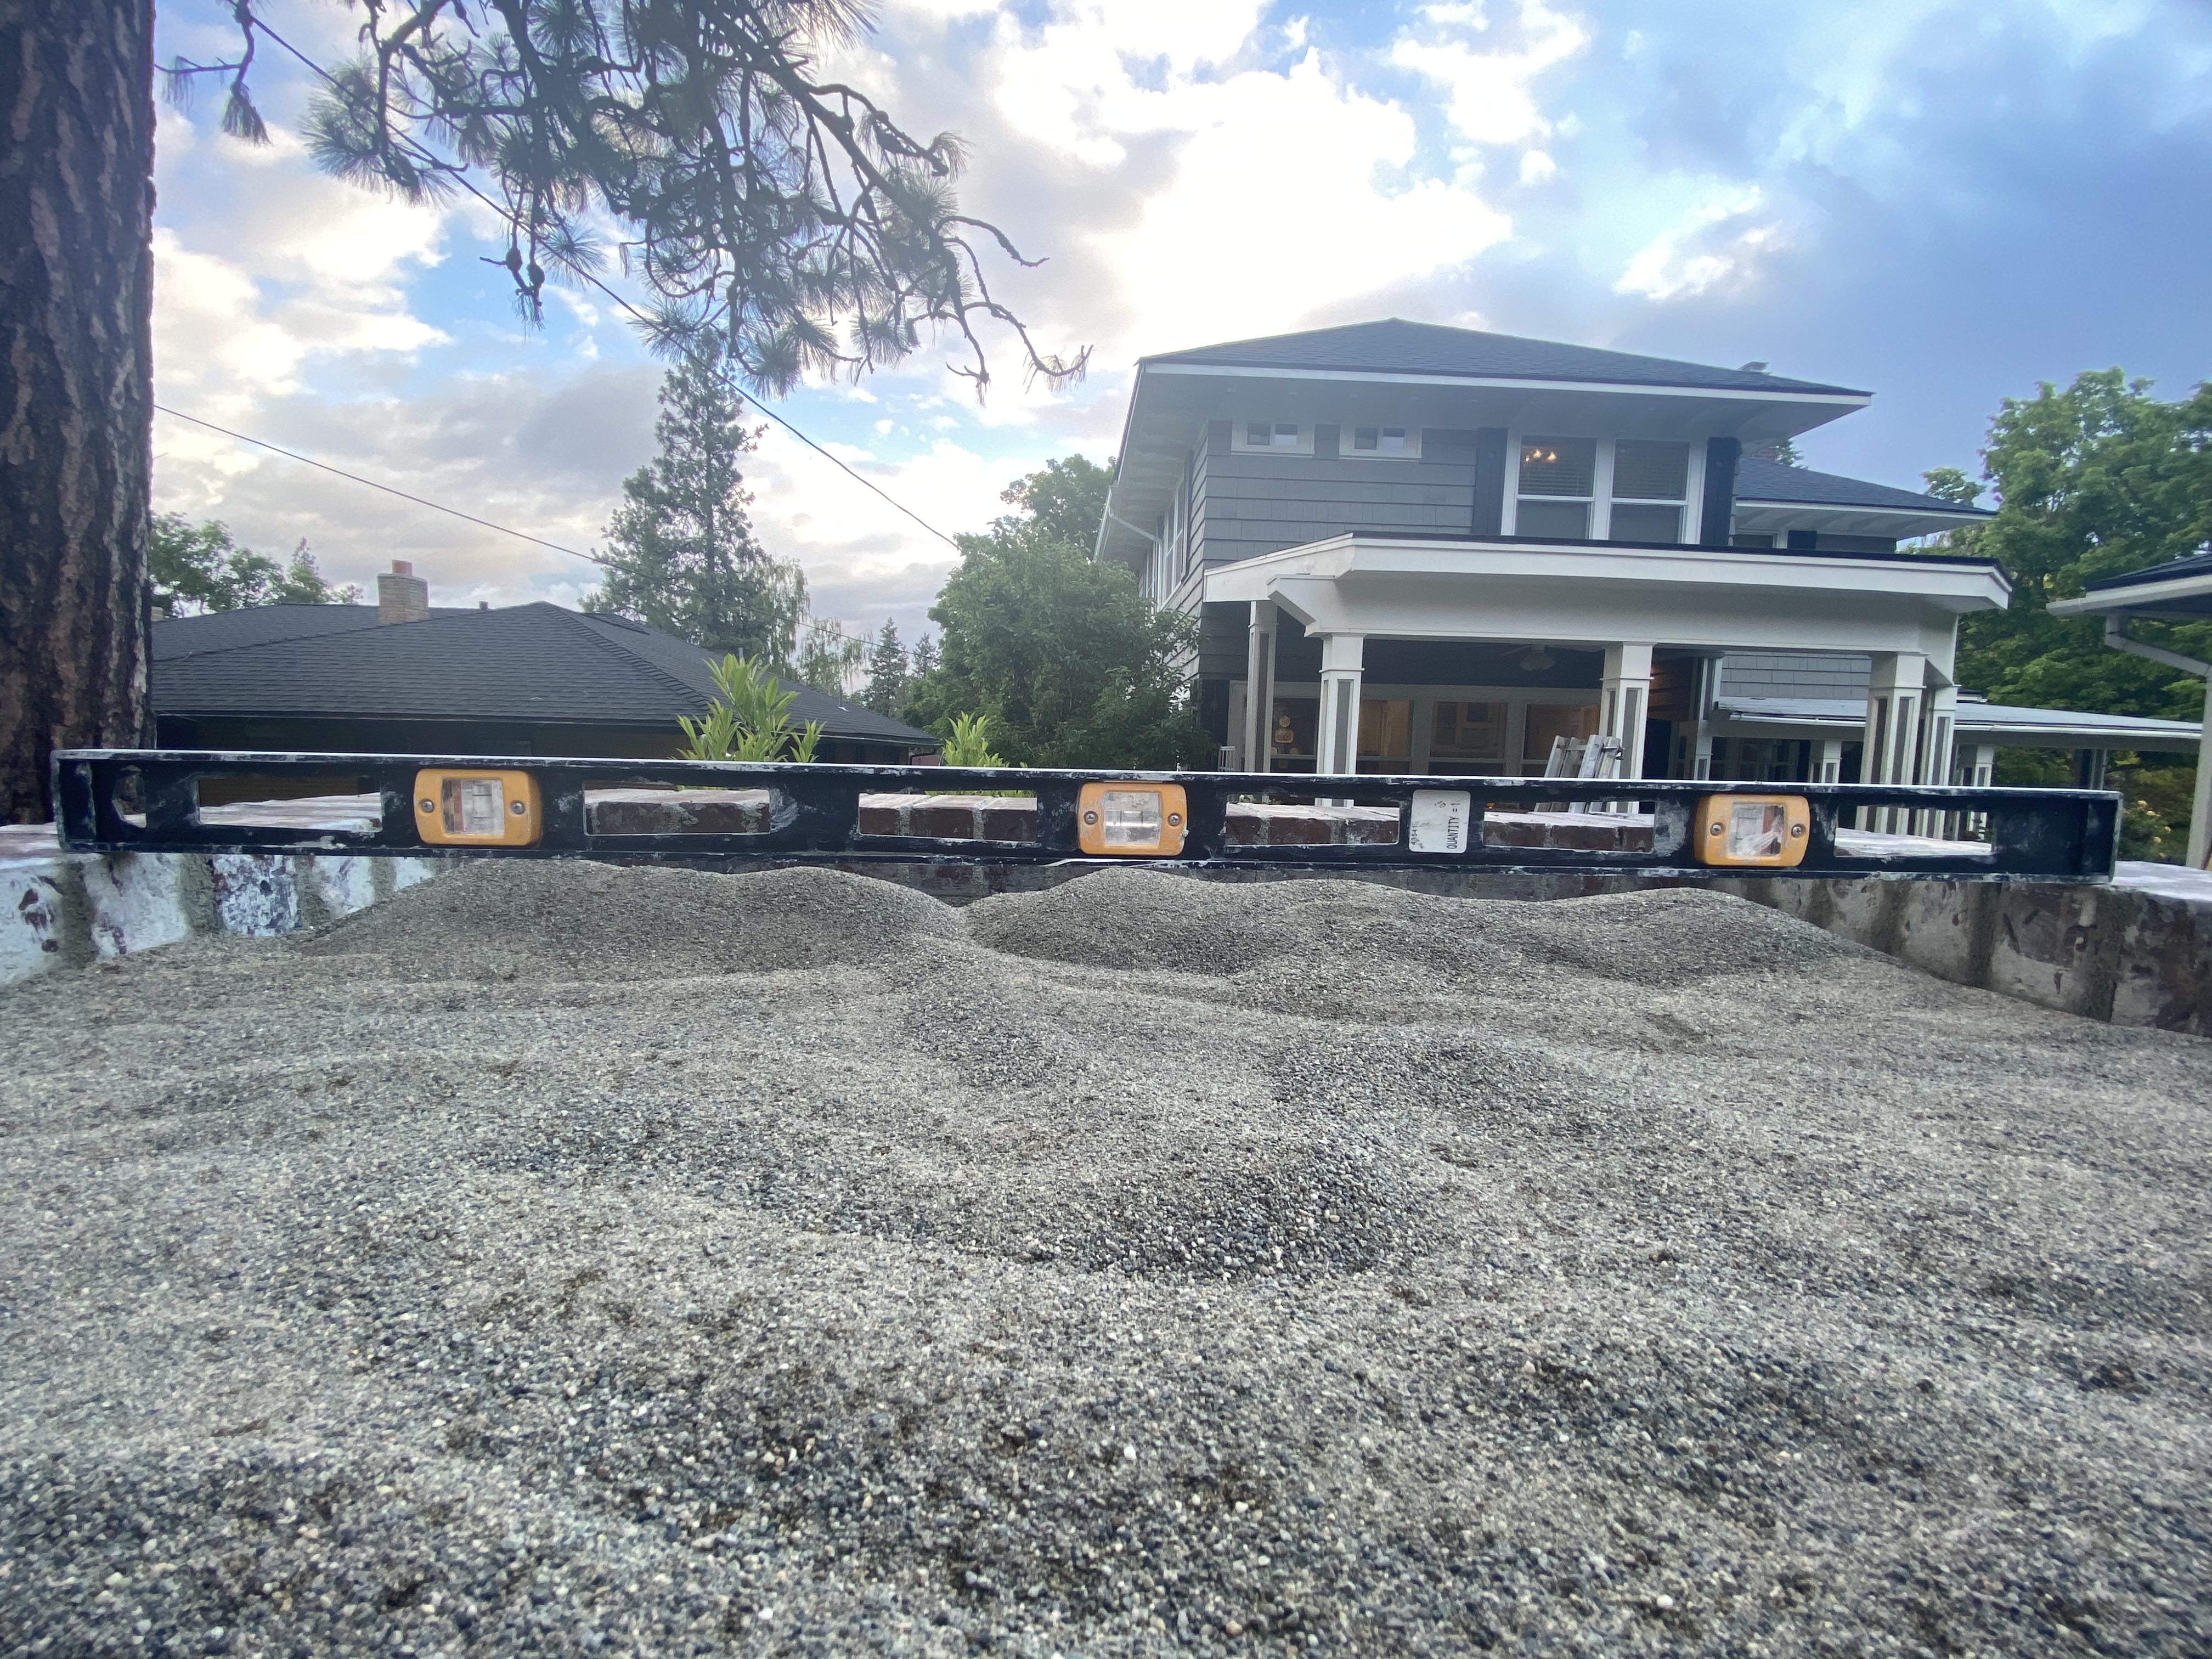
Hey, Matt. The frame brick is in. The effort on it was great, but not so confident in the results. like others before me, the levelling was not really tight (see pictures). I am now thinking about the appropriate adjustments needed to make sure the oven barrel arch is level. I have read previous suggestions about using sand beneath the foam mold, using mortar to make sure the first row of arch brick is level, and (most importantly) ensuring the hearth floor is perfectly level. A few questions before going onto laying the hearth brick and building the oven:
does the rear of the oven rest at all on the frame brick?
does the sand need to be tamped down?
if the frame brick is high/low in spots, this means the hearth brick will not line up (I am assuming the hearth brick is exactly level). does it really matter given the oven will overlay the hearth by 2-3 inches?
based on the pictures and description above, any other adjustments you think I need?
You’re making good progress, and in my opinion just a couple of things you need to do to keep making this right (which it pretty much is, but you’re going to come out “on the money”):
Yes, you must level and tamp down the sand, and level it again. That’s how your hearth firebrick will be leveled. The sand needs to be a firm, leveled surface that will support the firebrick. Use a couple of firebrick as your guide to the final depth of the sand. Because the rear of your frame drops off just a little, It’s going to be a ¼ inch or so “proud” at the rear, but you’re going to allow for that later.
The oven back wall, like the barrel arch, rests partly on the frame bricks and partly on the hearth brick.
Once you start laying in the hearth brick, you may find (as you say) that some of it is a little high or a little low. When that happens, pull that brick back out and use your trowel to make adjustments to the sand in that section. It’s not exactly a self-leveling system, but it works. Your goal is to get the hearth as smooth and level as you can. When you’re done, that’s the surface you are going to see.
If the hearth is a little high or a little low in relation to the frame, favor getting the hearth leveled.
You are going to “true up” everything with your first bed of fire-resistant mortar over the frame and under the arch brick. This is the first absolutely critical, you must take your time with it and get it right step for the oven itself. Use a mason’s line, use a level, use a carpenter’s square. Measure across the top from front to rear, from side to side, diagonally with your long level. Just be sure that the very first row of firebrick you lay for the arch (and later, for the back wall) is absolutely level, both along its length and in relation to the row on the other side of the hearth. You can make that bed a ½ inch or even ⅝ inch thick, and give the mortar a chance to set. The instructions call for building 3 rows on one side and then switching to the other side—this is to make sure that your form does not start getting pushed to one side or the other.
When you get to the back wall, same thing: get the first row straight and level. The instructions are silent about whether you set the brick flush to the arch wall or lay a mortar joint between; for this job I’d include a joint. All of this brickwork will be covered on the exterior by the insulation and stucco.
Guess that was more than a couple of things.
Hoping this is helpful. Thanks for the pictures; they really help me see where you need to go with this.
when I mortar that first row of arch brick, am I trying to keep mortar out of the hearth brick seams?
for the first row, how do I level across to the other side of the hearth? do I remove the mold temporarily? same question on leveling diagonally.
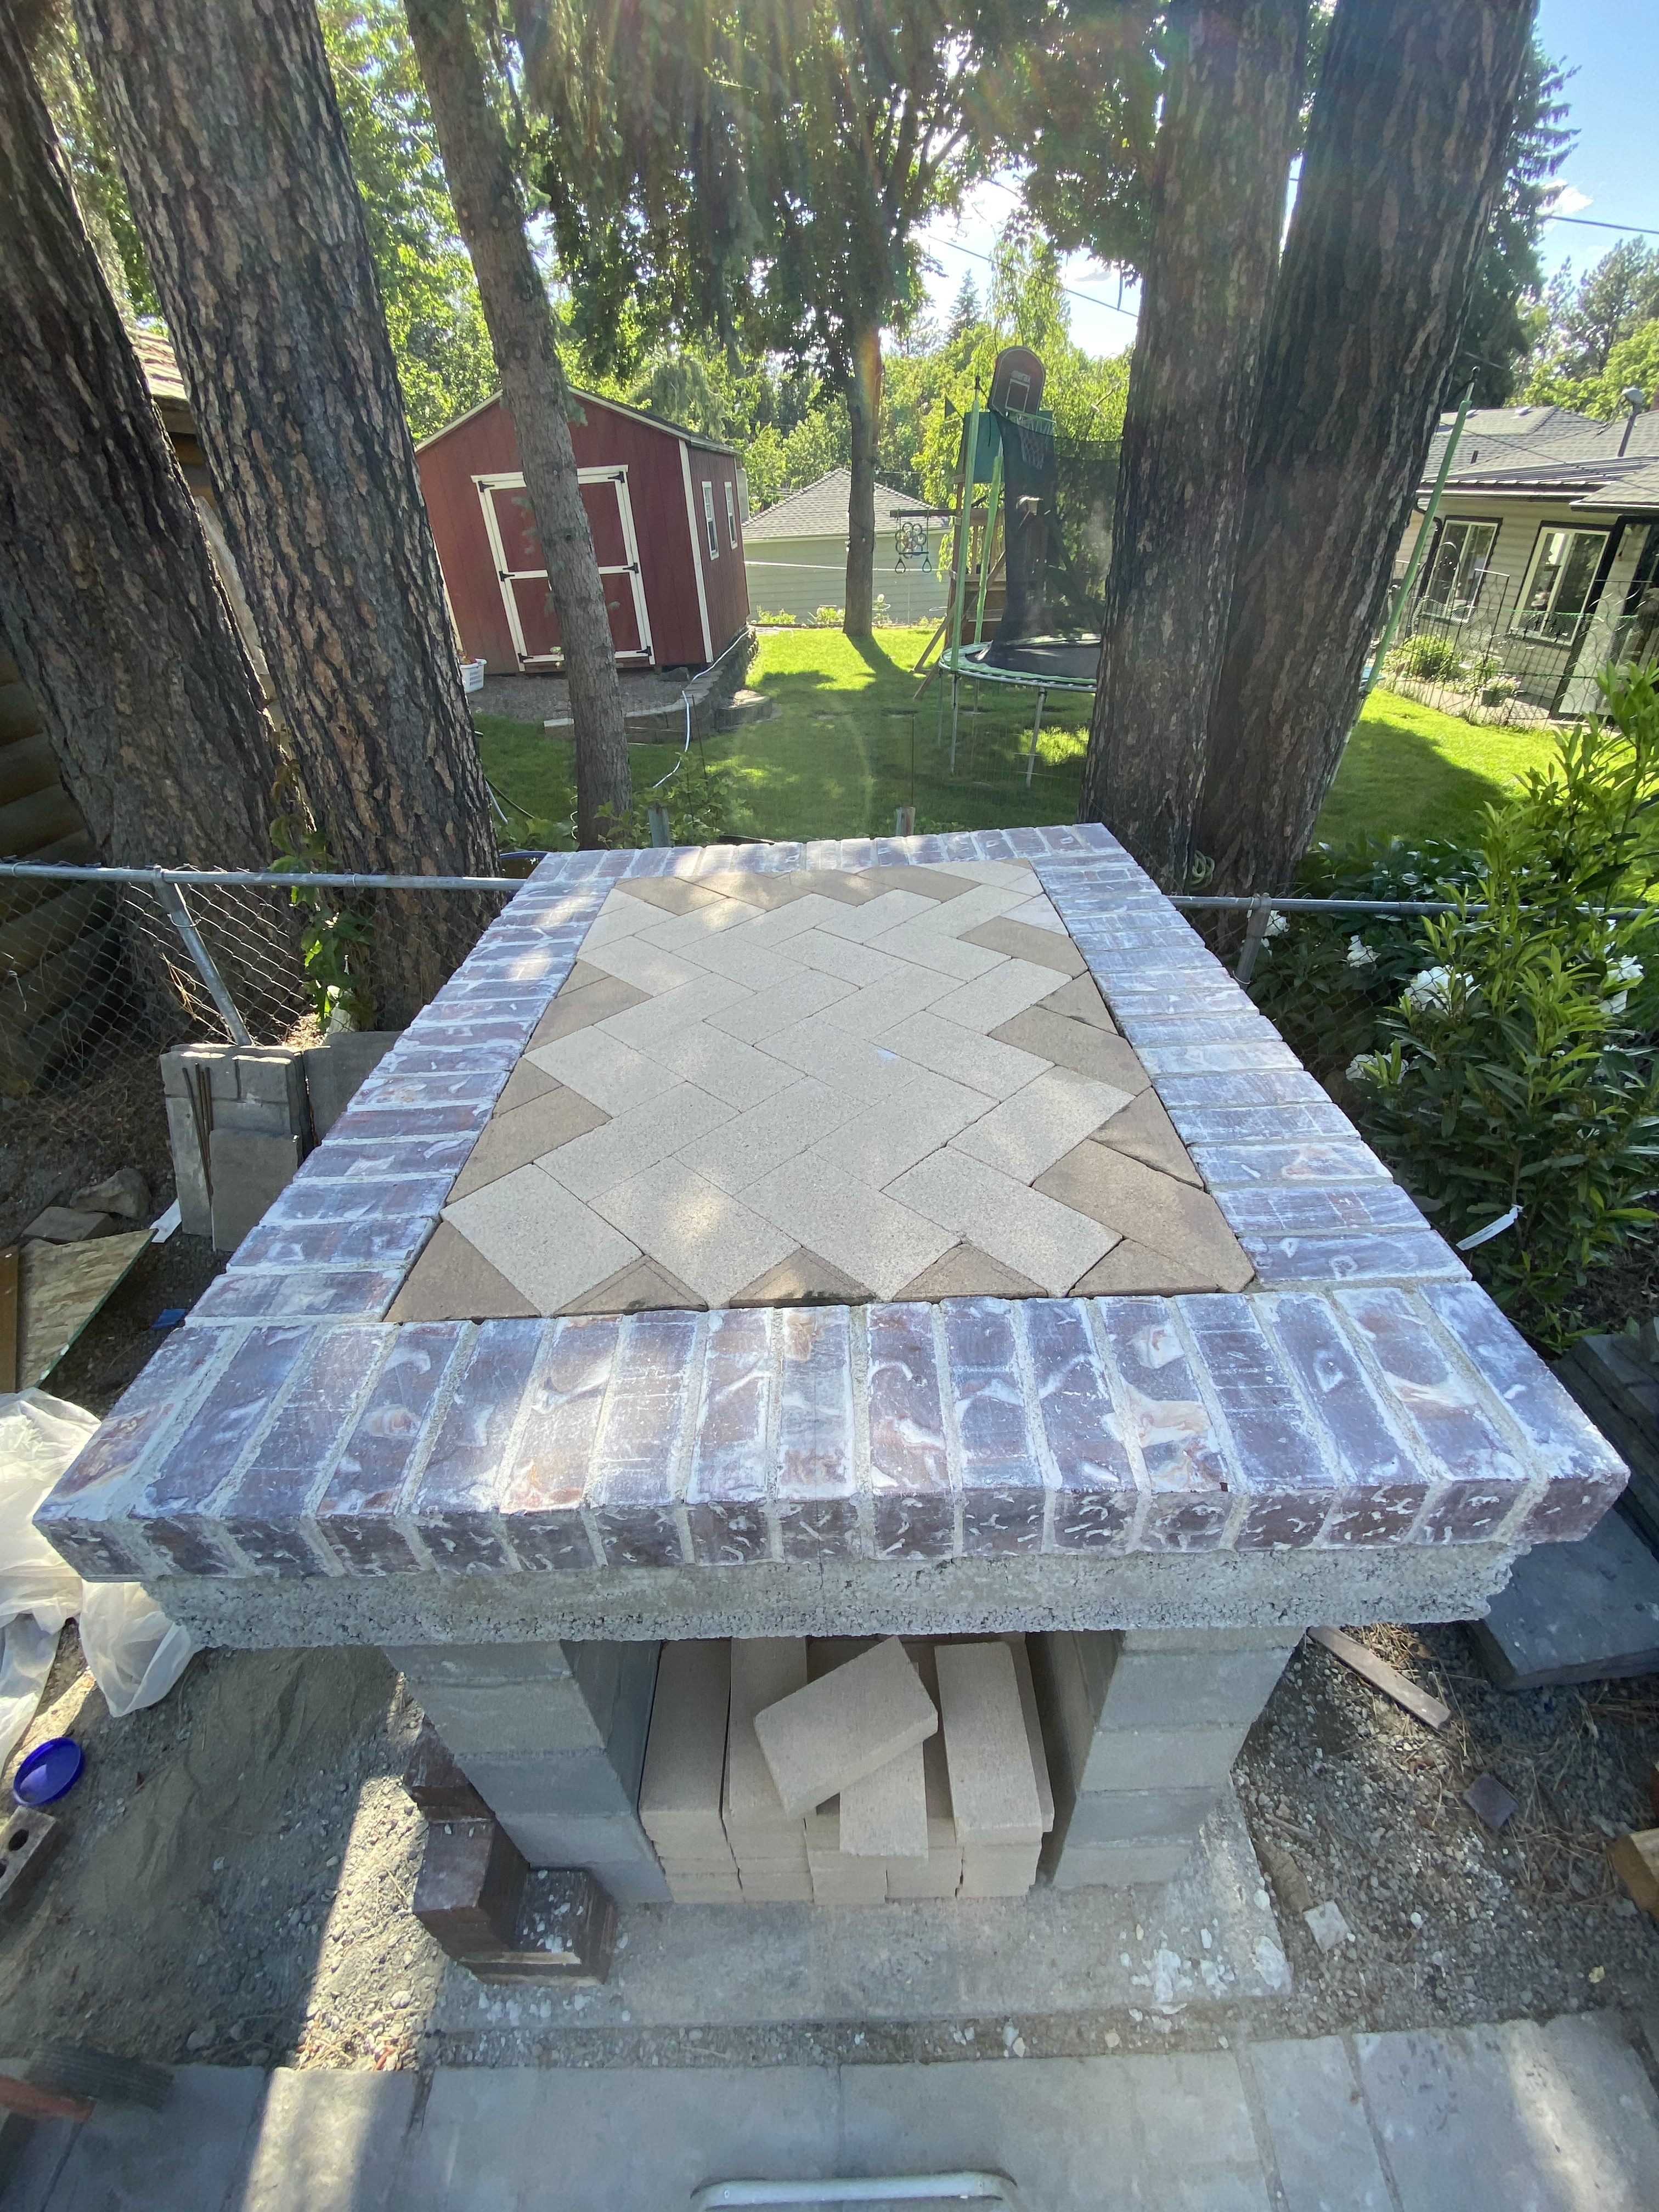
i started the herringbone floor. i started at the front thinking i want that flush or worst case lower than the frame brick. pictures attached. how does it look so far? i am focused on keeping the firebrick level with itself even if that means it is not level with the frame brick. as expected the firebrick is not 100% level with the frame.
Floor is down. It is level to at least 99% (nothing is perfect, right?). I checked the levelling with 9 inch, 2 foot, and 4 foot levels in EVERY direction. I even ran the pizza paddle across the floor. No stops. I would say the one thing is some of the cuts on the edge pieces could have been tighter. Pictured attached. But I am thinking that on the sides and back, at least, they will be covered with the oven arch. So am I ok there? On the front, I may pop a few of the small triangle outs and pop better fitting ones in. Your thoughts?
I start the oven build on Thursday and am planning on a full day effort on that. My plan is to lay a row on each side, pop off the foam mold, and then level in all directions.
Before you cut new pieces for those three triangles in the front, try flipping them if the edge on the other face is intact. I agree that they will probably bug you if you leave them as is, though they won’t affect the oven’s functioning.
You’ve picked this up so well. I think your final oven is going to be beautiful!
In looking at step 28 (chimney guide) of the oven build, it mentions cutting the firebrick “as shown”. Does that mean as shown on page 14, immediately to the right of the step 28 wording? If so, it appears there is some type of rounded cut to the 4.5 inch side of the brick to match the contour of the arch. Is that right? Is there another picture someplace? Any thoughts on the best tool for the cuts? Angle grinder with masonry disc? Just grind it to shape? Or ???
“As shown” means ideally cutting to the rounded contour of the arch, as you suspected. That’s the “as designed” way to do it, and if your chimney ends up being exposed in the front it will look a little nicer.
I can also say that there are numbers of builders here who have simply laid a bed of heat-resistant mortar (figure ⅜ inch thick closest to the foam form), put a firebrick in place and held it up against the form, and pointed in enough mortar to make sure it is dead level. Doing it that way means no grinding or cutting a shape that is technically more difficult, and you let the “plastic” mortar do the work of rounding rather than your grinding. If you do it that way, make absolutely certain your first course of firebrick is dead level.
If you look ahead to the very next step, and you are in fact using the DuraTech kit on your oven, you’ll still have to cut. I used the angle grinder with a diamond masonry blade.The cut needs to allow enough space for the flange to rest flush on the chimney cap.
And finally, while you’re up there, and you have mortar tools out, take a moment to cap the chimney brick with about a half inch of heat resistant mortar. Go for dead level across the brick surface, and run your trowel along the edges at a 45° angle to create a bevel that will allow rain to run off. That’s not in the current instructions, but I believe @BrickWood will add it to the 2.0 revision.
Matt, I got most of the oven firebrick mortared in place today. The only parts not done are the chimney and the back wall.
I could not find the post that mentions what to do if the oven arch build is not done in 1 day. it mentioned something about wetting the firebrick that was previously mortared. Can you help me locate that info or tell me what I need to do?
My plan is to build finish the oven this Friday and then do blanket, chicken wire, and stucco on Saturday.
Your instincts are really good about this, Kirk. That’s all you need to do: use a hose with a nozzle that will produce a fine mist, and wet down the firebrick that will be receiving mortar.
The idea is that dry brick will pull the moisture out of mortar so quickly that it will not set properly. That can lead to loose brick and gaps.
Doing it at the beginning of your work day should be enough, especially if you are soaking your firebrick.
Matt, weather was uncooperative today. Got a bit of rain. I got most of the back wall done before I had to shut it down.
I have to tell you that I am a bit psyched out about the chimney part. BTW, I am using the Duratech. Seems to me the mortar route means an awful lot of mortar (like inches deep). Am I wrong about that? Seems like I would be better off cutting a bricks similar to the ones in step 21 and then mortaring. Seems to me that would cut down the amount of mortar.
I’ll never say anyone’s wrong … But in this case it won’t be nearly as thick as you’re picturing. Most of the brick sits around the form on top, and the drop off is maybe a full inch at the deepest point. The chimney base will be buried along the sides and back by the insulation and stucco layers.
You can really go either route and you’ll be fine.
Hey Matt. I am laying the last layer of chimney brick in the morning. You mentioned previously to lay 1/2 inch of mortar on that last layer of brick and create a 45 degree beveled edge. Since I am using the Duratech kit, am I laying that mortar on BEFORE I install the anchor plate? Also, can I install the Duratech before I stucco the oven? Thanks.