At the bottom of the Pizza Brick Oven post above is the detailed explanation of the build. The pictures I submitted with the explanation didn’t end up in that post unfortunately, so I’m attaching the pics of the first door build below. I also copied the written synopsis of the build of Metal Pizza Oven Door V1.0 at the bottom of this post as well.
Uploa
ding: Photo Nov 13, 8 53 14 PM.jpg…
Loeb Pizza Oven Construction Explained
First, I’ll layout the order in which the pictures exist in the timeline. The order is:
• Foundation
• Base
• Oven
• Design
• Shell
• Door
• Install
I’d been considering building an outdoor pizza oven for years by the time I finally got around to taking it from concept to reality. I live on a hill and flat ground is in short supply. Choosing the flattest place to build from was less important to me than having reasonable access to the oven. Prior to breaking ground, I built a second staircase off my deck down to an existing concrete patio. I’d been meaning to do so ever since I built the deck in the first place (20 years ago) and neglected to consider that as I expanded the landscaping around my house, I might eventually want a staircase that allowed me access the patio below my deck without walking across the entire front of my house first. The idea of adding a hundred or so feet of real estate between my kitchen and my future pizza oven did not appeal, so out came the Sawzall and a staircase was born.
With ready access assured, I laid out the foundation that would soon cradle my third child and provide the necessary support and stability it would require to grow to full potential. Because of the aforementioned hillside and my sincere desire to minimize the distance from my kitchen to my anthropomorphic pizza creation device, I traded ease of installation for ease of access. It required 2.5 yards of concrete just to pour the (18”+ thick) footing because of the slope. The area was also completely covered in raspberry vines up until I started digging. Compounding the suck, the existing grade was already about 2’ lower than the patio I planned to use as the operating room floor when birthing my pizza babies. My base course required a couple extra rows of blocks to get the base up to a workable height. And, not to belabor the point, but NOTHING is flat on my property. I was forced to rely on a combination of ghetto scaffolding, my almost supernatural balance and cat-like reflexes, and good old American kinda-sorta-know-how in order to construct my Magnus Pizzopus. Fun fact, even at the age of 47 my mom still admonishes me to stay off ladders. Of any height. My track record is, if I’m being totally honest, bad. The picture taken from the backside of the oven is illustrative of the challenges I faced while building this magnificent bastard.
The actual construction of the pizza oven was unremarkable and not worth recounting for the most part, other than to say that I do not like working with masonry. This entire project was a learn-as-you-go operation for me and without a doubt, the masonry aspect was the worst. But I digress. A few things became clear to me rather soon after completion of the oven. The first being, the arch that I built around the opening made maneuvering more than one pizza around in the oven very difficult. It was like playing a real life version of Operation except the pizza oven is the patient and the pizzas are the organs. And instead of a buzzer going off when you mess up, you get ugly pizzas. The second was that I realized I don’t like the look of masonry. Third, it was going to be tough to engineer a functional door with the current set-up. I started thinking about ways to:
- Seal the front of the oven, both for thermal retention and weatherproofing 2. Make my pizza oven look less like a brick turd 3. Prevent traffic jams when trying to cook two pizzas at once
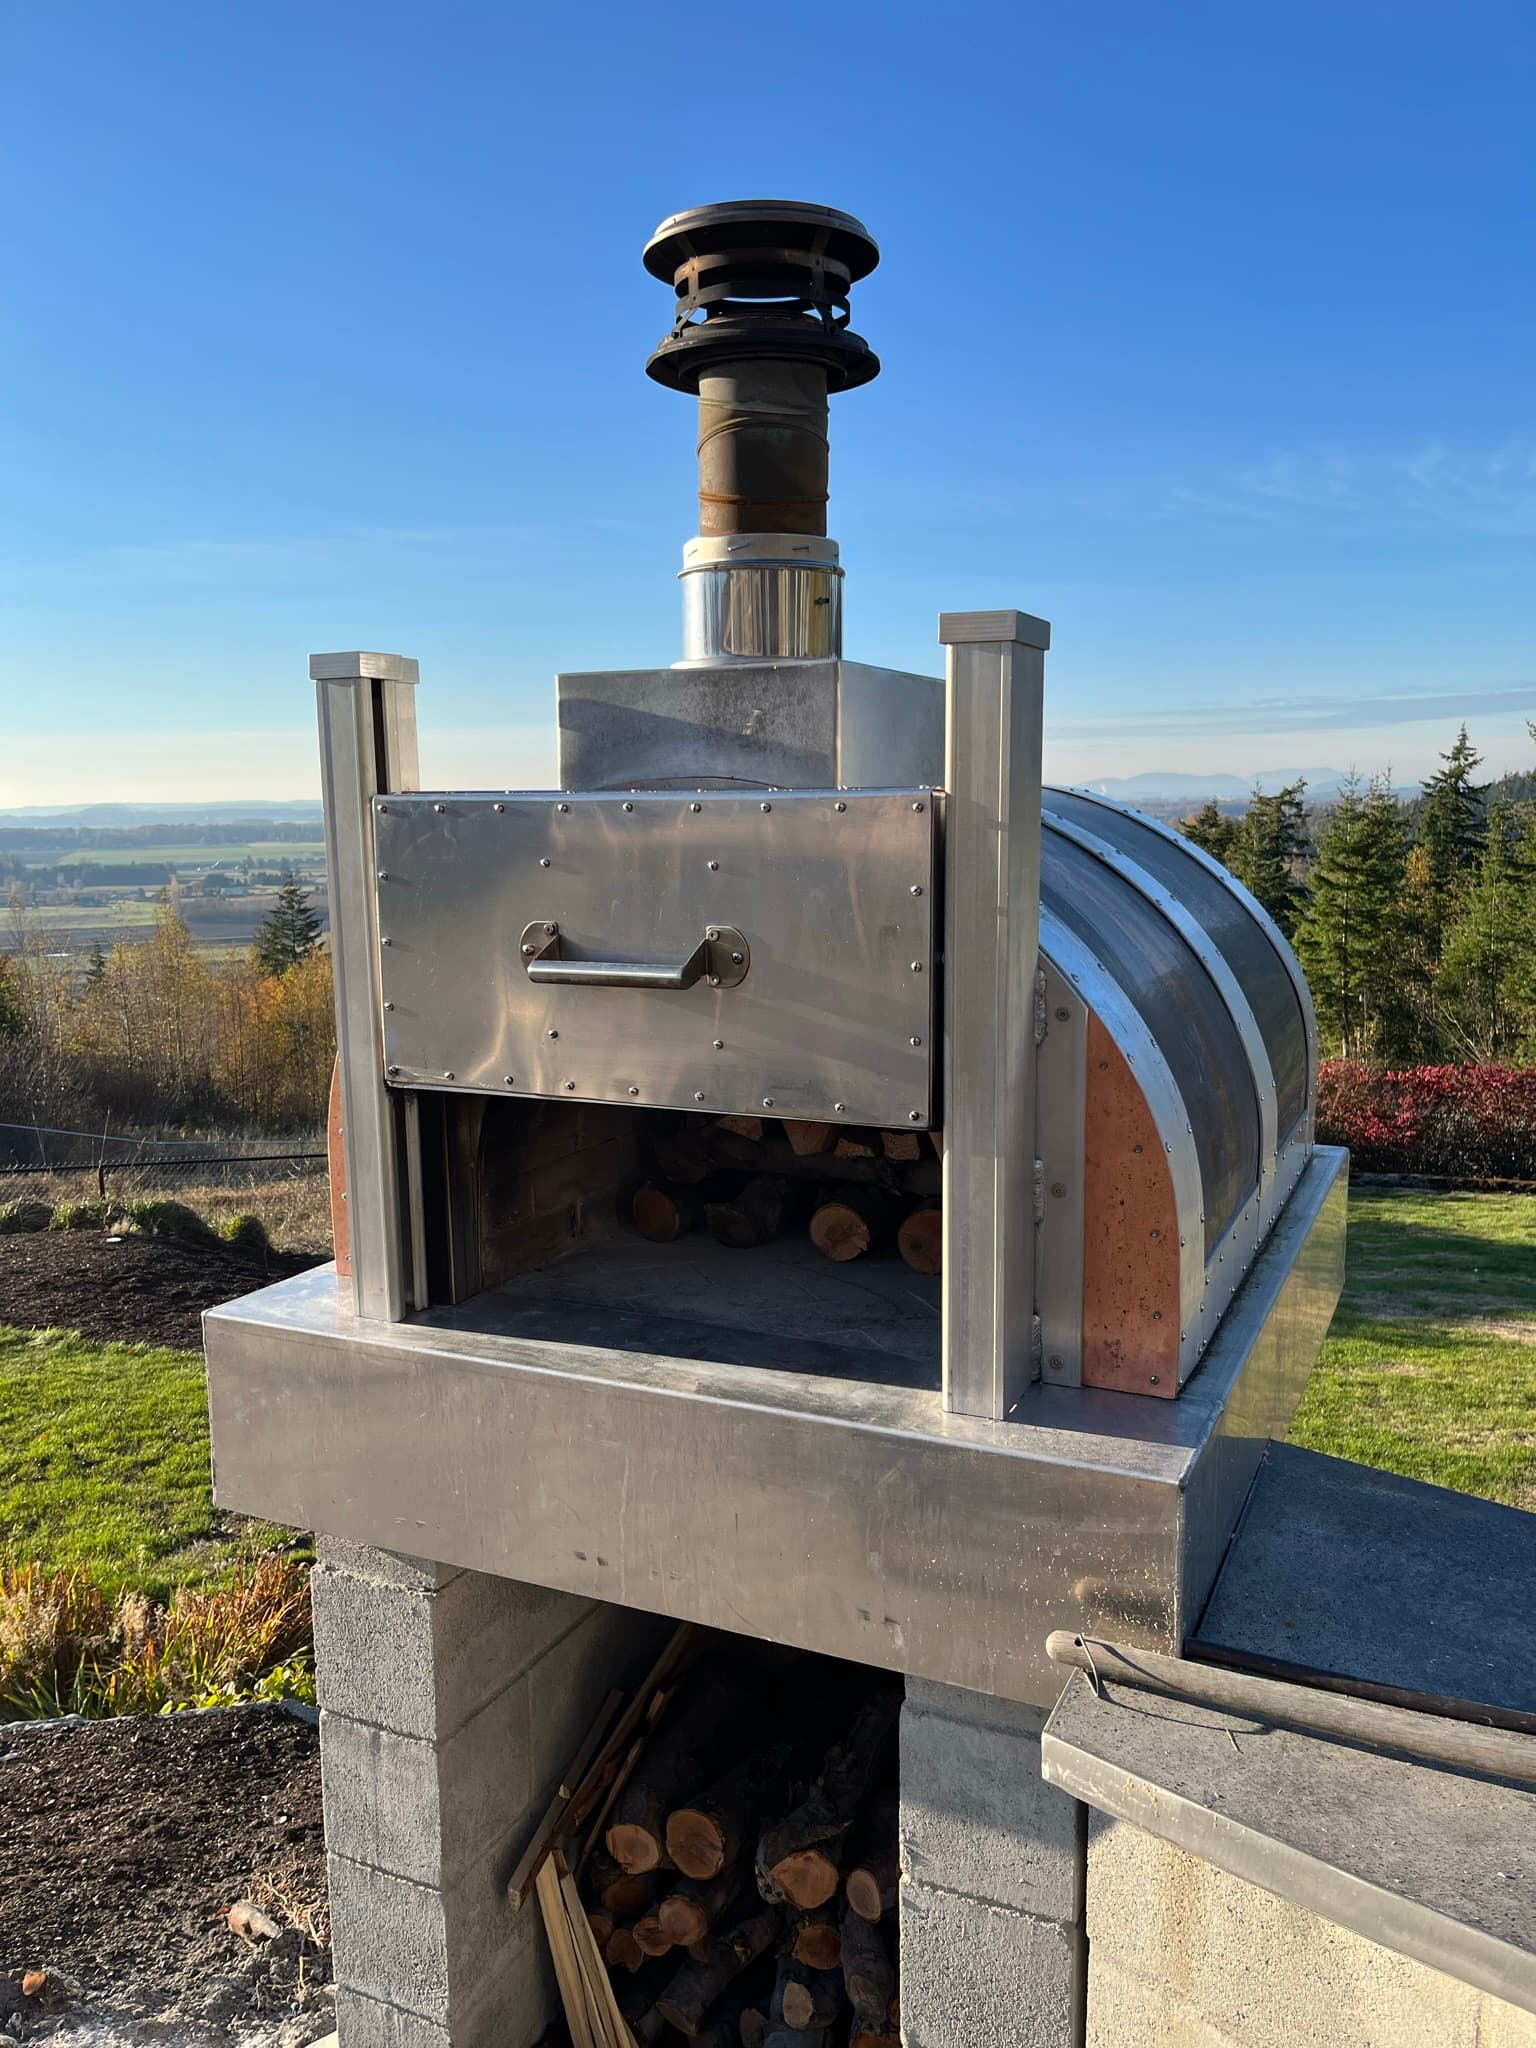
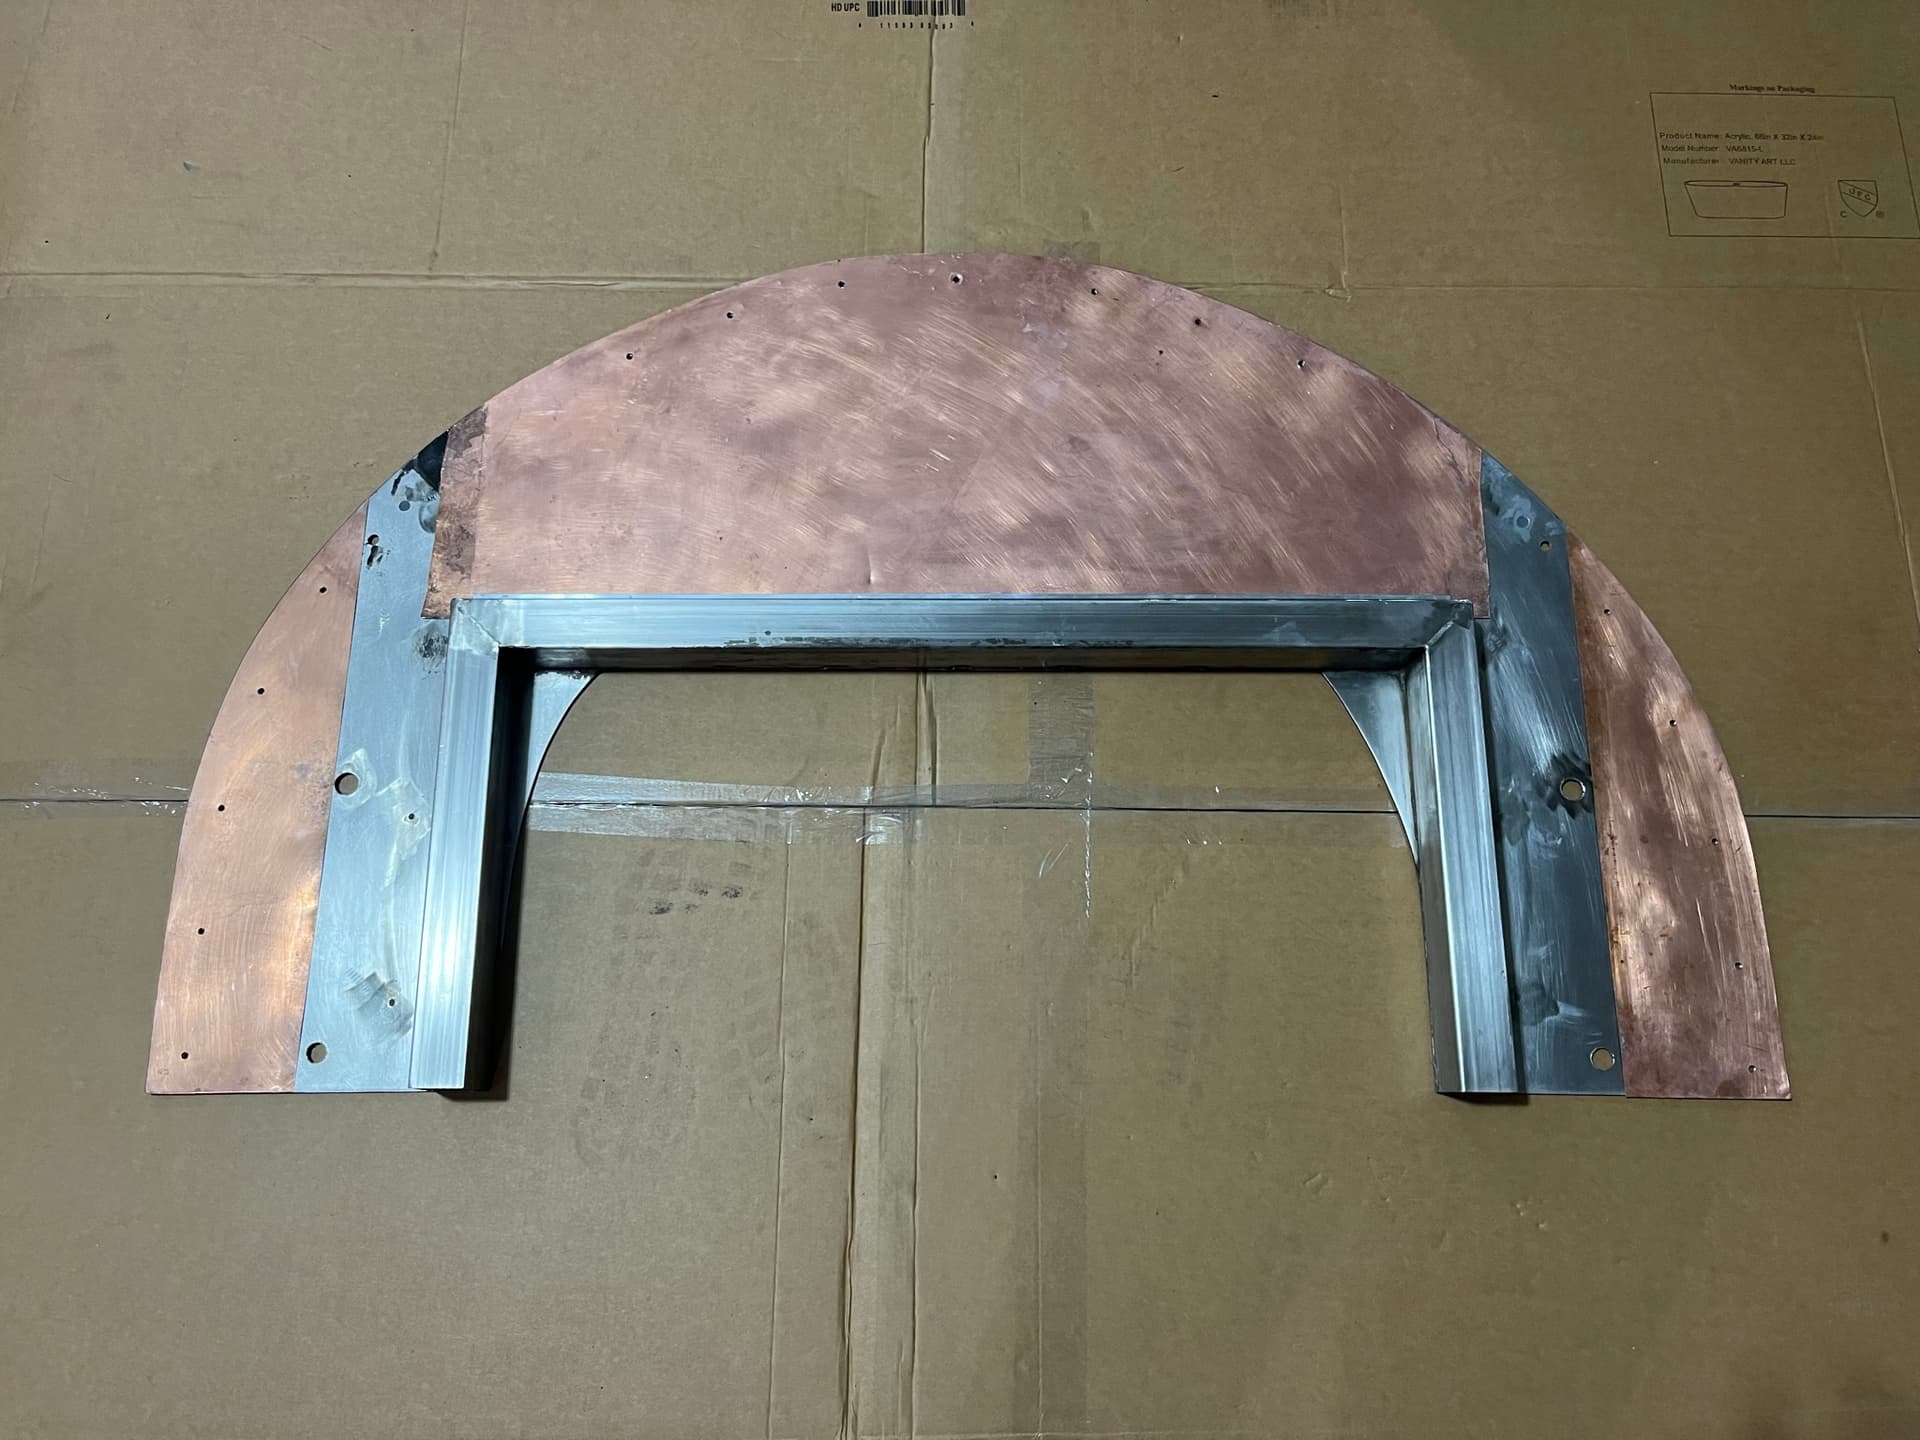
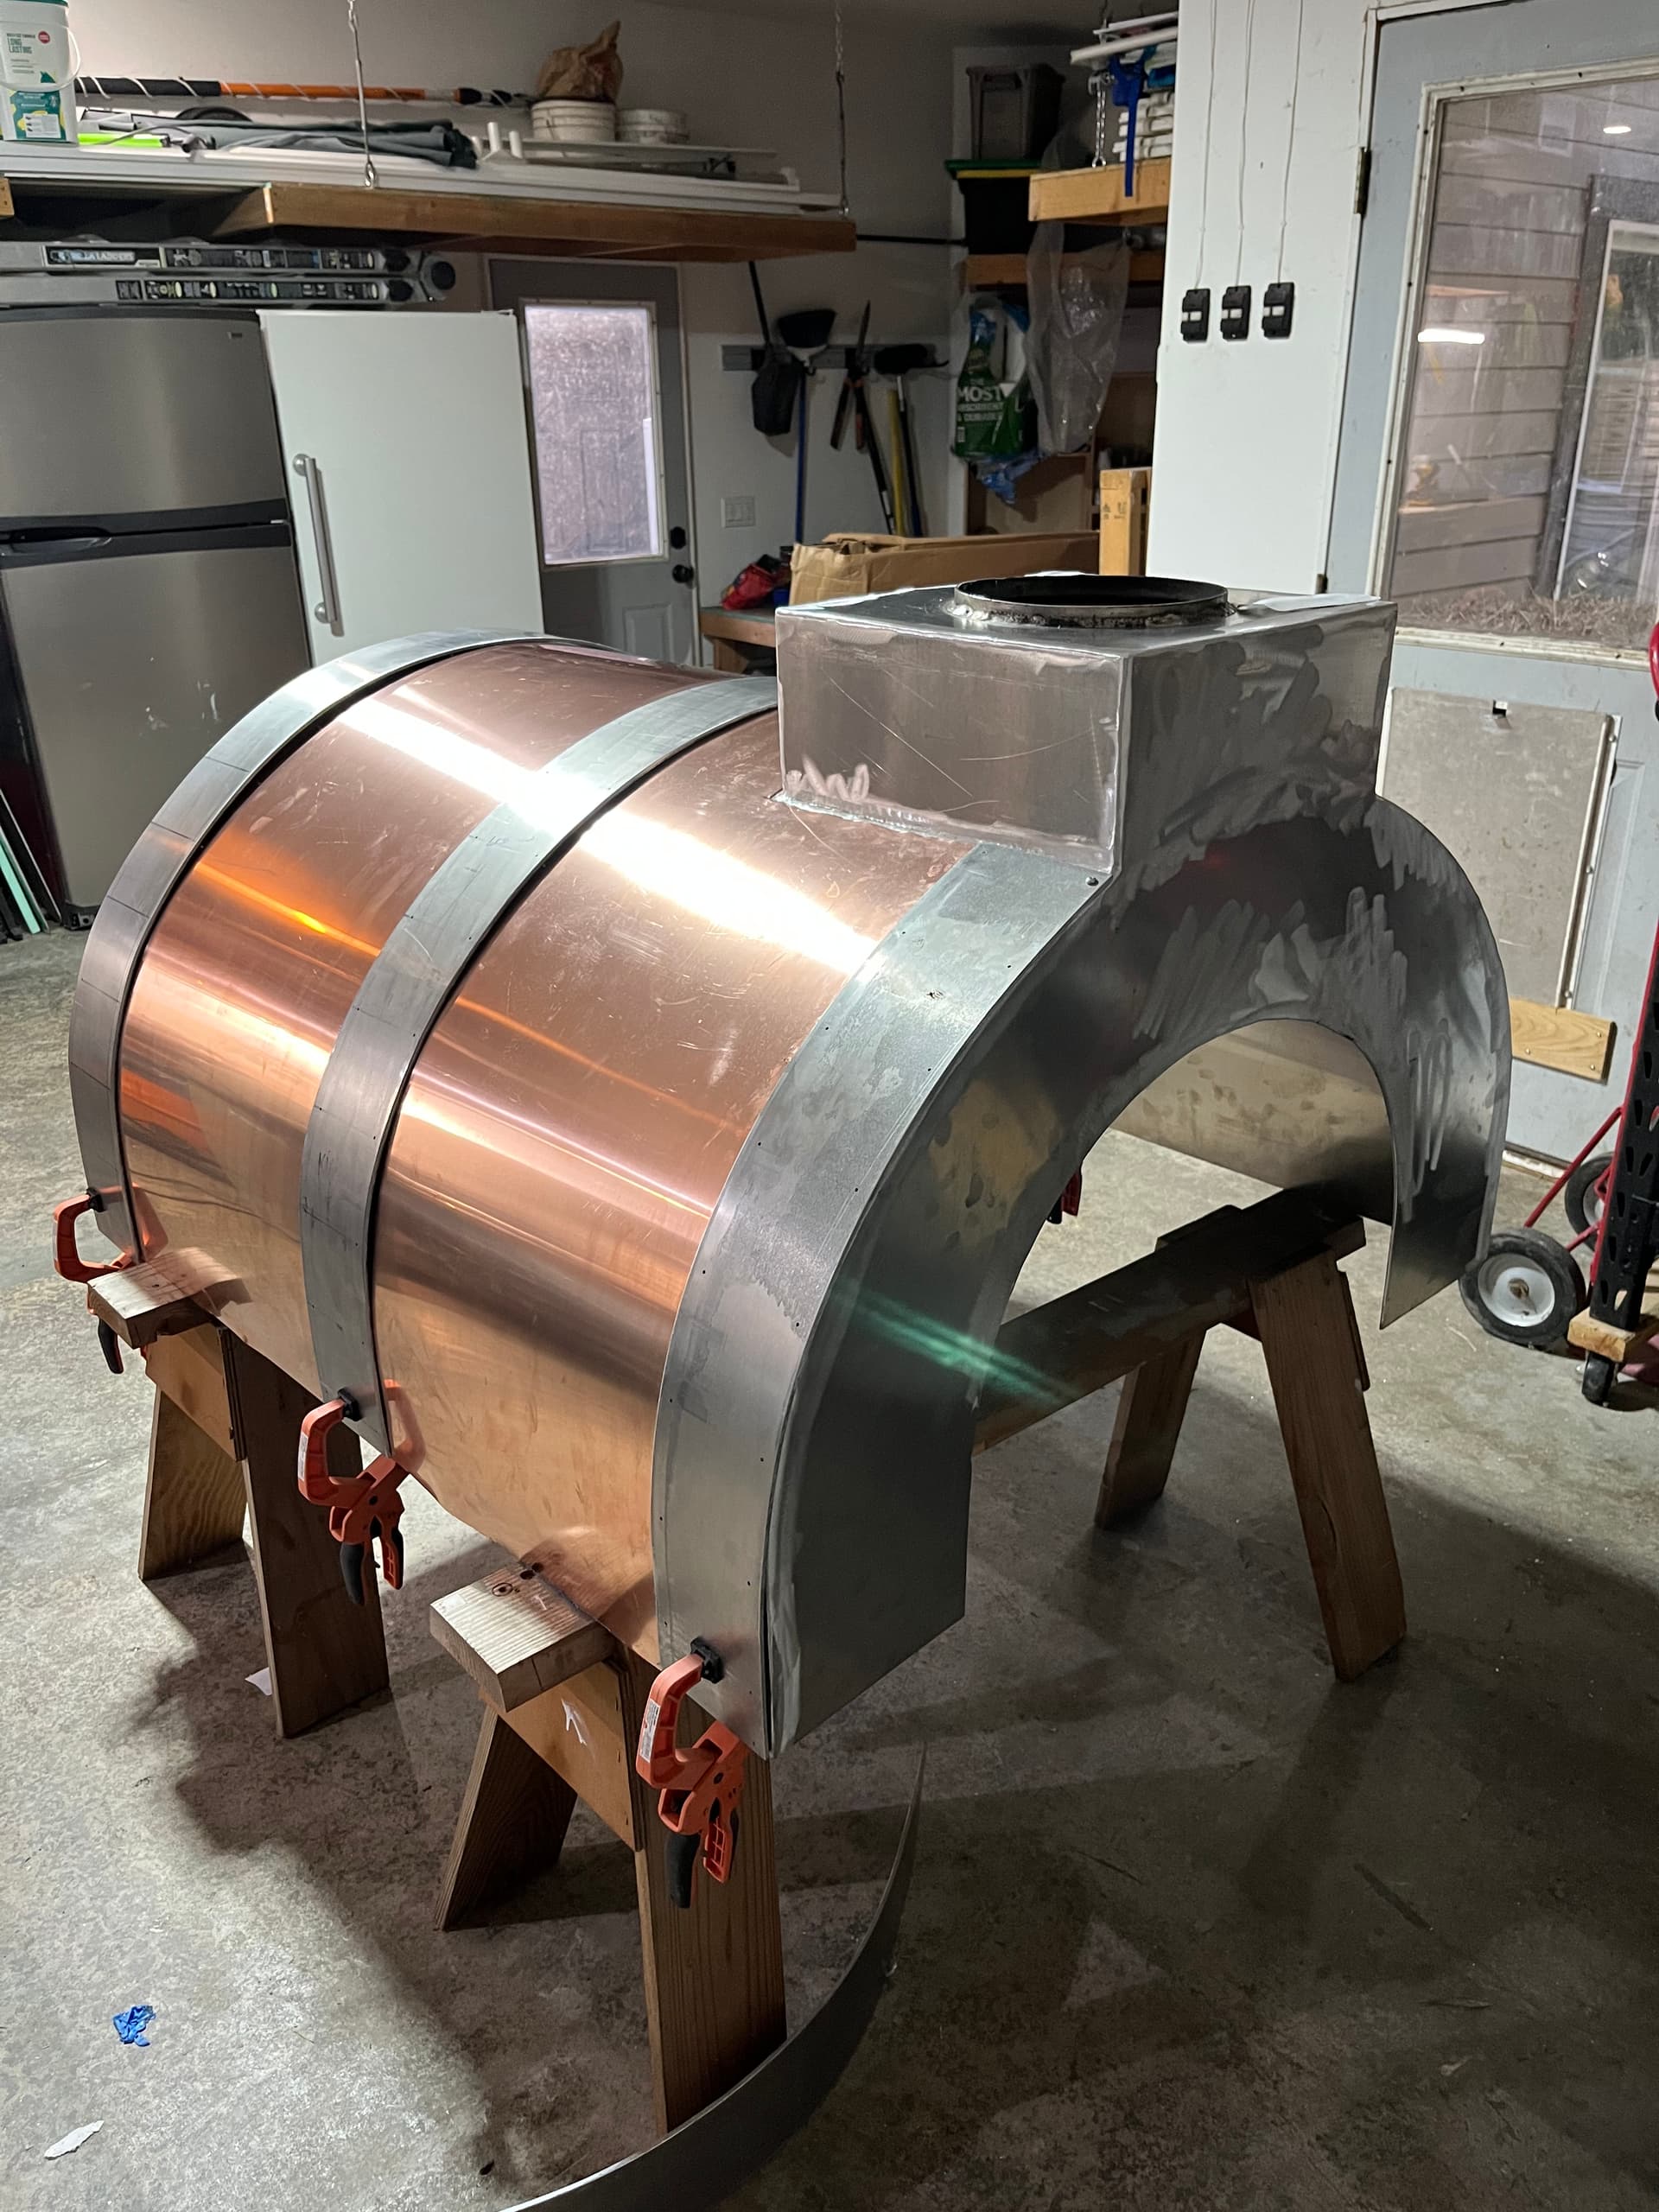
The solution I arrived at for the first two issues was to build a metal shell around the oven. My reasoning was that it would be much easier to build a door if I had something solid to attach it to. I started by building a hardboard shell around the plinth and the oven as a proof of concept. My plan was to build the shell, make sure it fit over the oven, then take it down to a local aluminum boat builder and have them use my wood shell as a template to fabricate the aluminum shell. During the process of building the template out of wood I had to put it on and take it off so many times that I started feeling like Ralph Macchio waxing Mr. Miyagi’s’ car. Shell on, shell off. Shell on, shell off. Two things became obvious at that point:
- This bad boy would need to be made in two parts. A skirt and a shell.
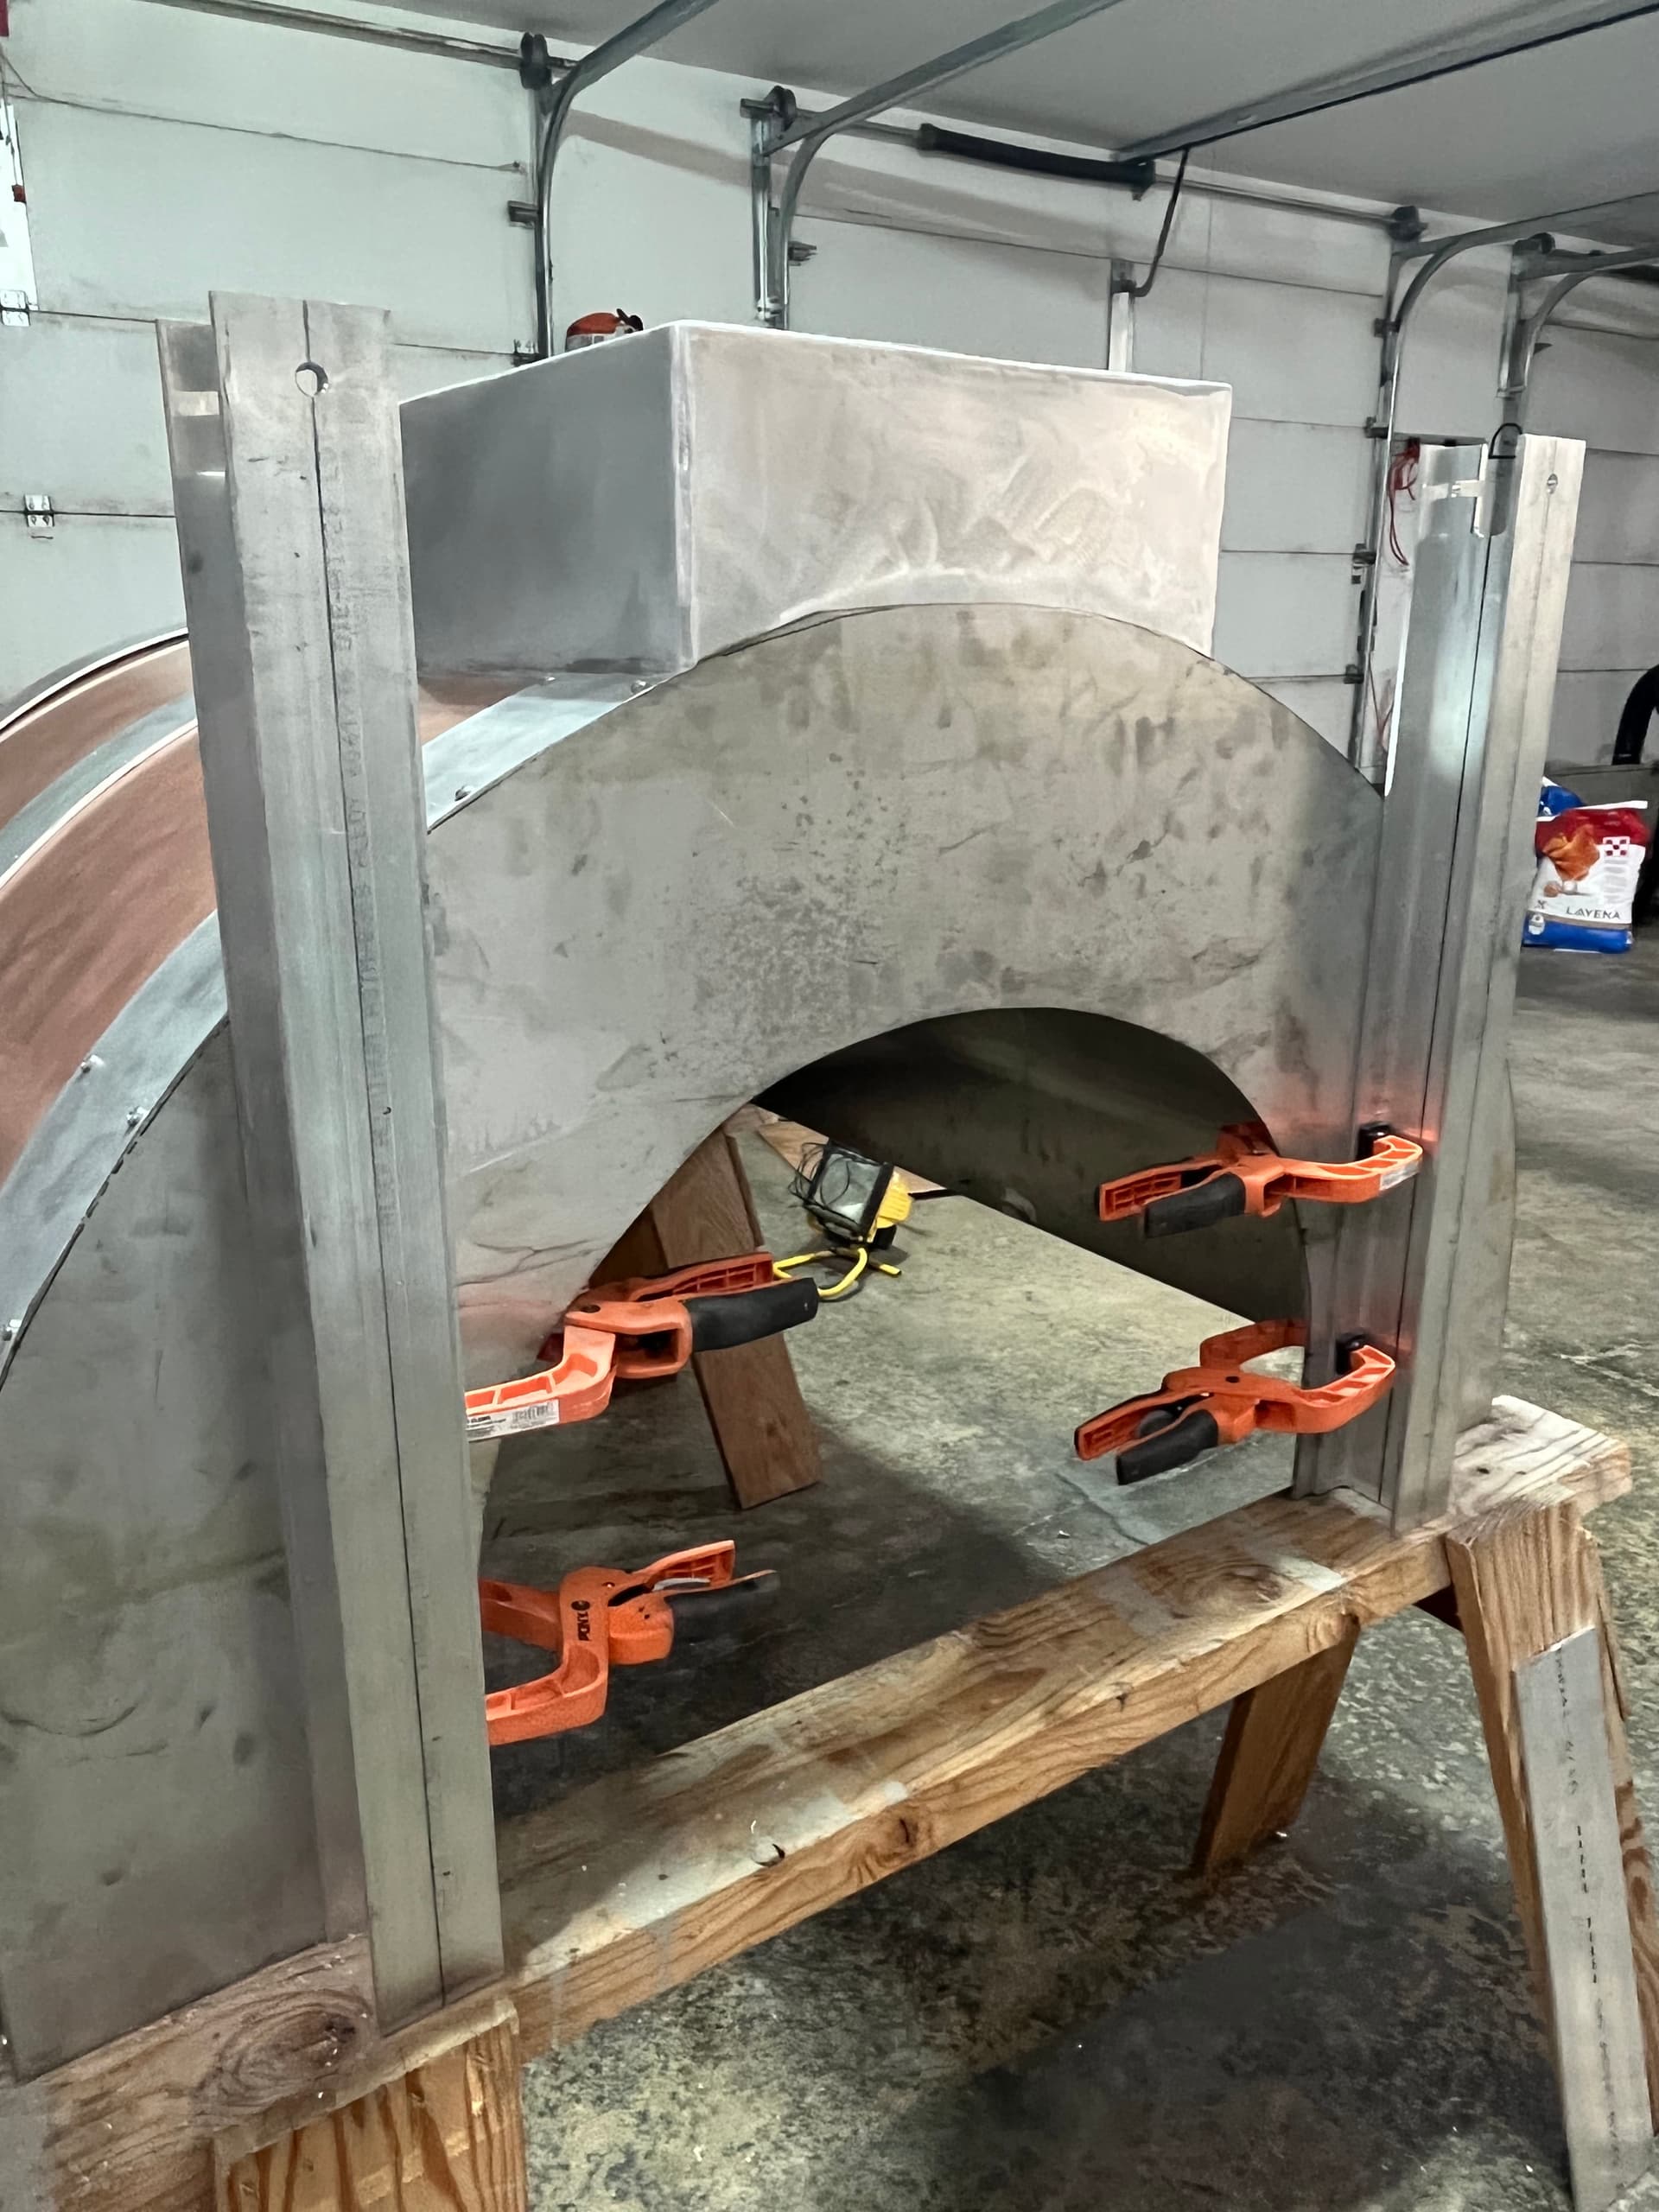
- The arch was going to make the aluminum shell and door apparatus vastly more difficult to fabricate.
Fortunately for me, the Patron Saint of Shoddy Workmanship and Morons had my back because the arch pretty much fell off on its own. Turns out I waited a bit too long to construct the arch after completing the body of the oven. The firebrick on the front of the oven dried out sufficiently to prevent the mortar used to attach the arch from bonding to it. After multiple pizza cremations, the mortar joining the arch to the front of the oven weakened and cracked. This eventually caused soot to come betwixt the two, sundering what should have been a lifetime of mutual support. Lucky me! Off it came.
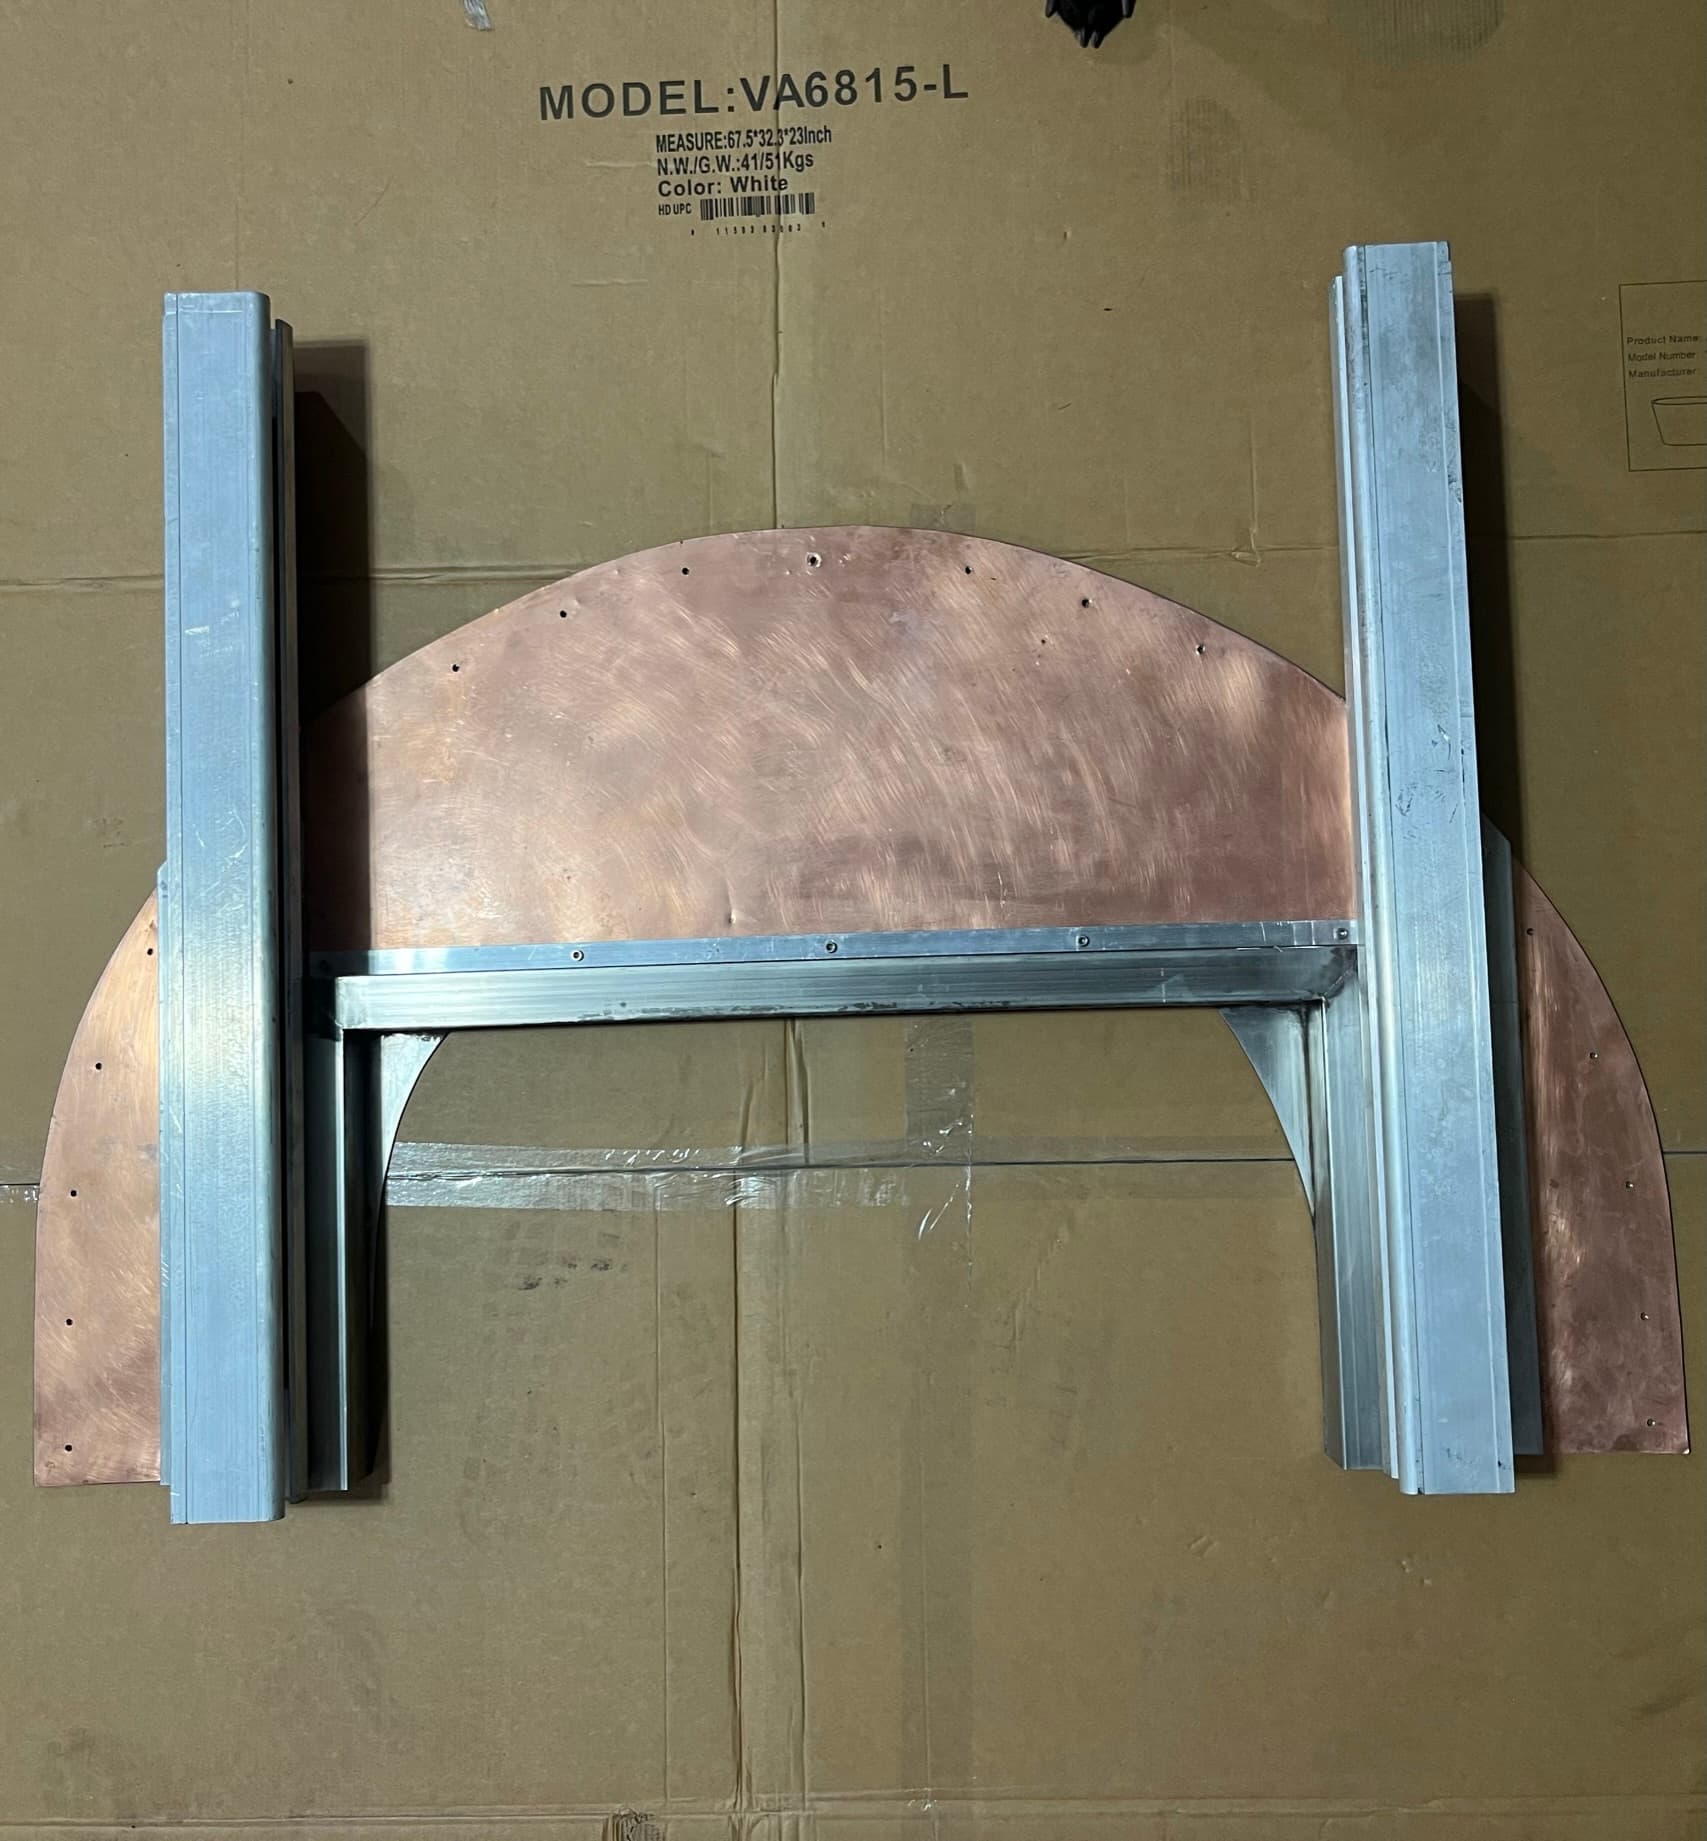
With a considerably simpler shape to work with, I completed the template and off to the boat builders I went. I had them build the skirt first. Come to find out that just because you can get a flexible wood shell made of 1/8” thick hardboard to fit over a rather large rectangular cube of concrete, that doesn’t necessarily mean the same shape made of rigid 1/8” aluminum will too. Spoiler alert: It didn’t fit. After hours of grinding away at the sides of the base I finally gave up and had the boat builders cut the welds on two of the corners and re-weld them giving the skirt an extra ¼” in length. After channeling my inner Karate Kid a little more, and some minor concrete grinding, I finally got the skirt to fit.
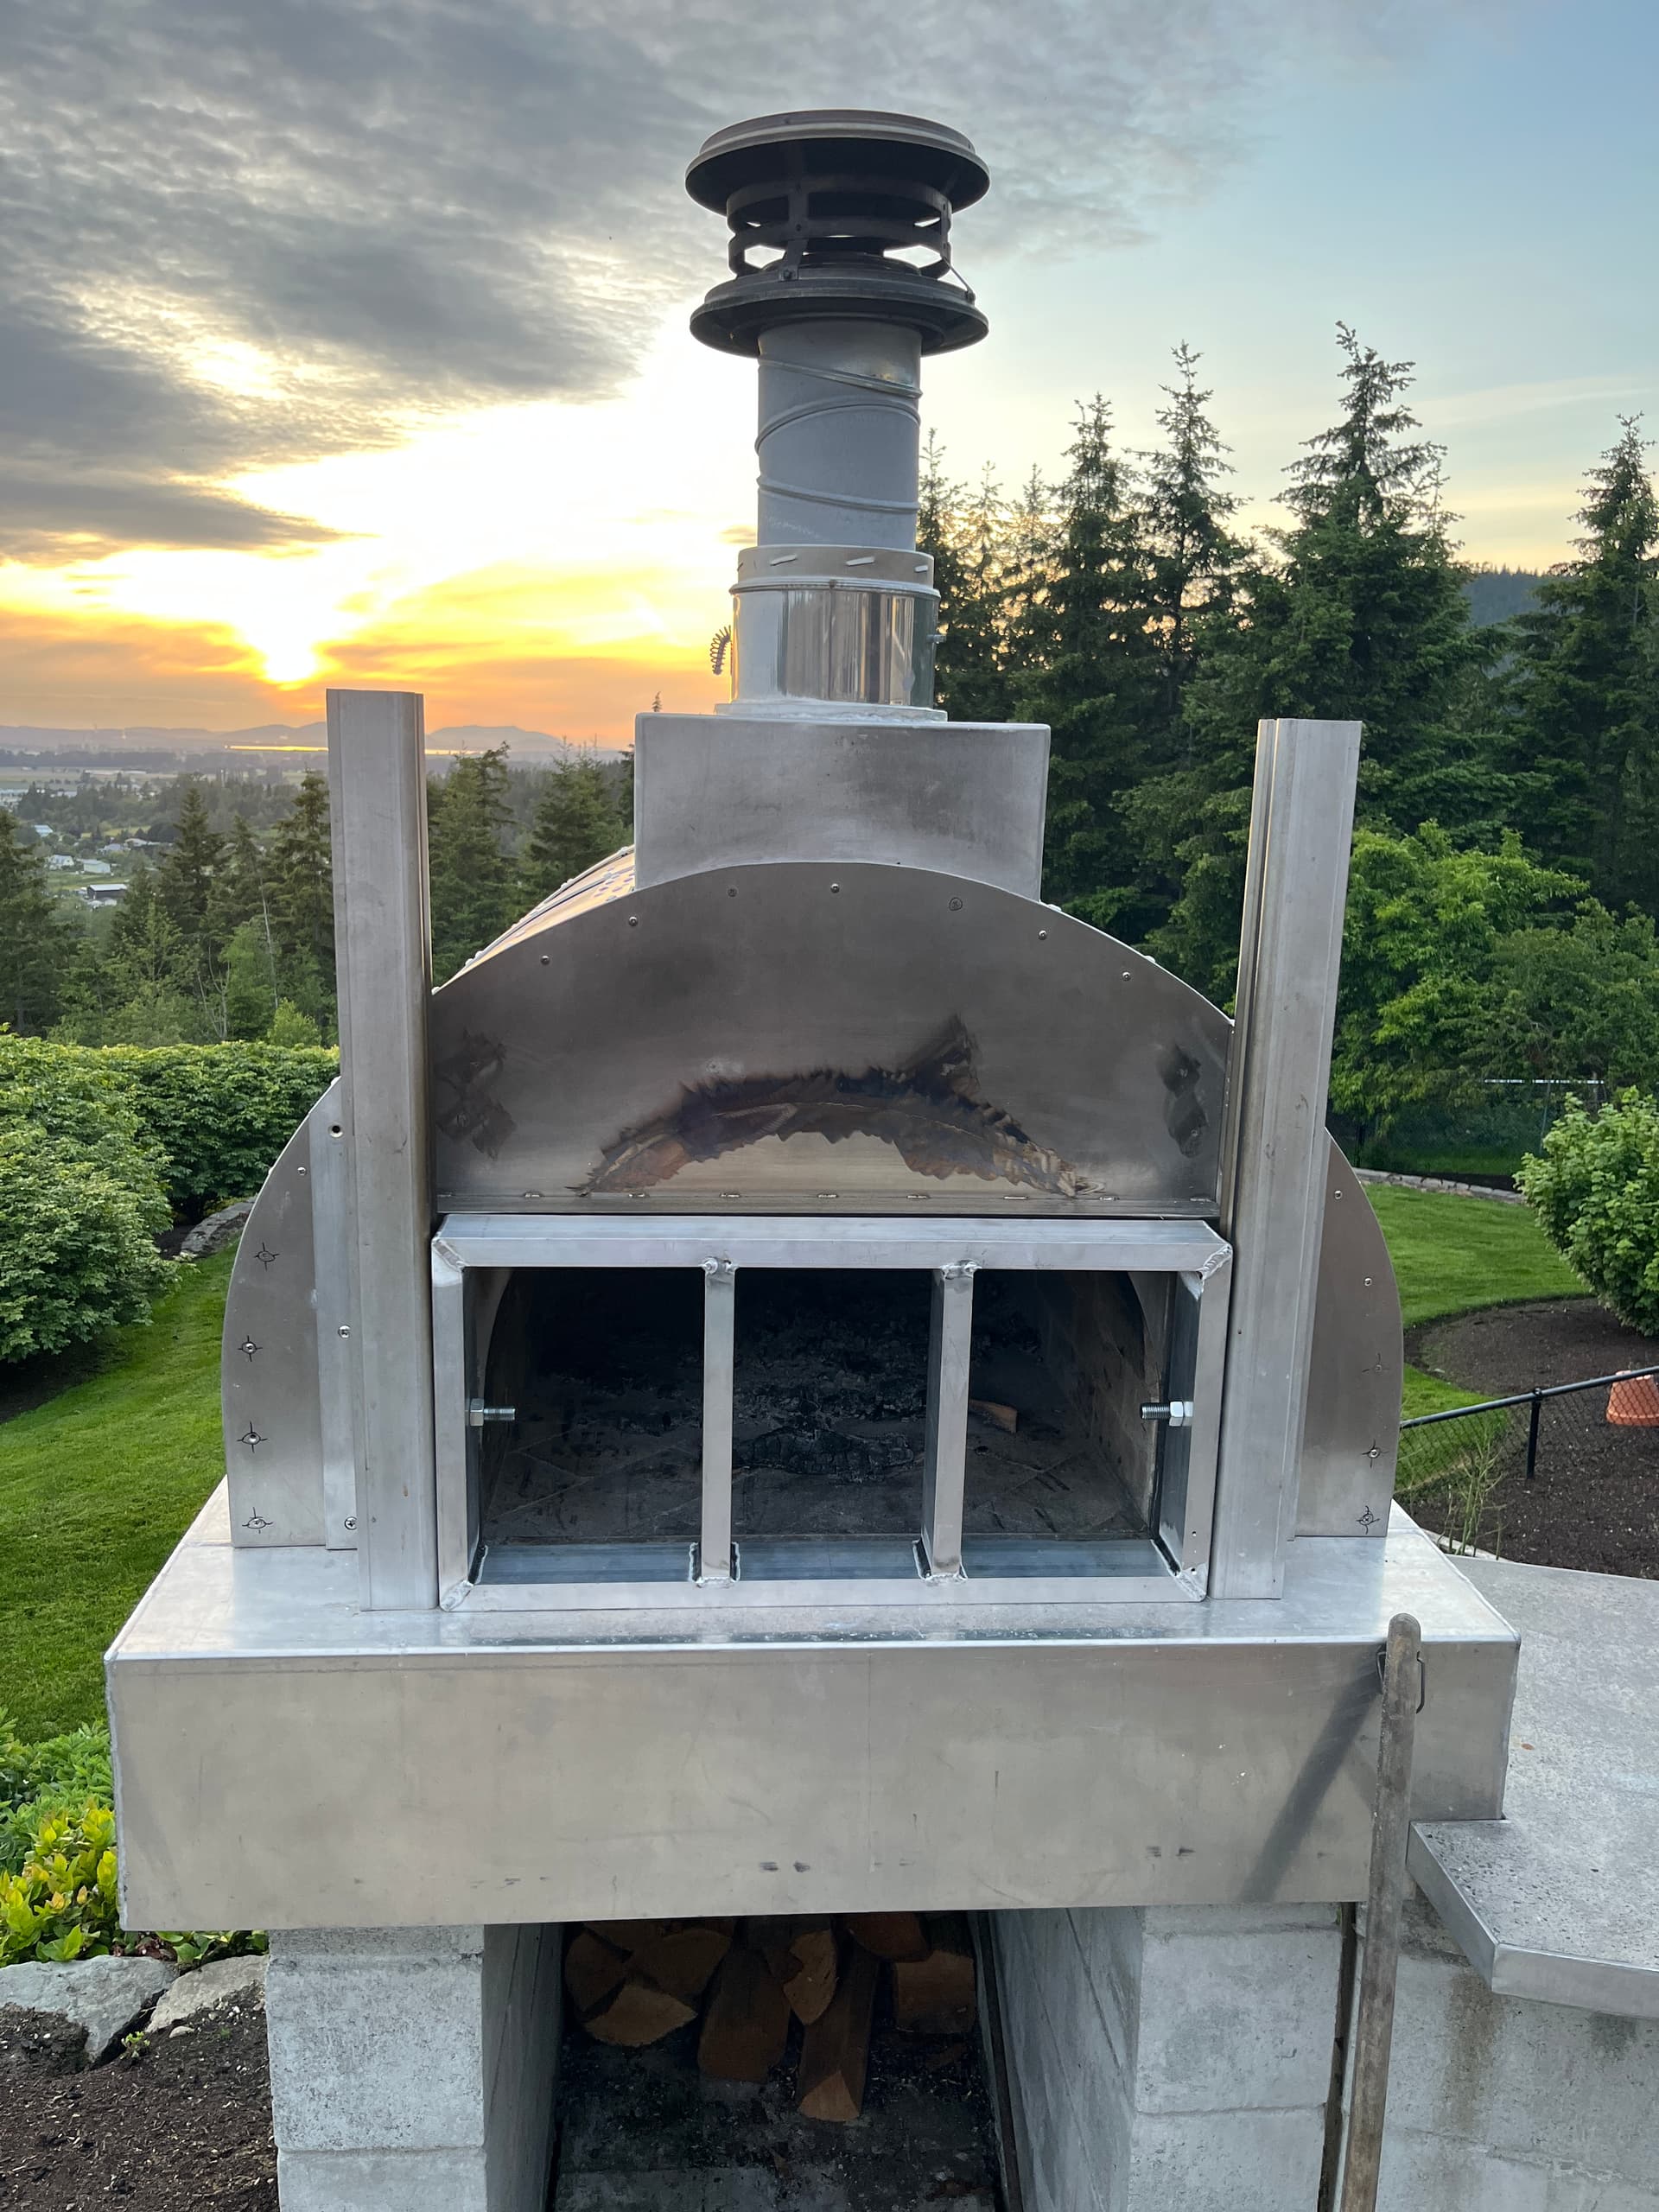
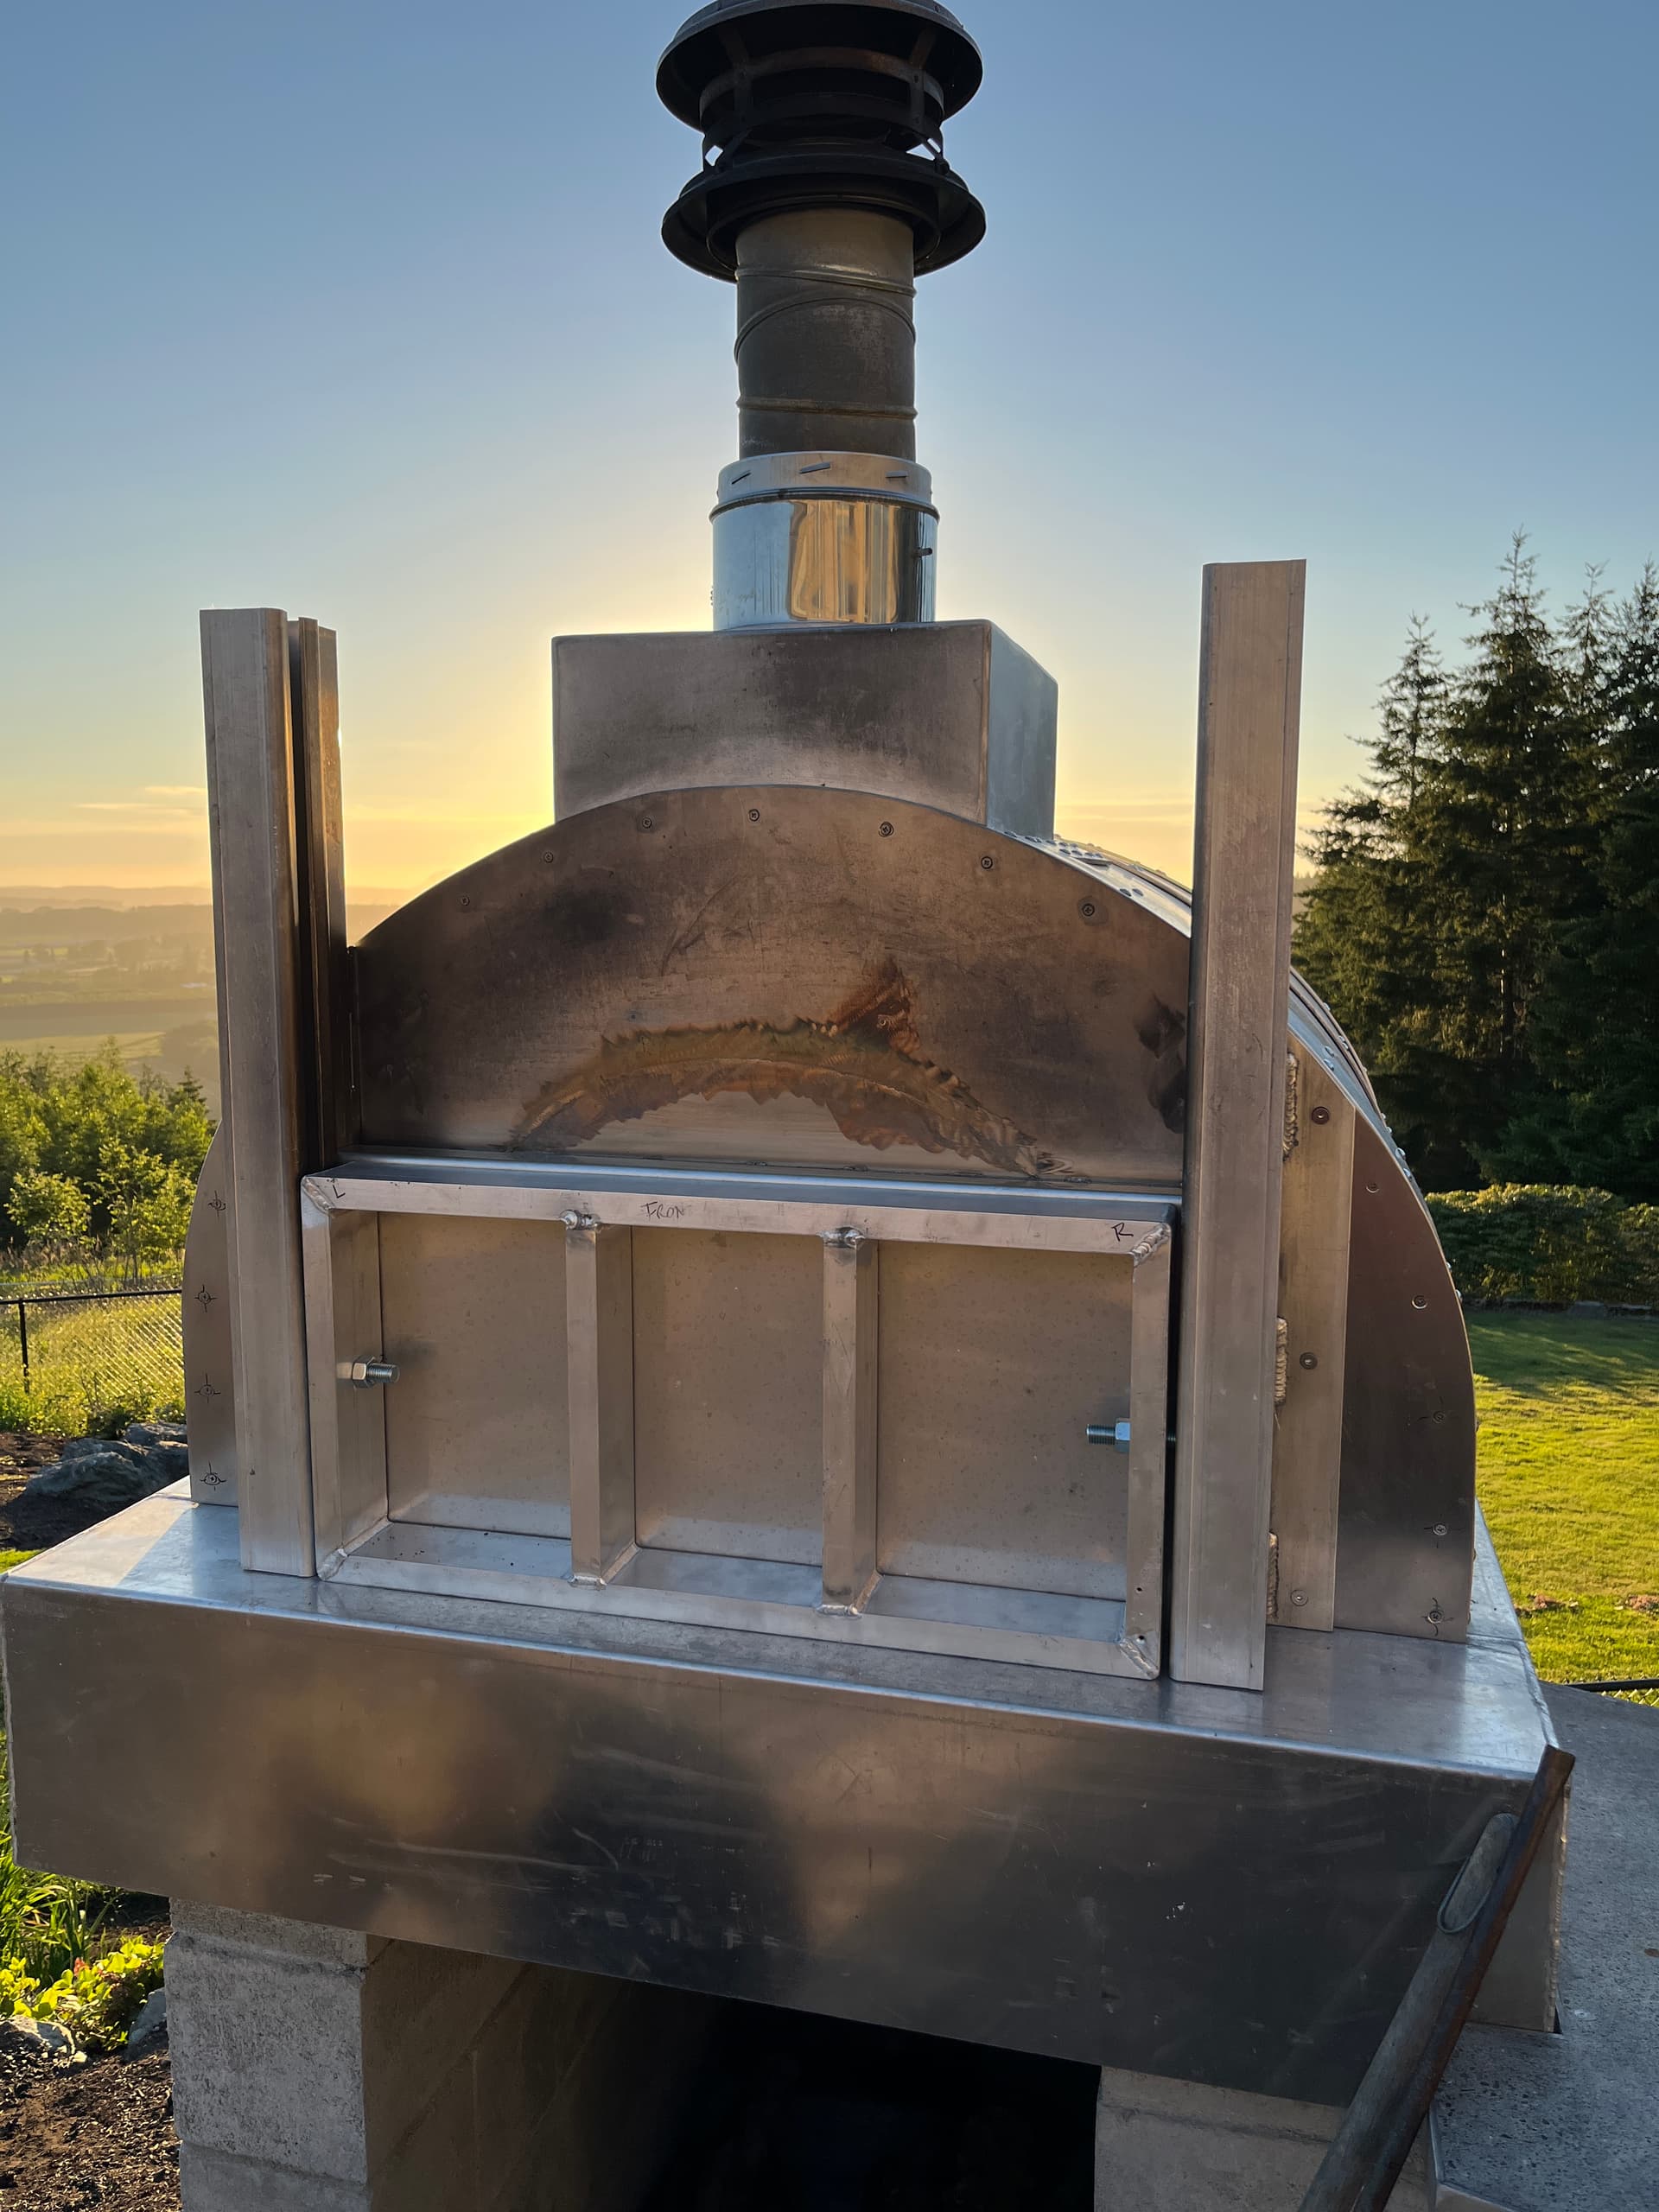
At this point I had decided I wanted to build the door in such a way that I could have infinite control over the opening size. The only way I could think to achieve that goal was with a door that opened and closed vertically. The challenges that confronted my already overtaxed and thoroughly pickled brain were:
- Figuring out how to seal the door.
- Figuring out the mechanics of counterweights, pulleys, etc.
- How to build the door assembly as a removeable attachment rather than as a permanent part of the shell.
I built several iterations of door assemblies using wood and old aluminum road signs. I ripped aluminum signs into strips and JB Welded them into rough H-beams. I built the door to fit in the channel of one side of the H-beams. I used cheap pulleys from my local hardware store and lead fishing weights to work out the counterweight design. As a proof of concept, it worked. However, it took many hours before I had the something I was willing to commit to fabricating out of metal.
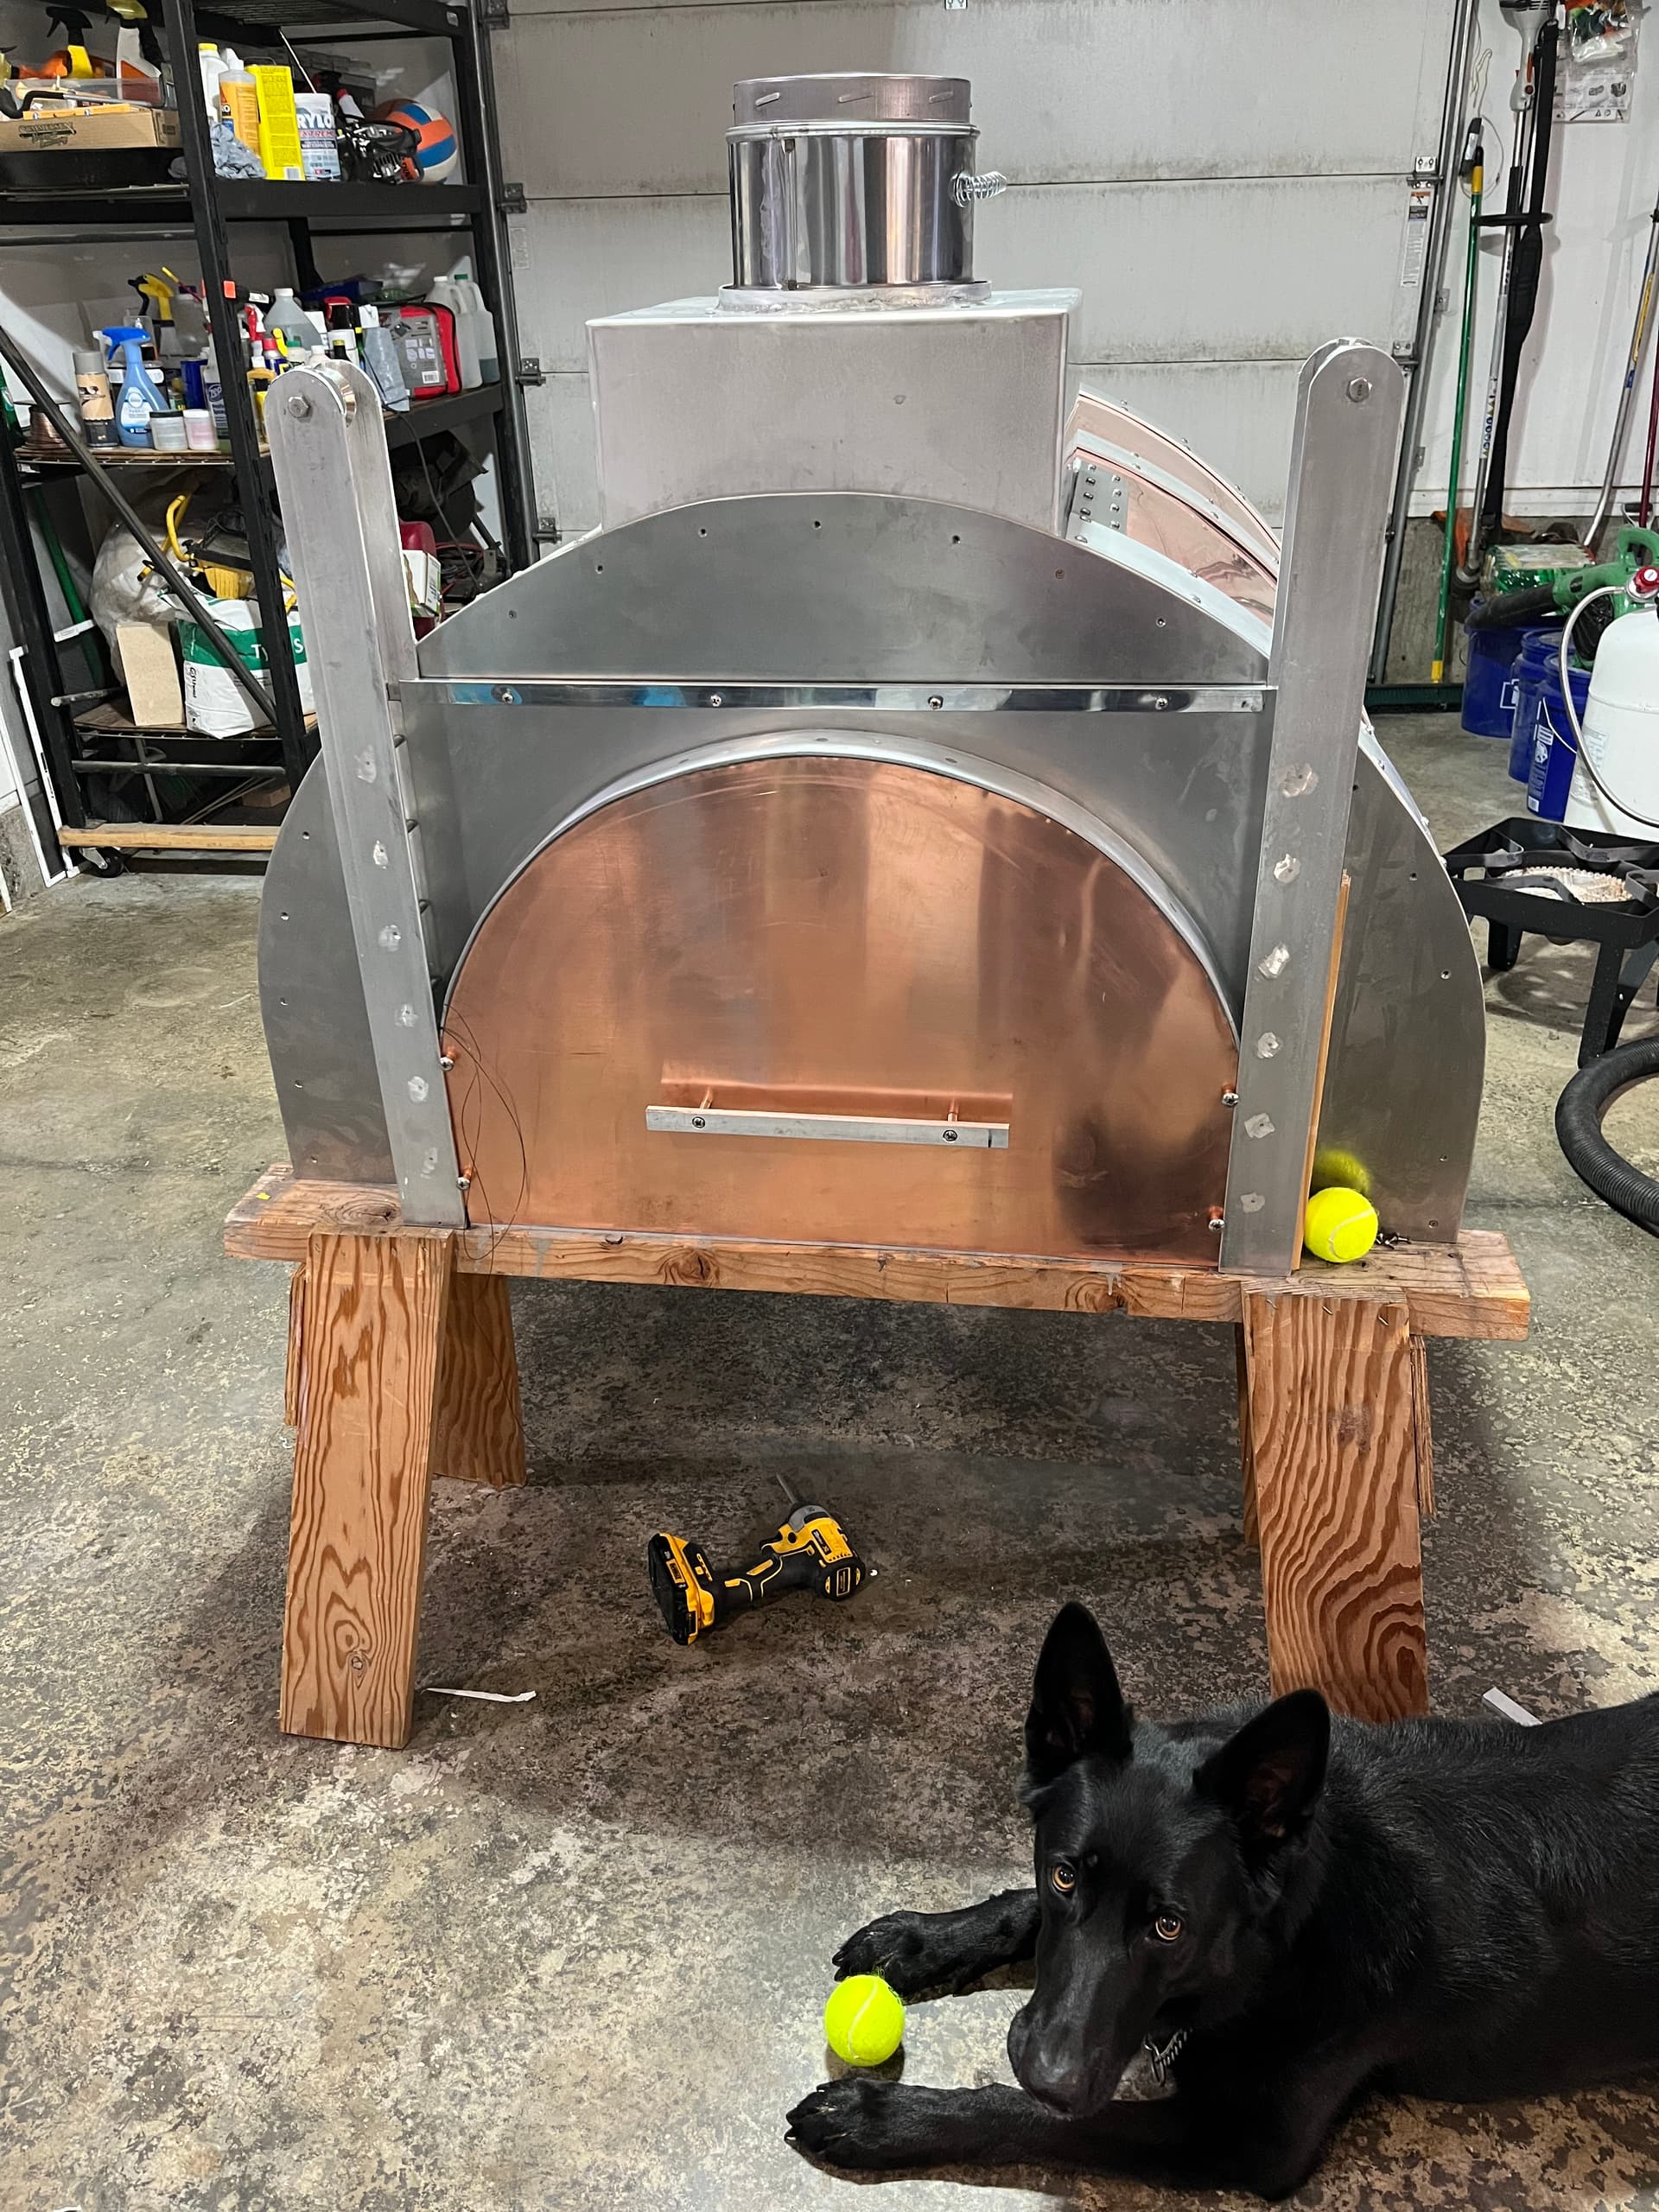
Around the same time that I arrived at a firm plan for the door, the shell was completed. I once again made homage to the Greatest Martial Artist of the 20th Century* and played several games of Shell On, Shell Off. With the skirt and shell in place and a solid plan for the rest of the build, I moved the party into my garage. For the next two months.
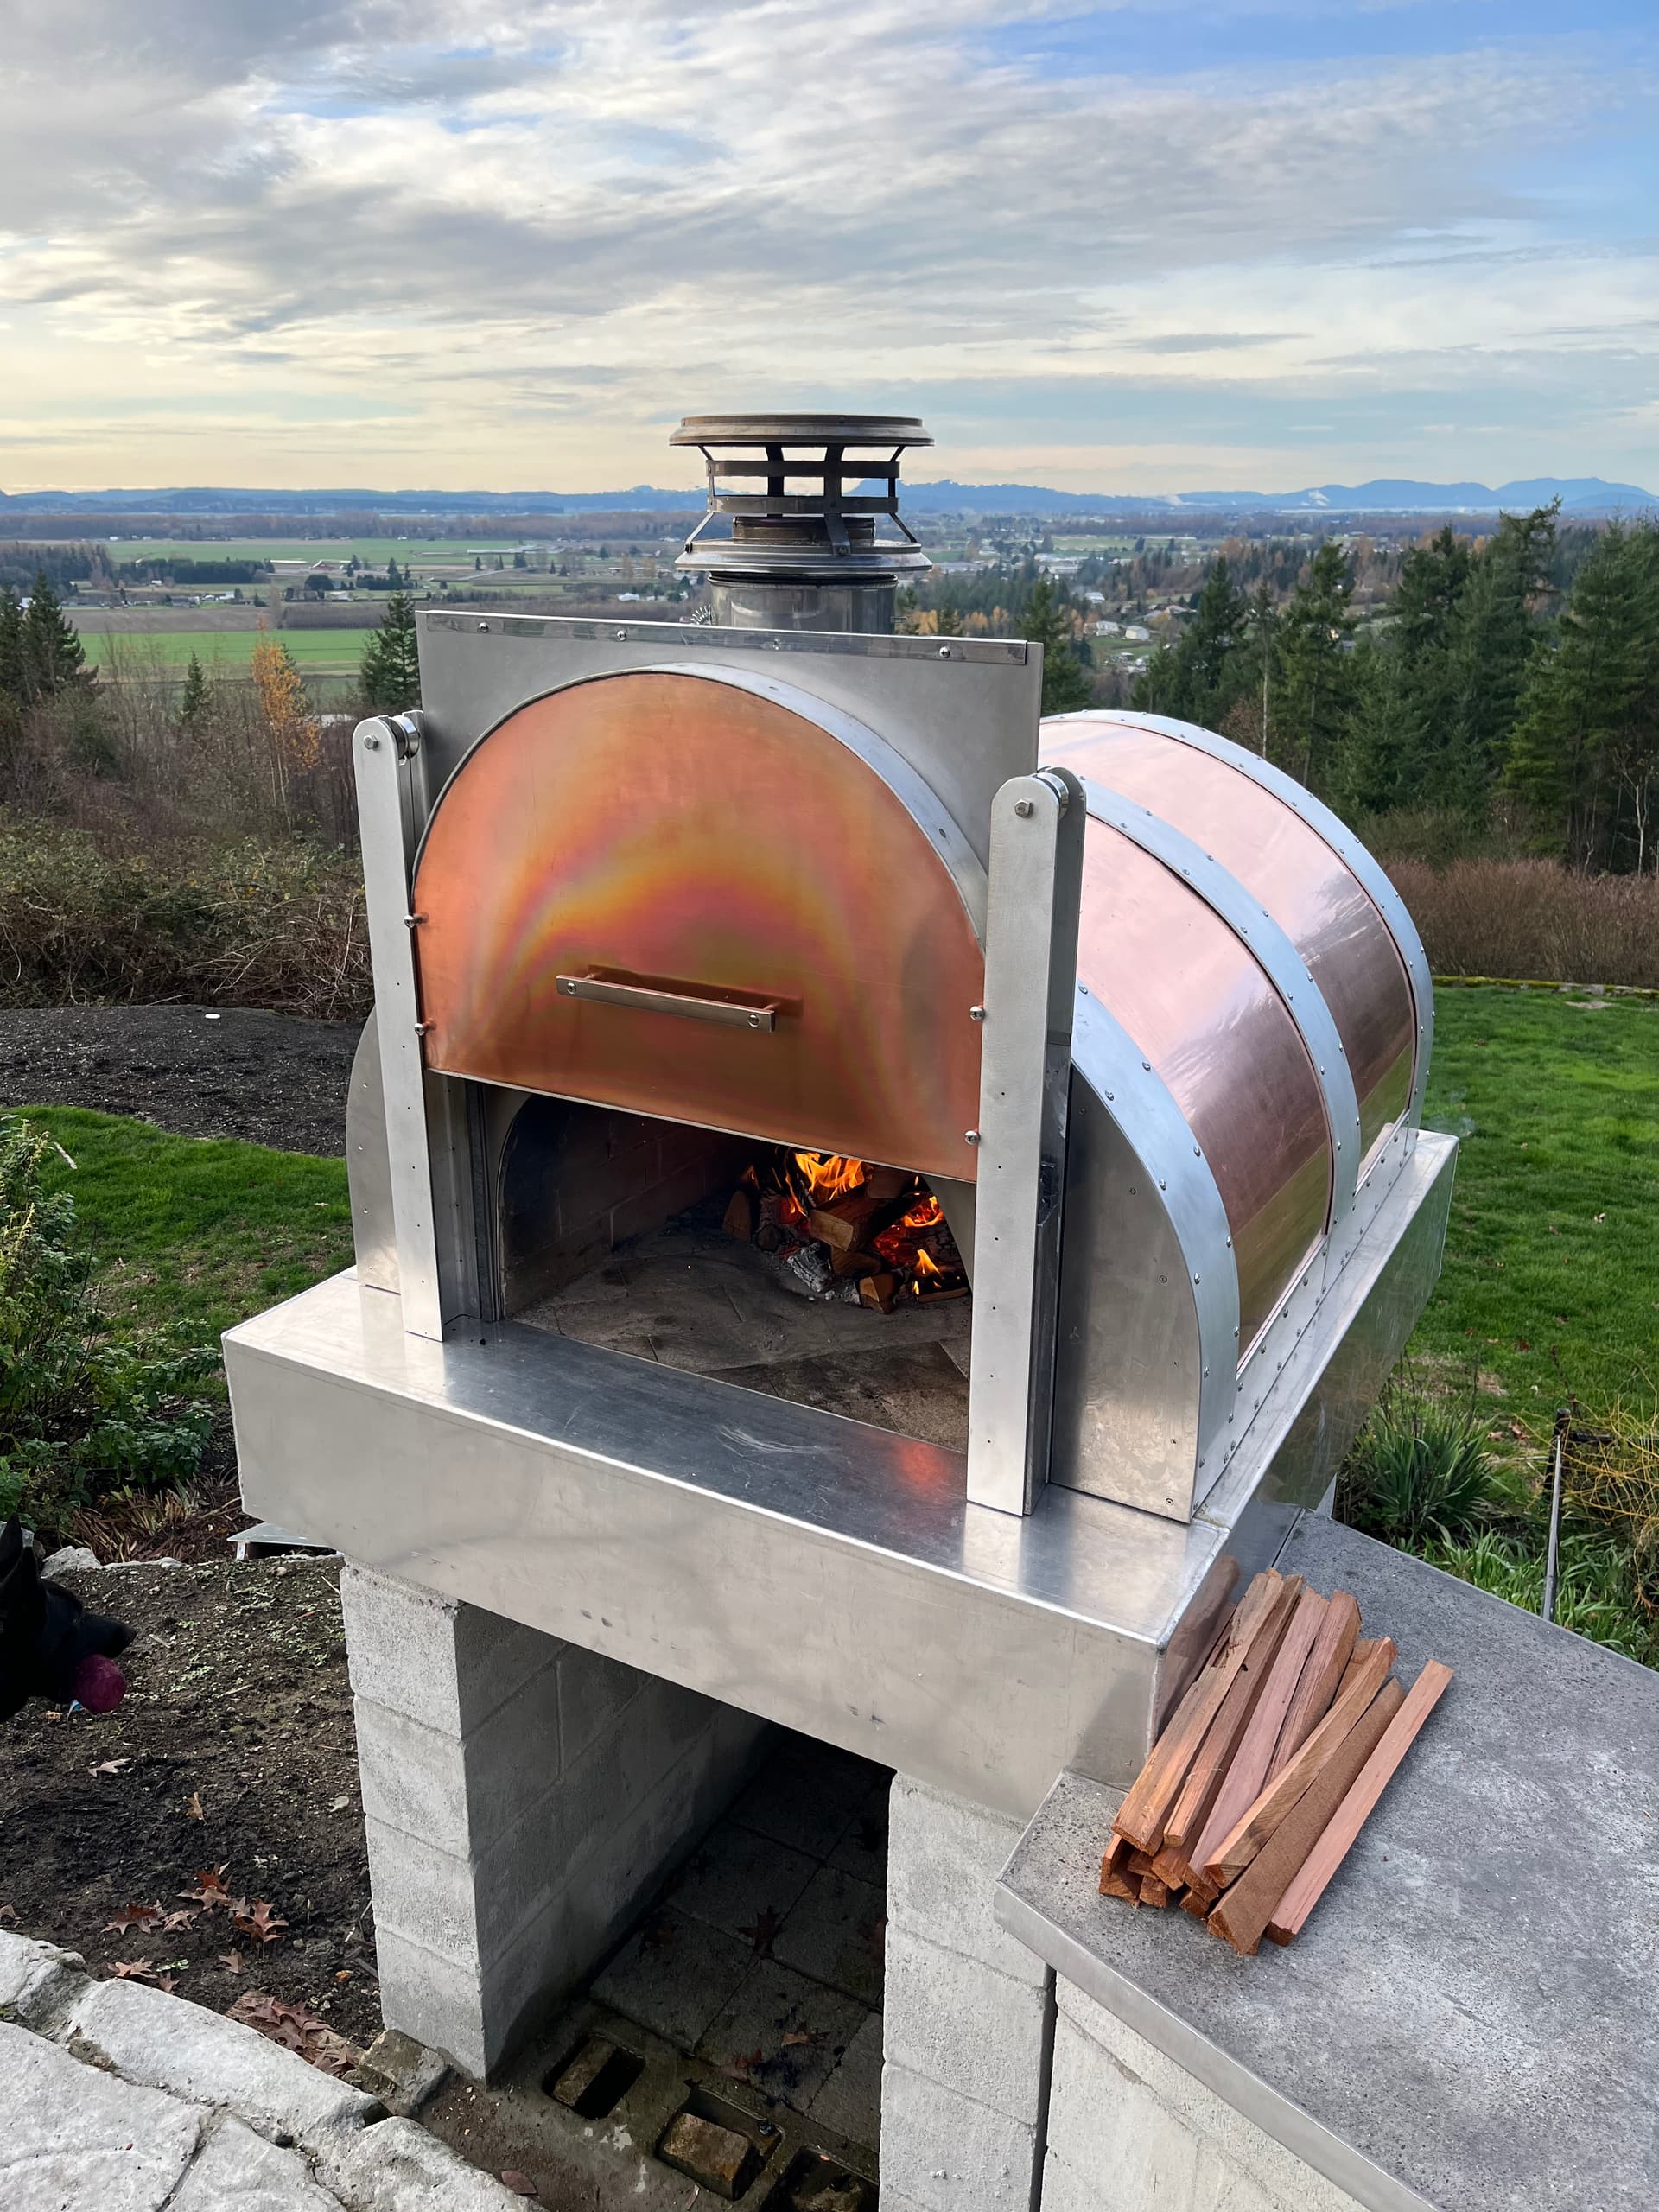
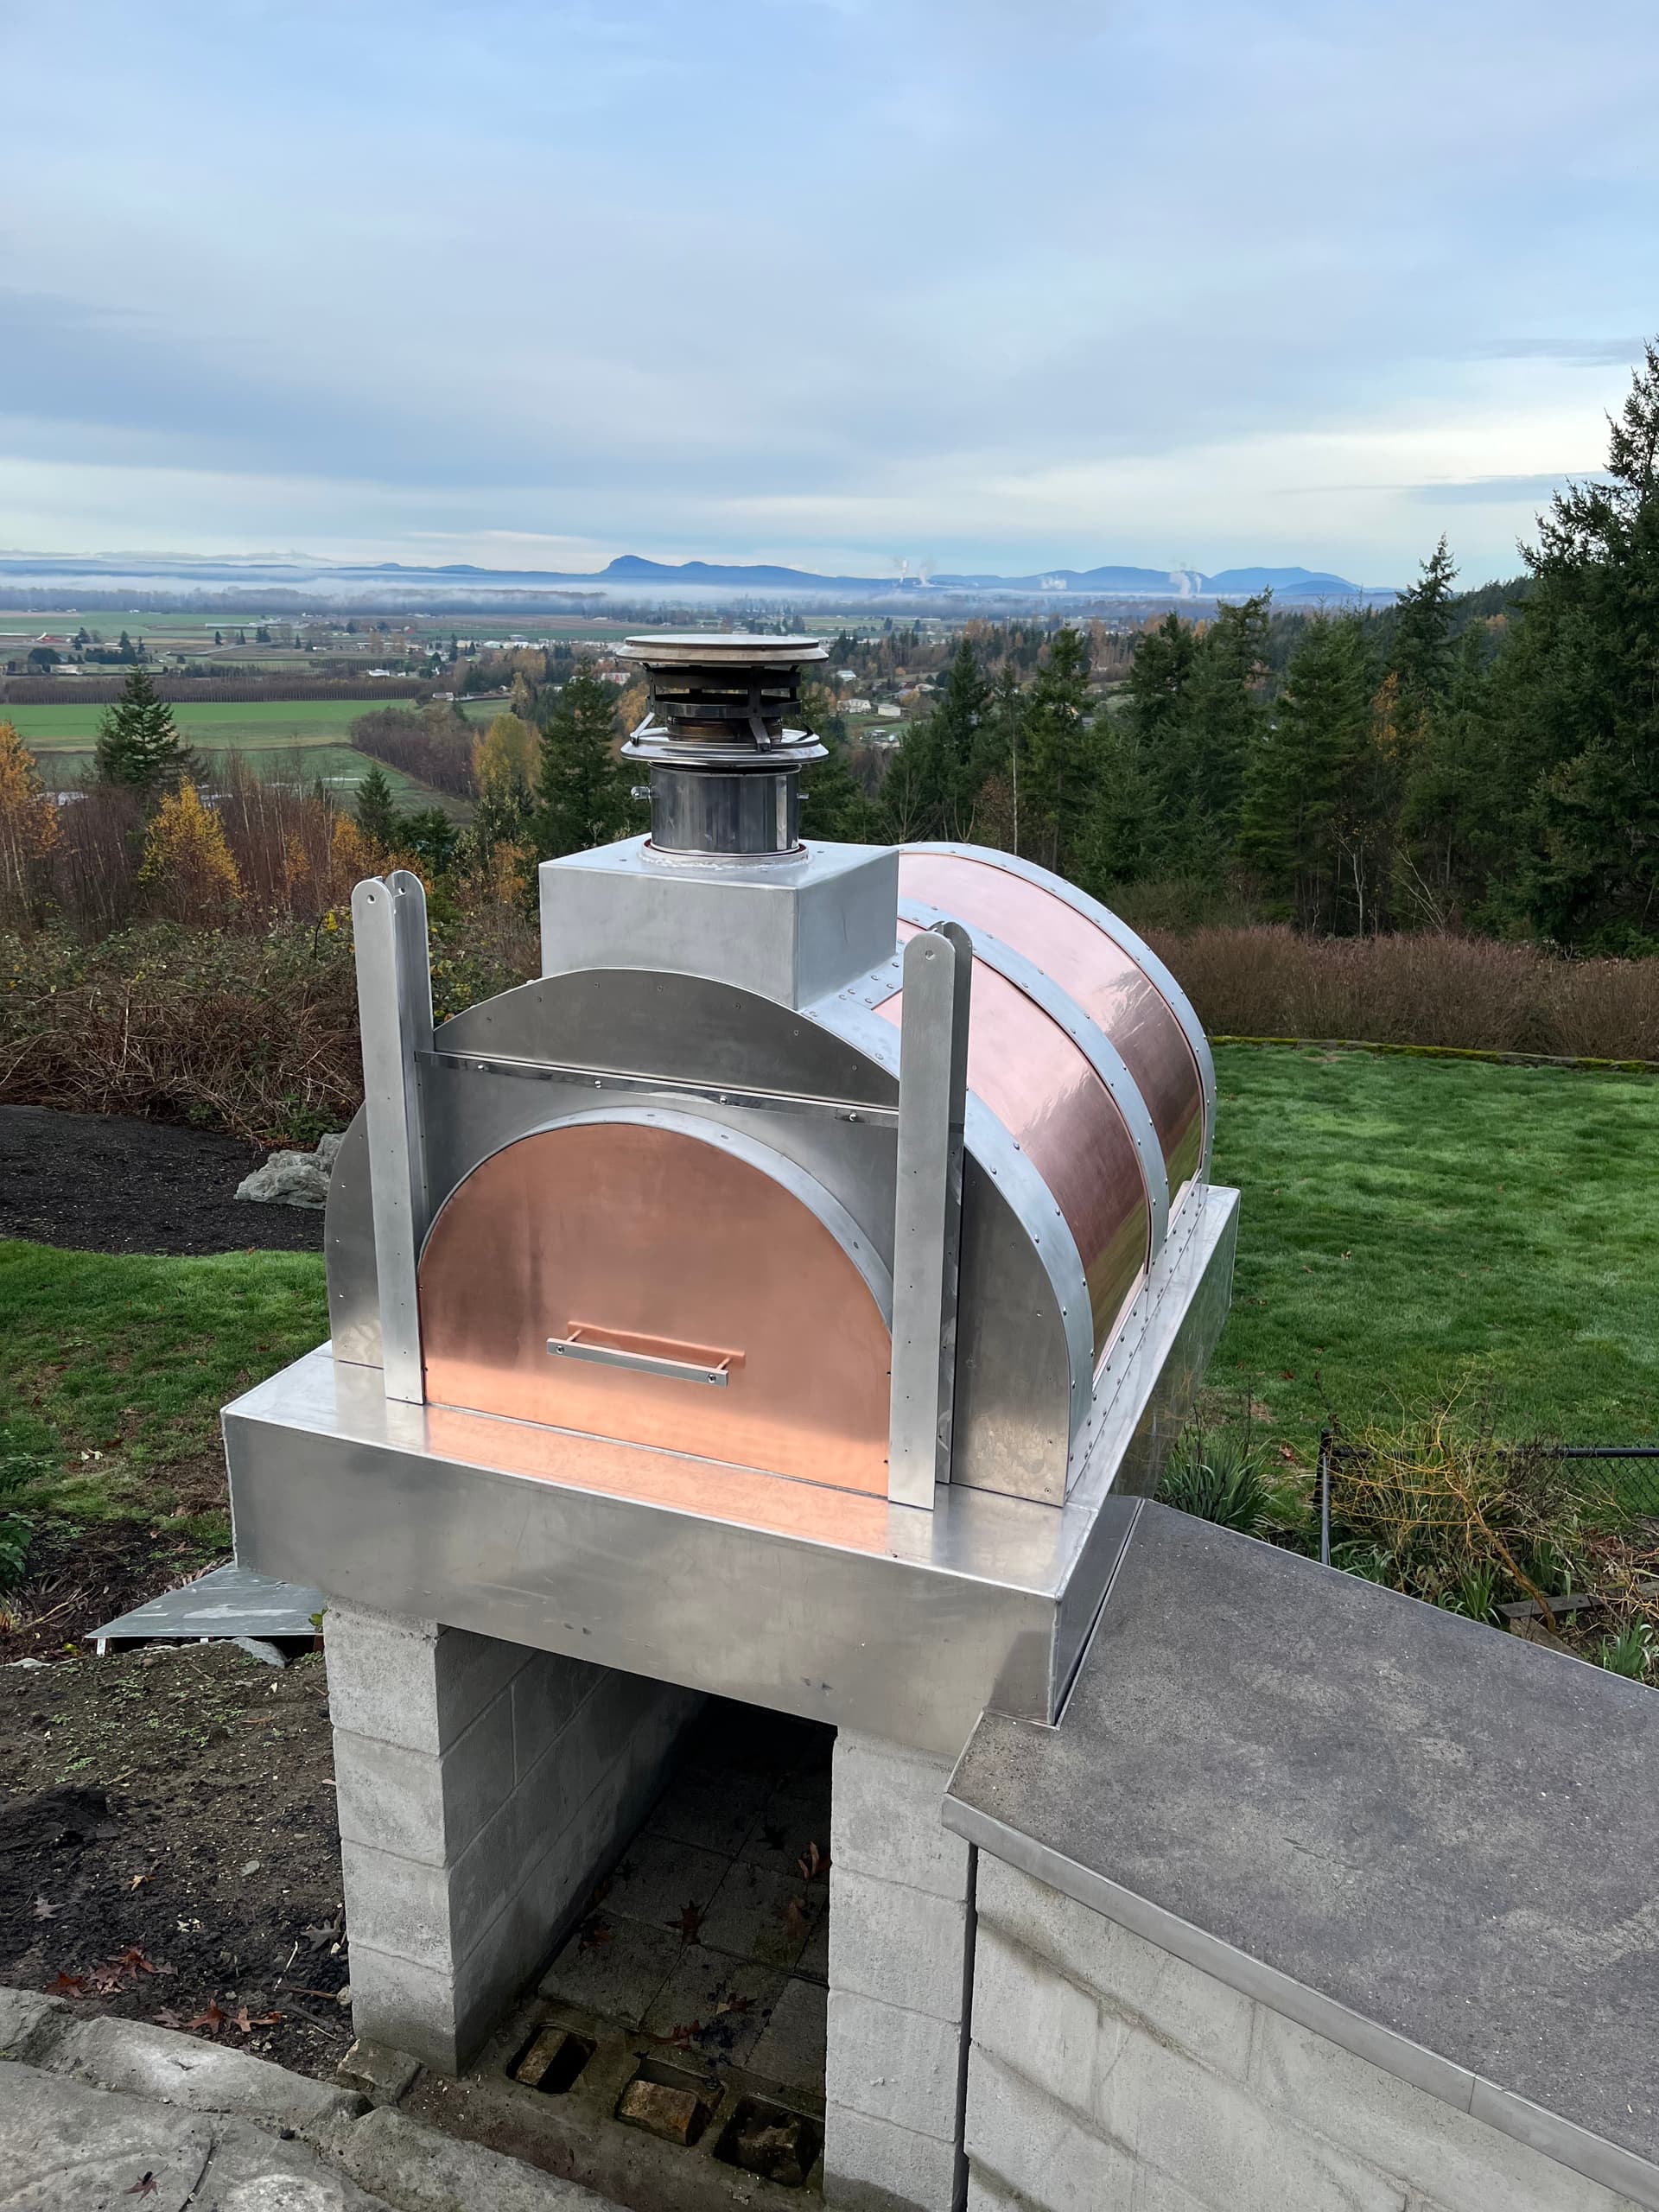
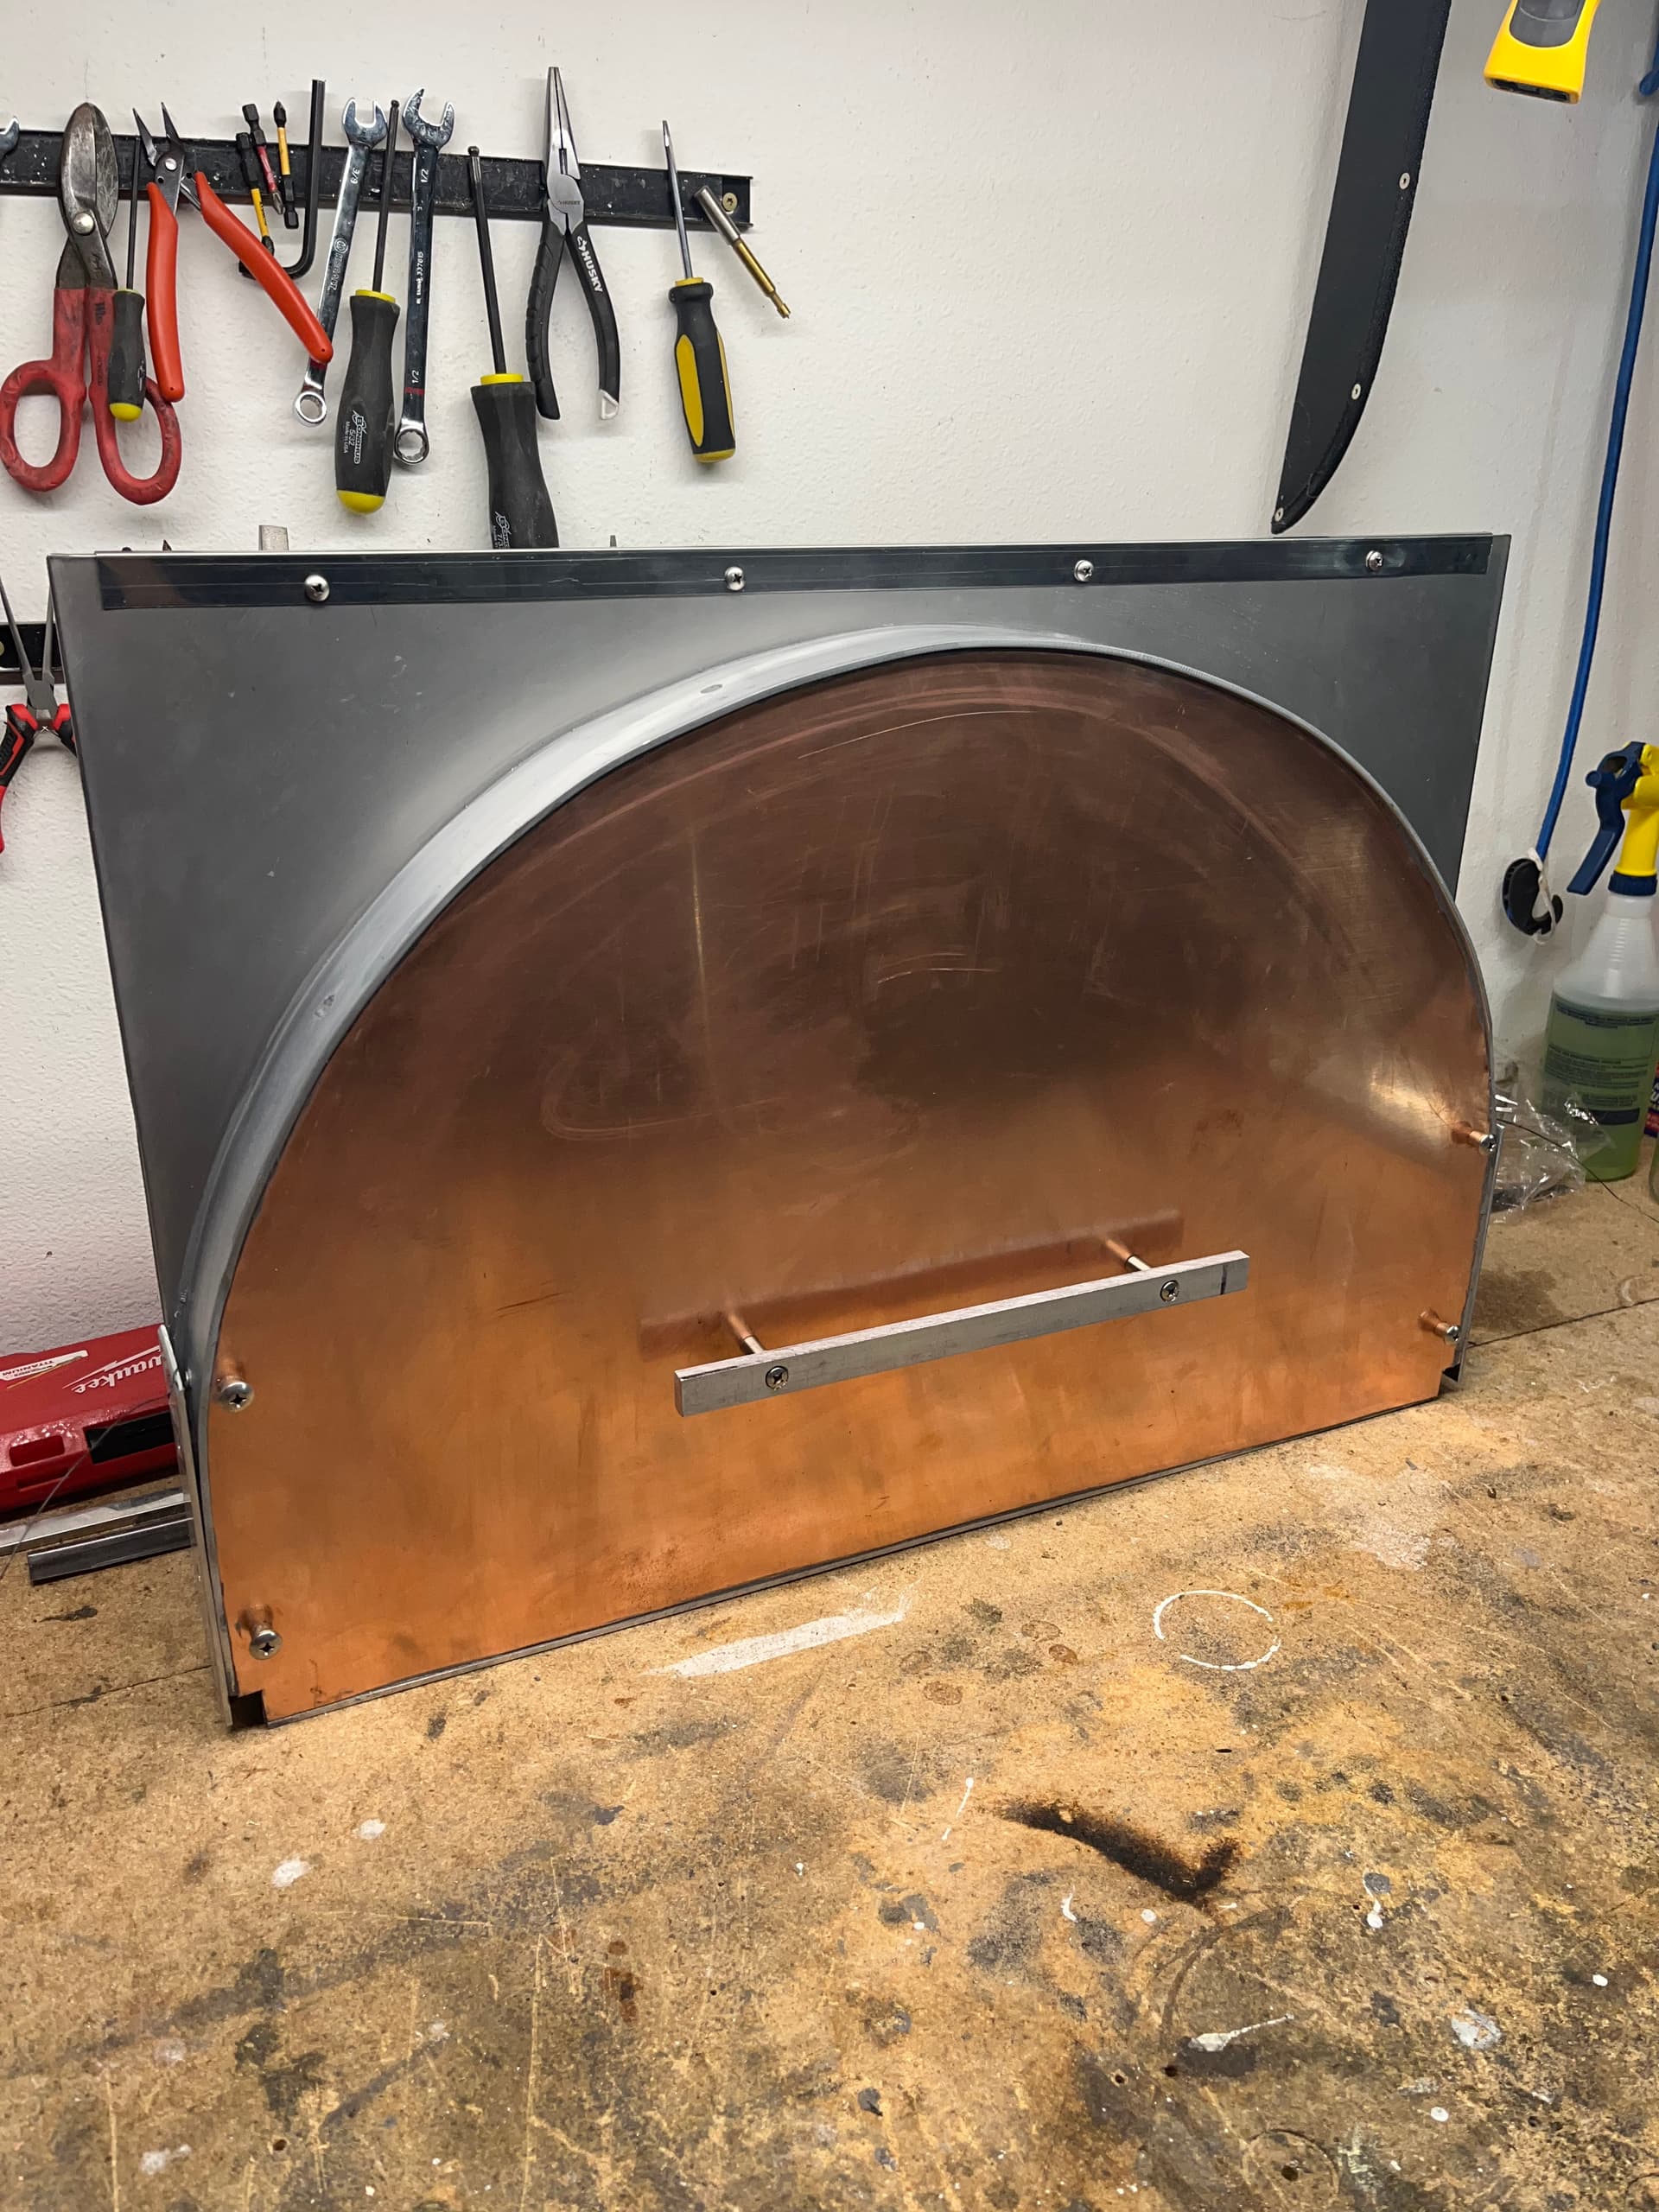
I’m fortunate to have a dear friend that owns a machine shop filled with every metal working tool known to man. I would not have been able to build what I built without his knowledge and assistance. I envisioned a shell that looked like a cross between a 19th century steam engine and a copper still, with a pinch of steam punk and a dash of pizazz thrown in for good measure. I wanted to give people that saw it what we called the ol’ ‘razzle-dazzle’ back in my carnie days. I decided to sheath the aluminum in very thin copper sheeting. Thanks, Ebay! I then used a me-powered roller to bend 3/16” thick by 5” wide aluminum strips into shape so they would fit over the shell. That was not easy. I then drilled and tapped hundreds of holes through the ribs, the copper sheeting, and the shell. I secured the ribs using 10/24×3/8” stainless steel machine screws. I tried three different head styles until I got the look I liked. I then removed the ribs and proceeded to use an orbital sander to sand them to a smooth finish. I think I ended up at 2000grit before I finally had my fill of sanding aluminum. I also sanded the parts of the shell that wouldn’t be covered by copper, or what would end up being the door assembly. Side note: Sanding metal sucks. I figured out wet sanding about 10 hours in, so at least I wasn’t constantly covered in a thin layer of aluminum powder after that. I had semi-permanent marks from my respirator on my nose after that ordeal.
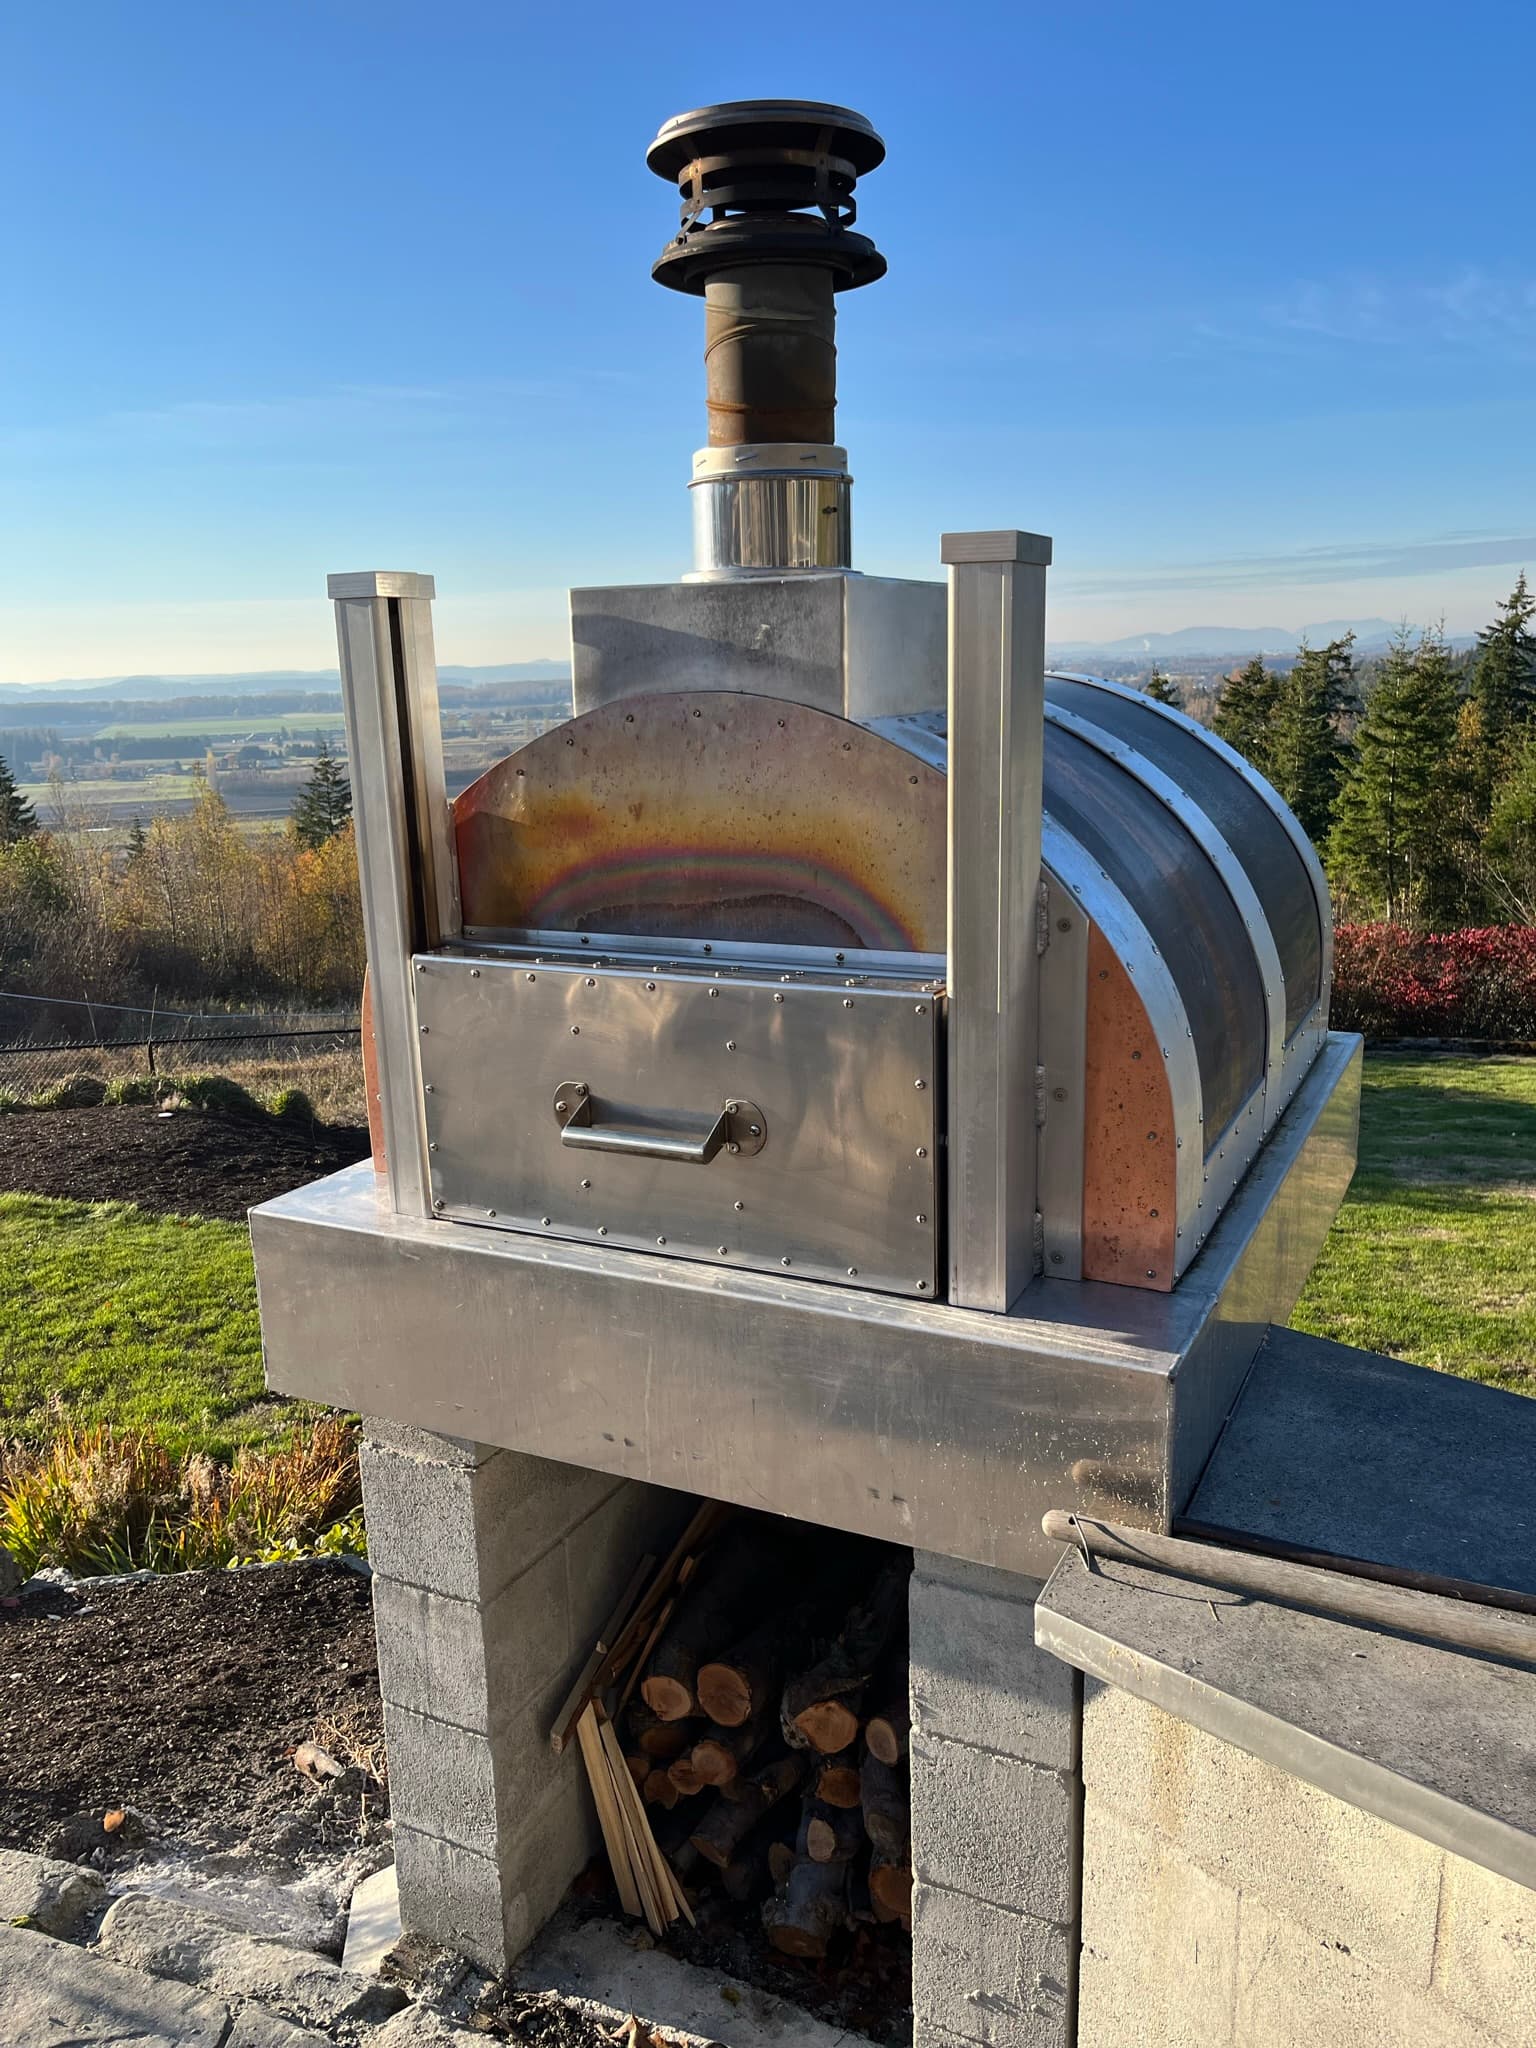
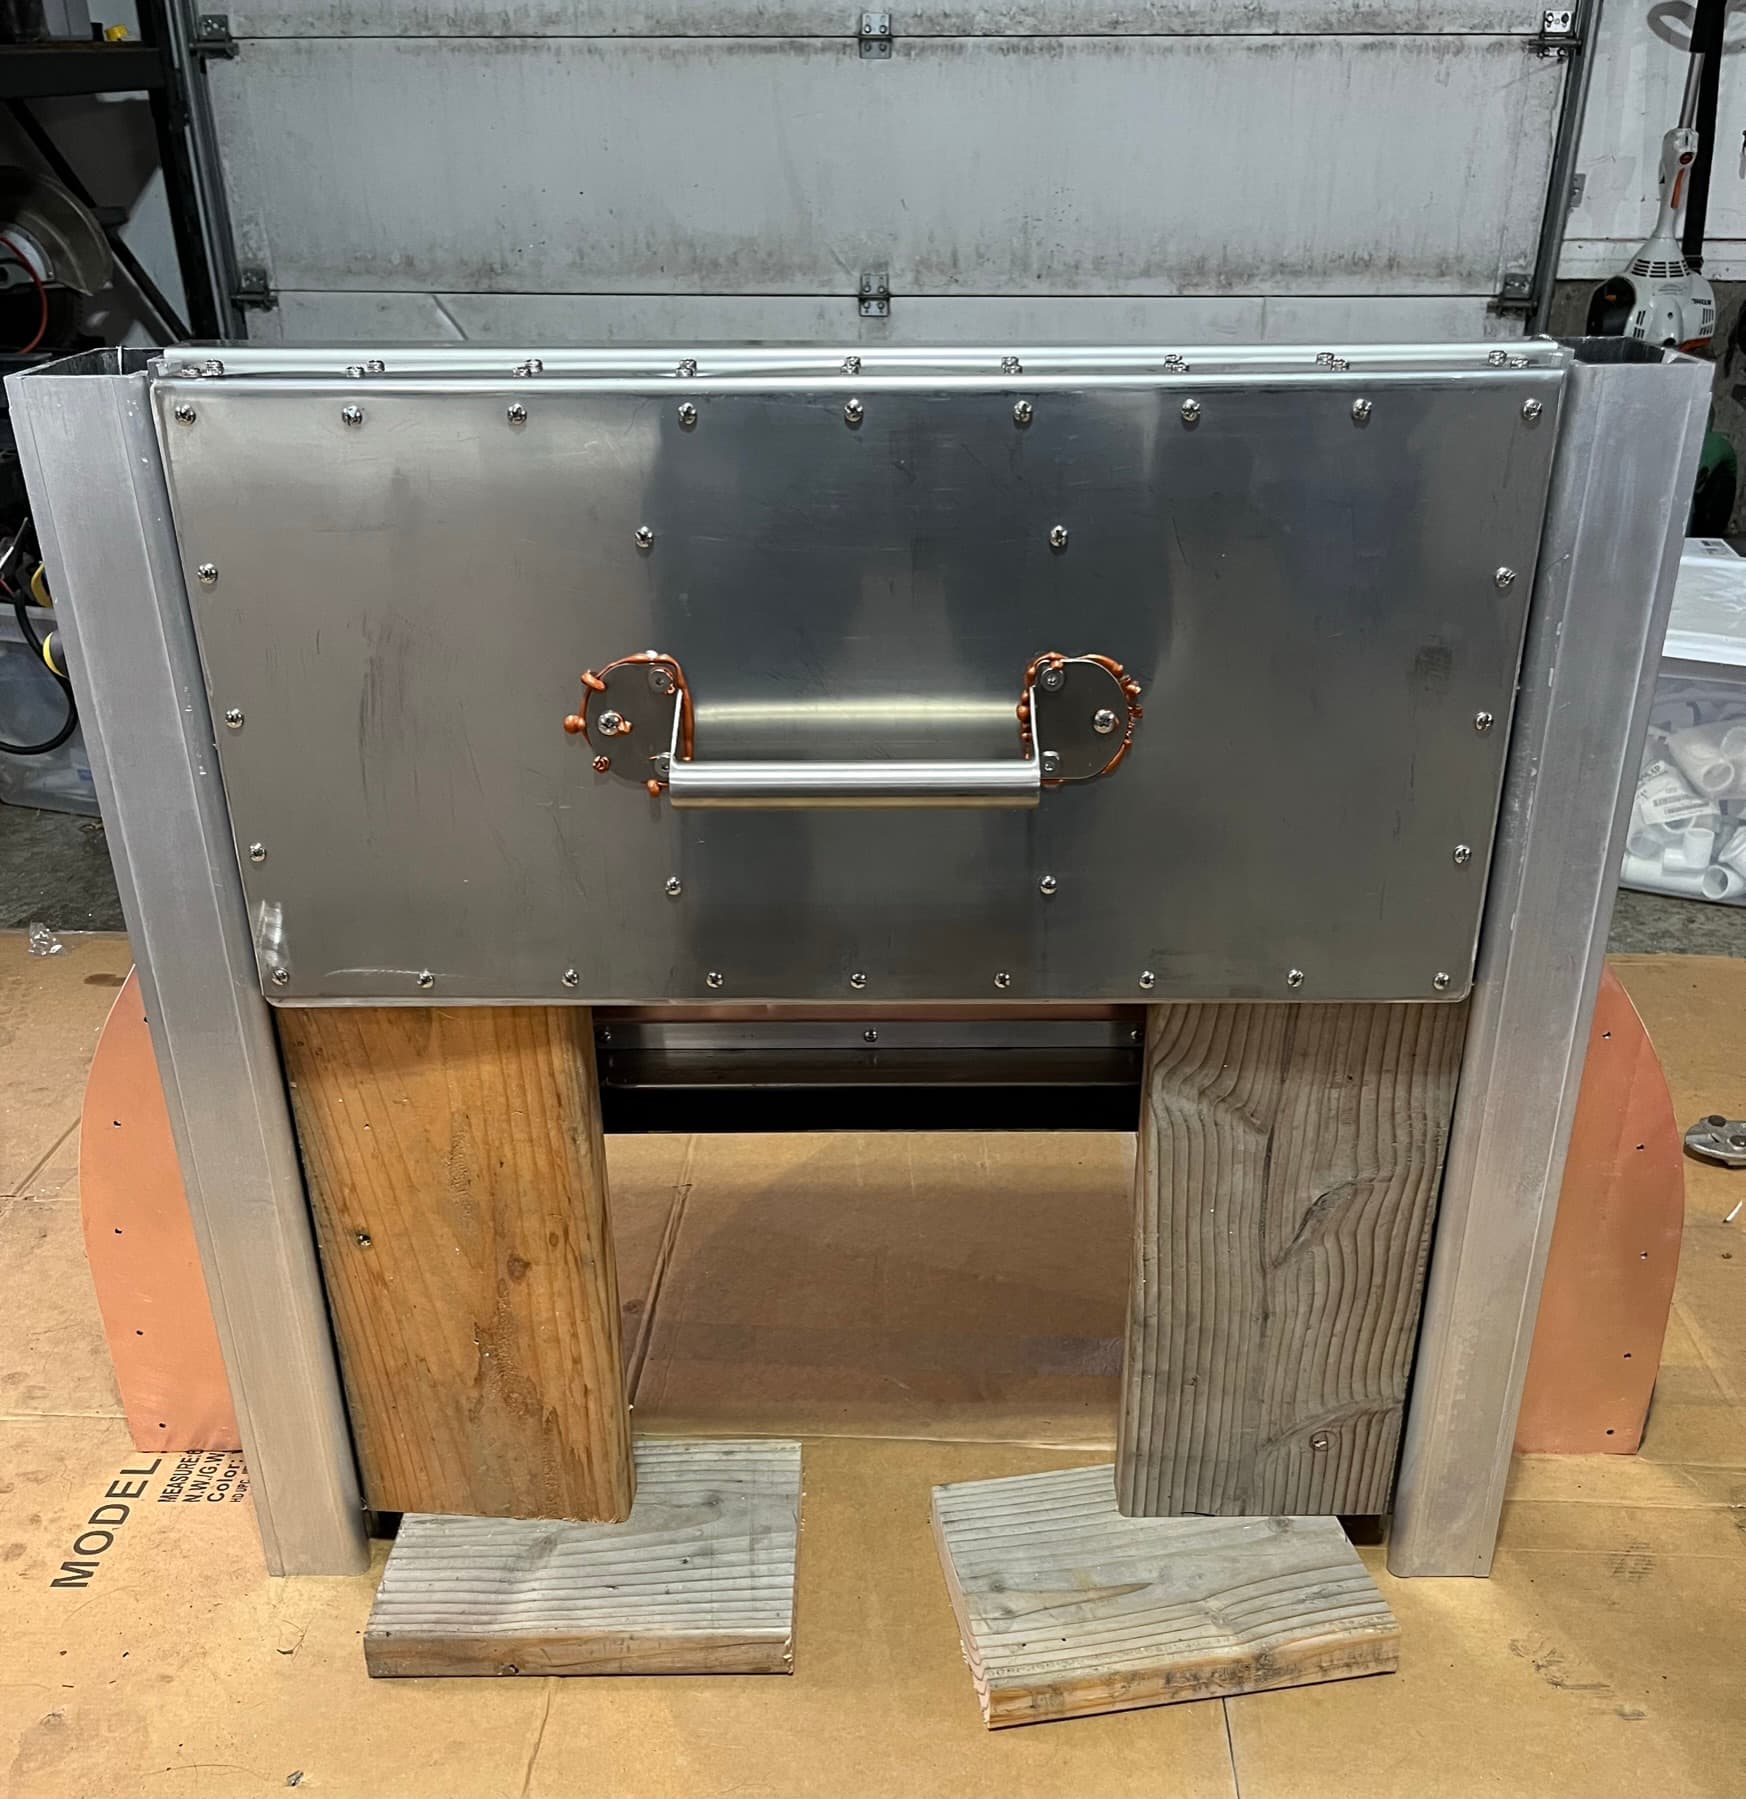
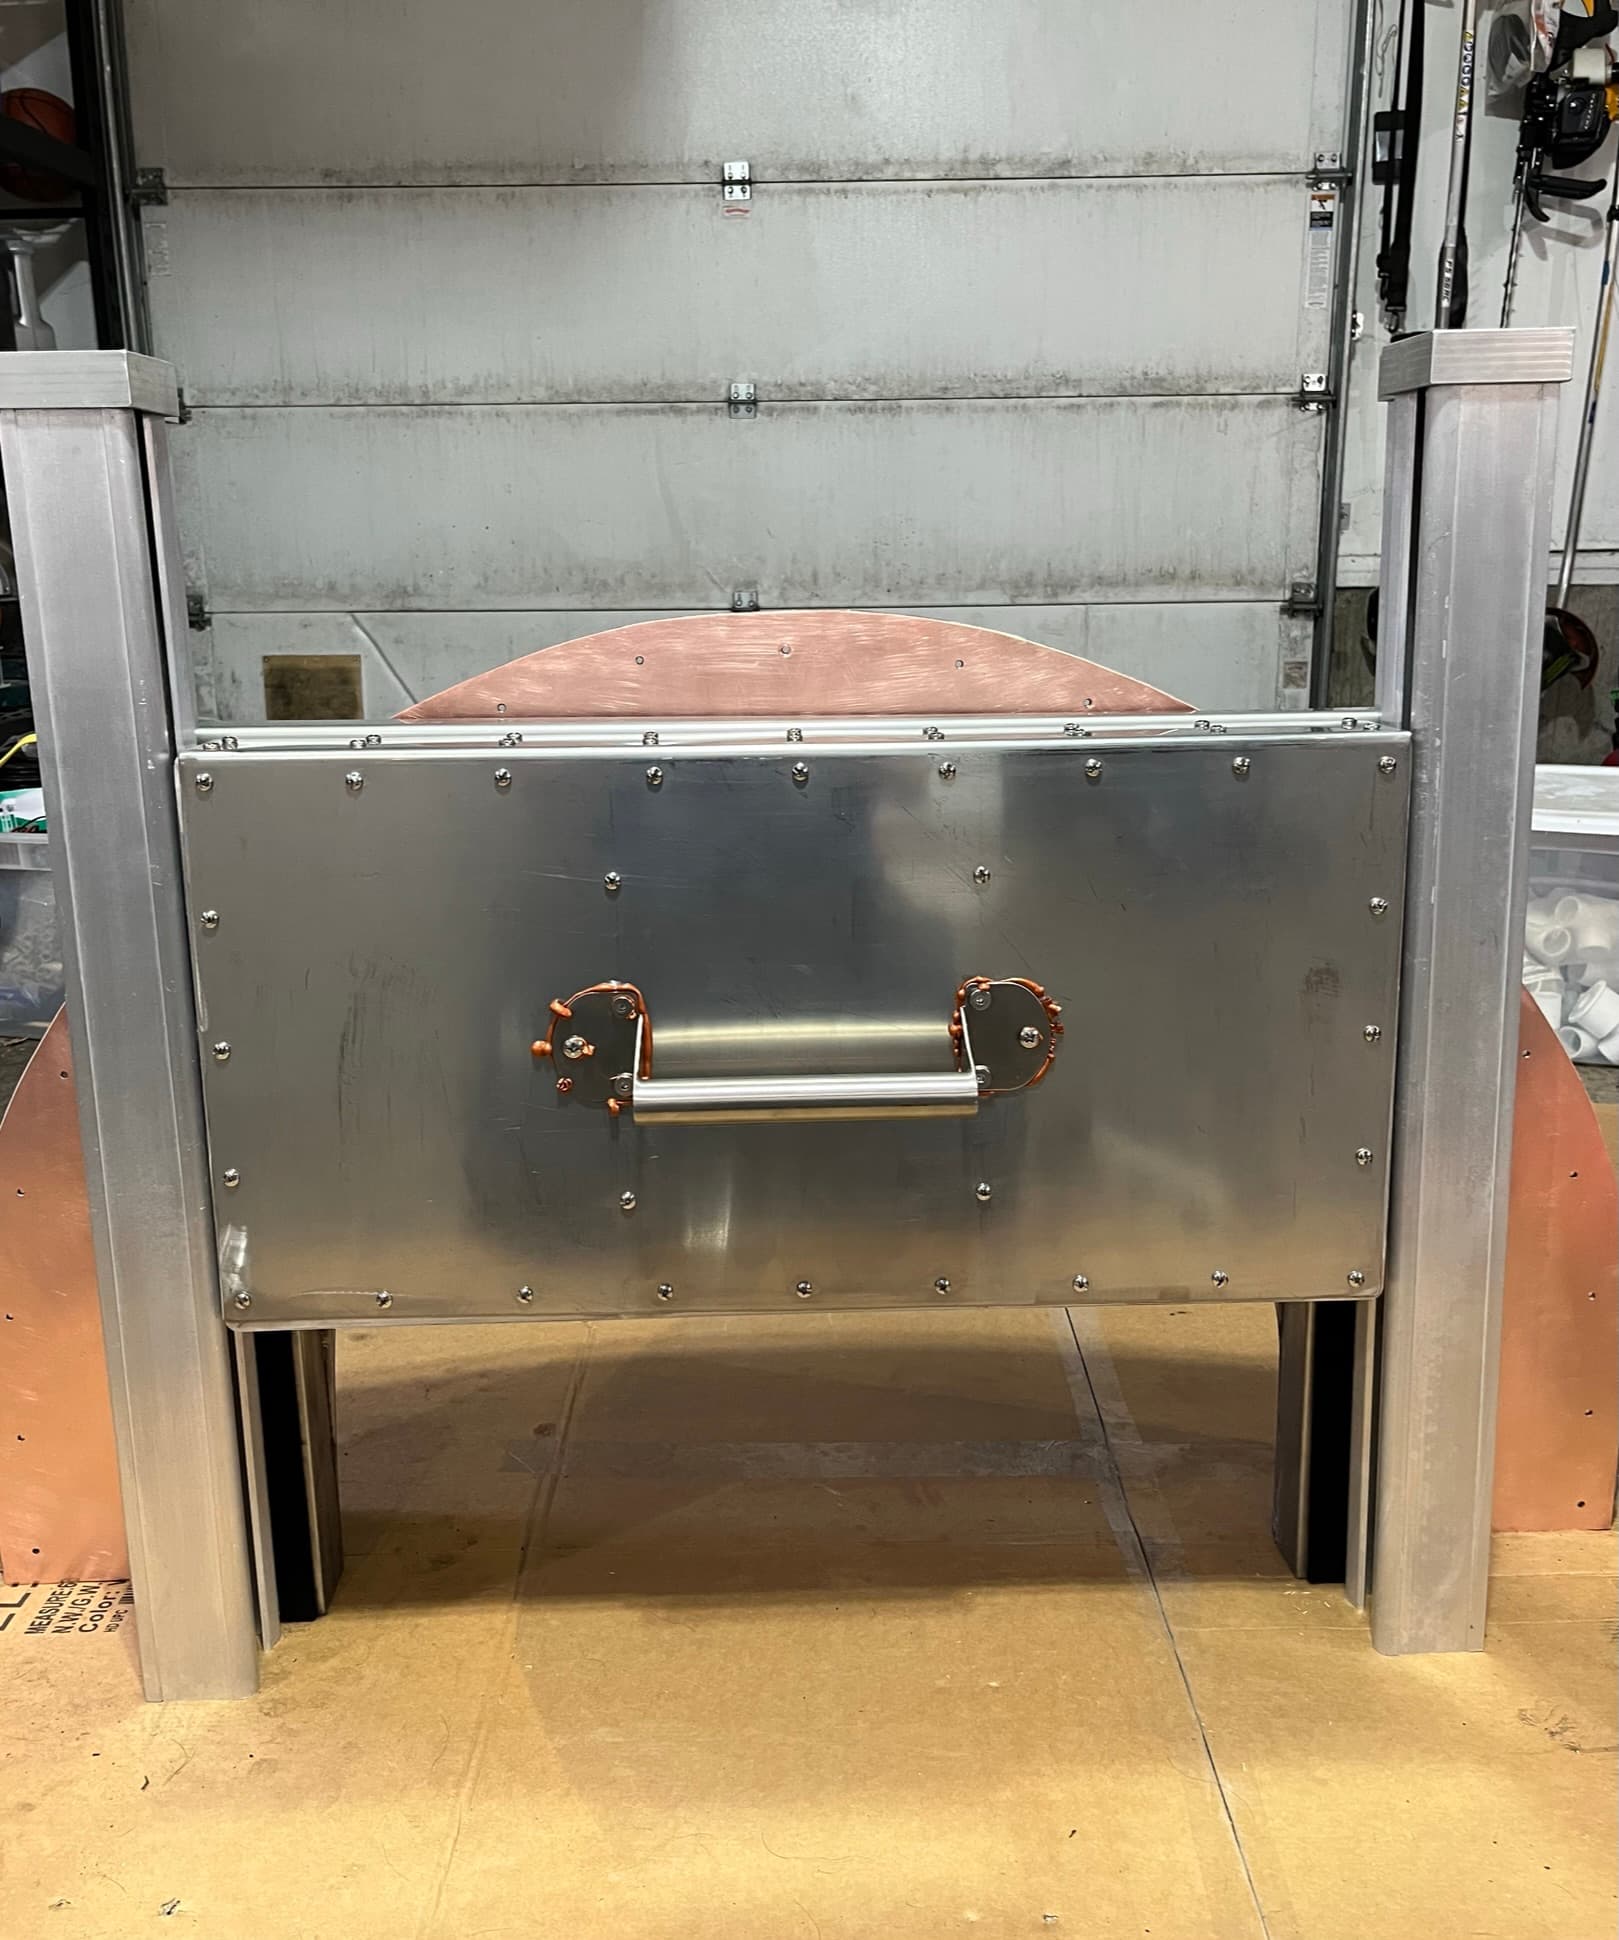
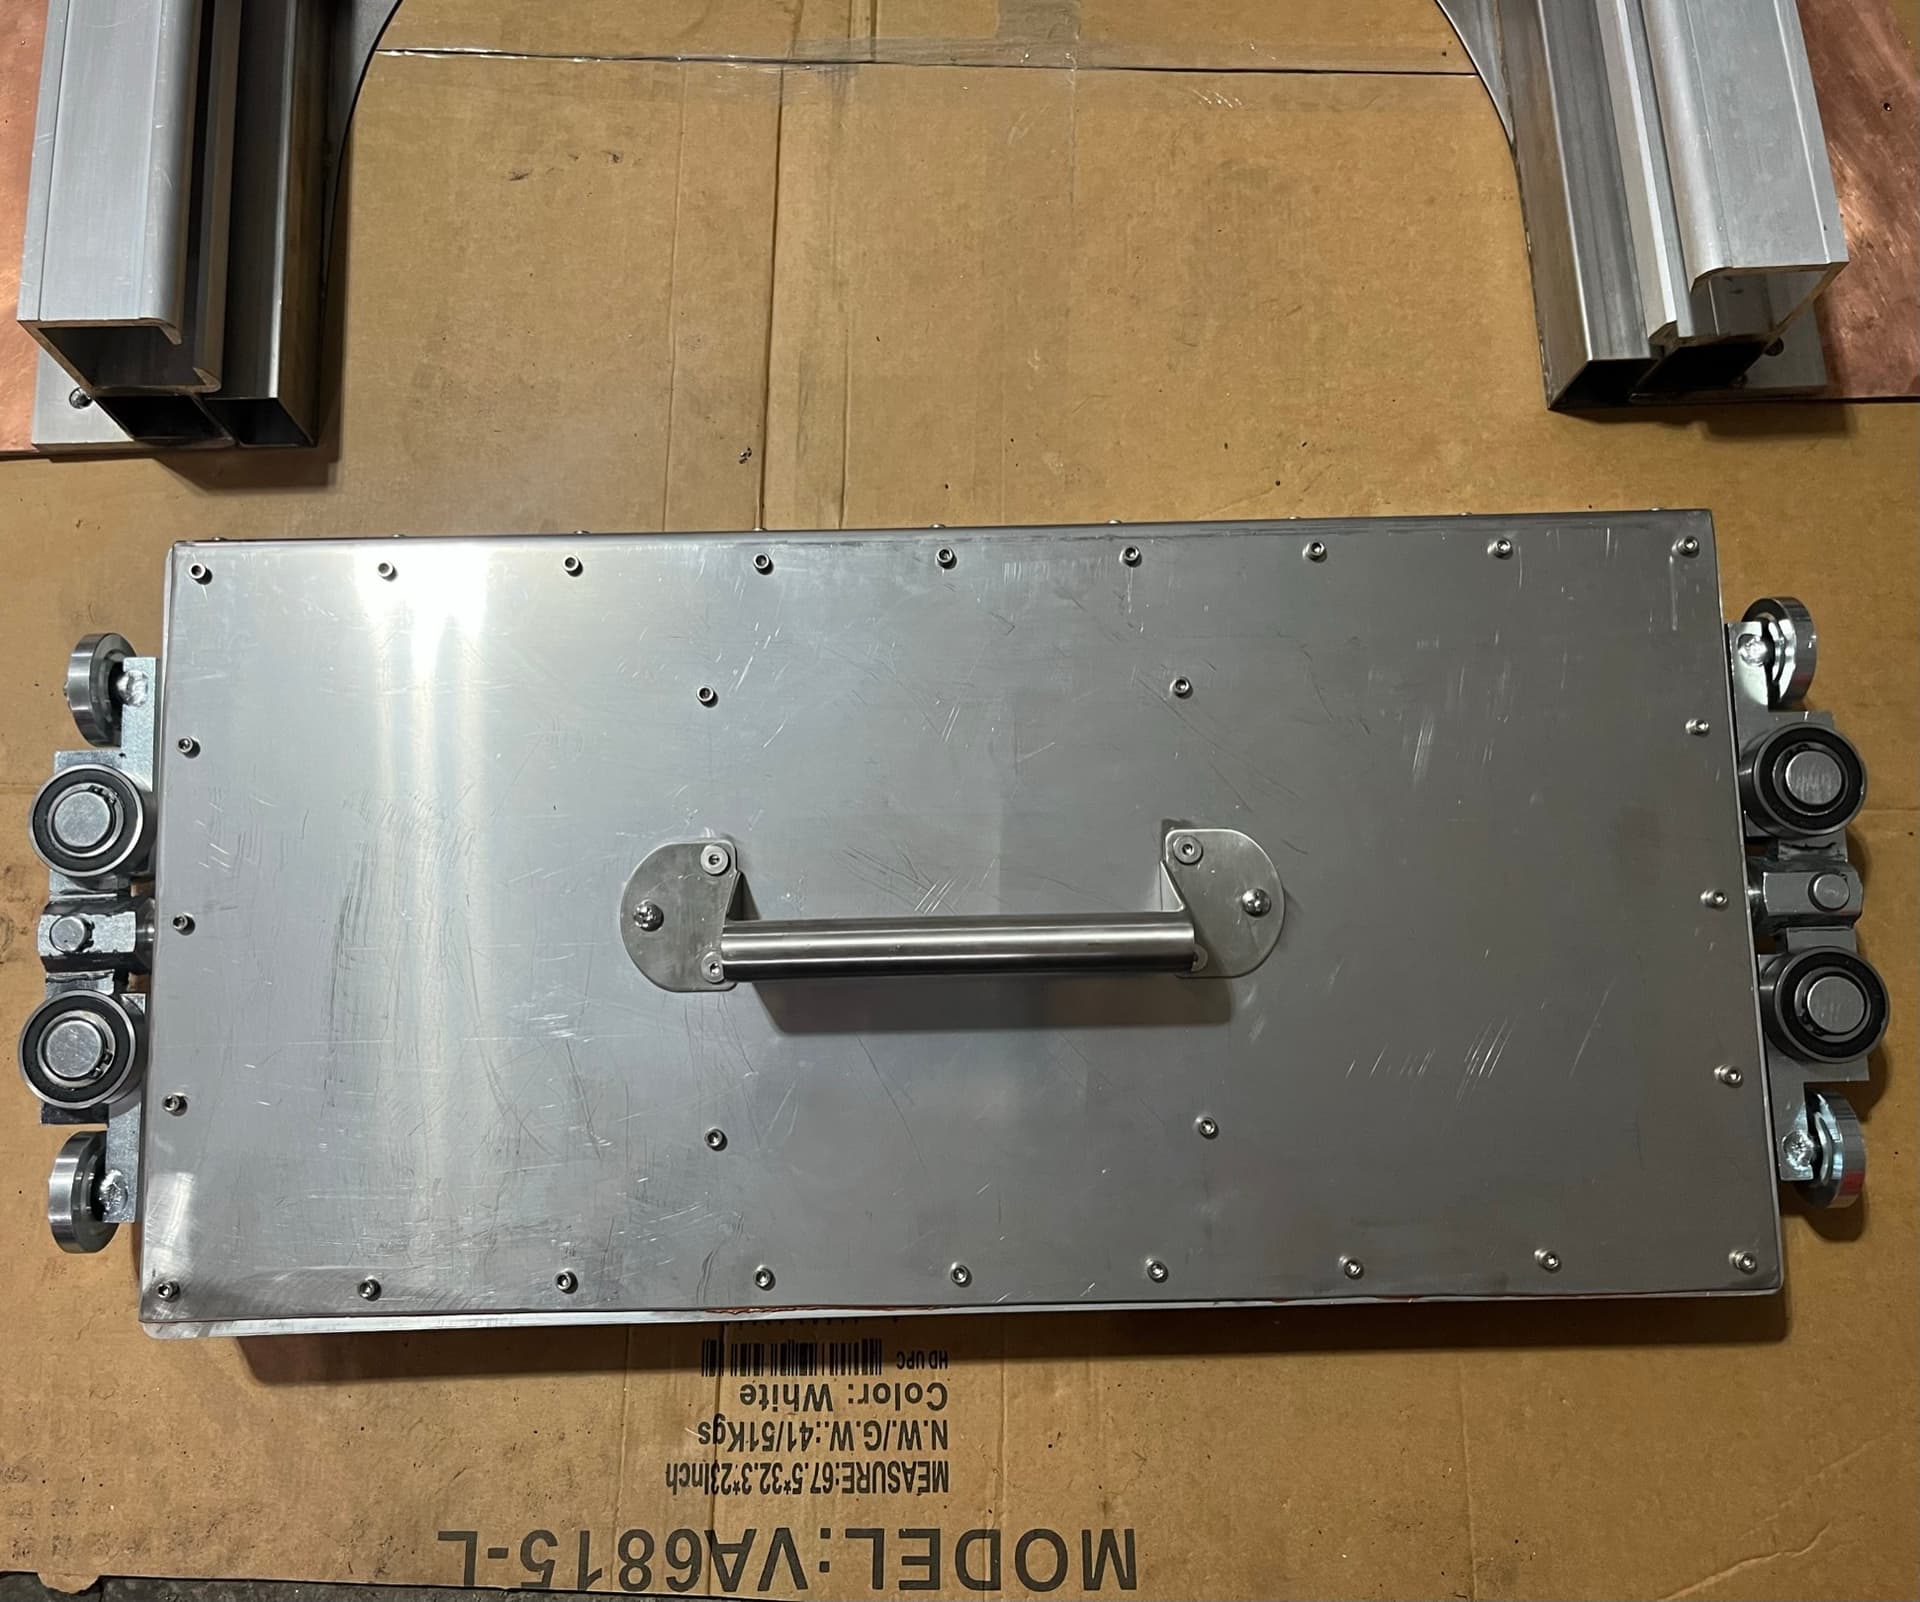
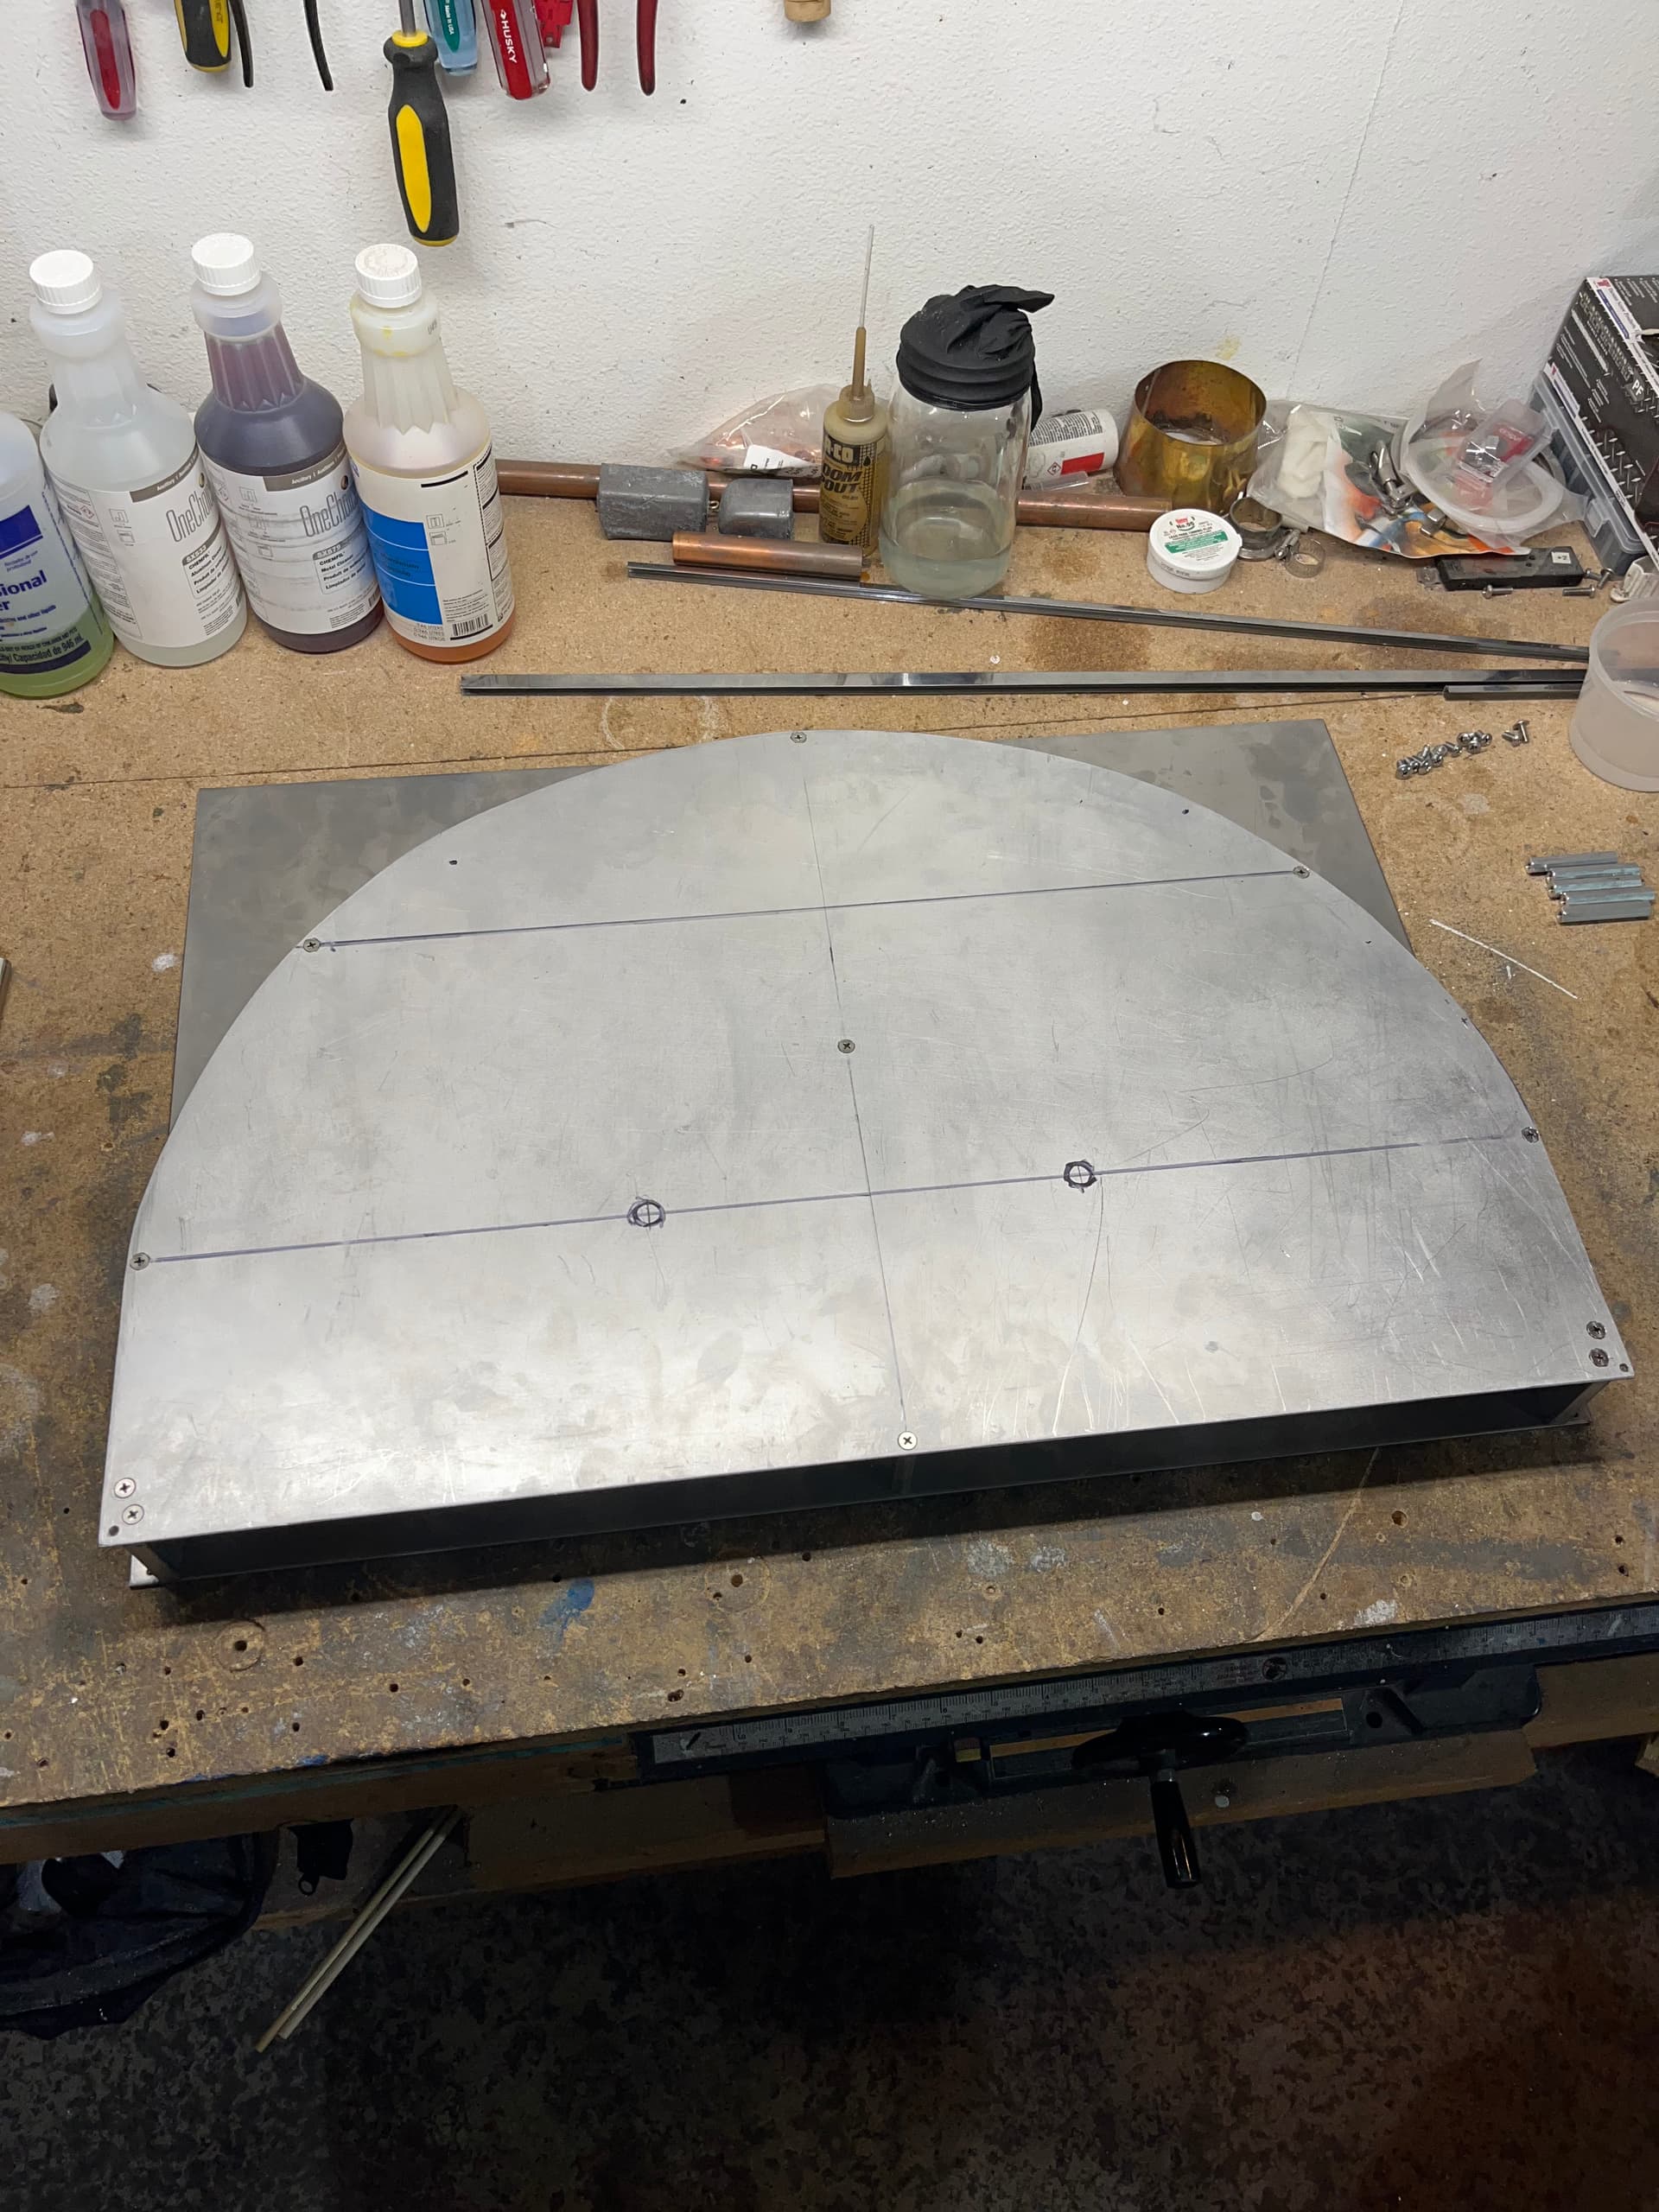
With the shell mostly done, I turned my gimlet eye towards the door. One of the challenges I had to figure out would be dealing with the heat generated by the oven. Aluminum is lightweight and easy to work with, but it doesn’t do so great with lots of sustained direct heat. I decided to make a backplate out of 1/8” stainless steel that I would bolt my door assembly too. I would then attach the backplate and door assembly to the aluminum shell. There were a couple big advantages to this approach. One, the stainless steel isn’t bothered by the heat. Second, attaching the door assembly to the shell after it was already in place on the oven would be vastly easier than trying to play the old Shell On game with an extra 50lbs or so of metal stuck on one end. The H-beams are aluminum and would be attached to the stainless steel backplate with countersunk machine screws allowing it to sit flush against the front of the shell.
The next problem I needed to figure out was how to seal the door. If the door itself was shaped like an arch both front and back, it would have been extremely difficult to seal it from rain effectively. The solution I came up with was to make the backplate of the door a rectangle and the front of the door an arch. I totally underestimated how heavy 1/8” thick stainless steel is and ended up building the rest of the door out of aluminum. Because the backplate would be the only part of the door with direct contact to the interior air space of the oven, I figured I could safely use aluminum for the rest of the door. Even with most of the door being constructed of aluminum, it still weighs a little over 30lbs. It’s beefy. With a straight edge to work with on the back of the door, I only had to figure out a method for preventing rain from running down between the backside of the door and the stainless steel backplate that it would be sliding up and down against. The solution I came up with was to attach a stainless steel C-channel to the backplate to act as a gutter. I milled a groove in the H-beams that allows the C-channel to pass through the H-beam to the outside of the door assembly. This would then catch any water running down the face of the shell and channel it outside the H-beams. I then attached another C-channel to the back of the door itself, facing down instead of up. When the door closes the C-channels overlap and create a weatherproof seal using only metal.
With weatherproofing taken care of, my next concern was working out the thermal seal. I ended up settling on heat resistant gasket material used for BBQ grills. It looks like felt and is only about 1/8” thick when compressed. I ran strips of it up the inside edge of both H-beams and then across horizontally just under the C-channel gutter. It does an acceptable job of creating a thermal seal while also allowing free movement of the door up and down. The door is filled with rockwool as insulation. I used hexagonal threaded spacers I found online at McMaster/Carr to attach the front and back door plates to one another. That was a pain in the ass, but ensured the door is of equal thickness (a requirement for smooth travel up and down the inside of the H-channels).
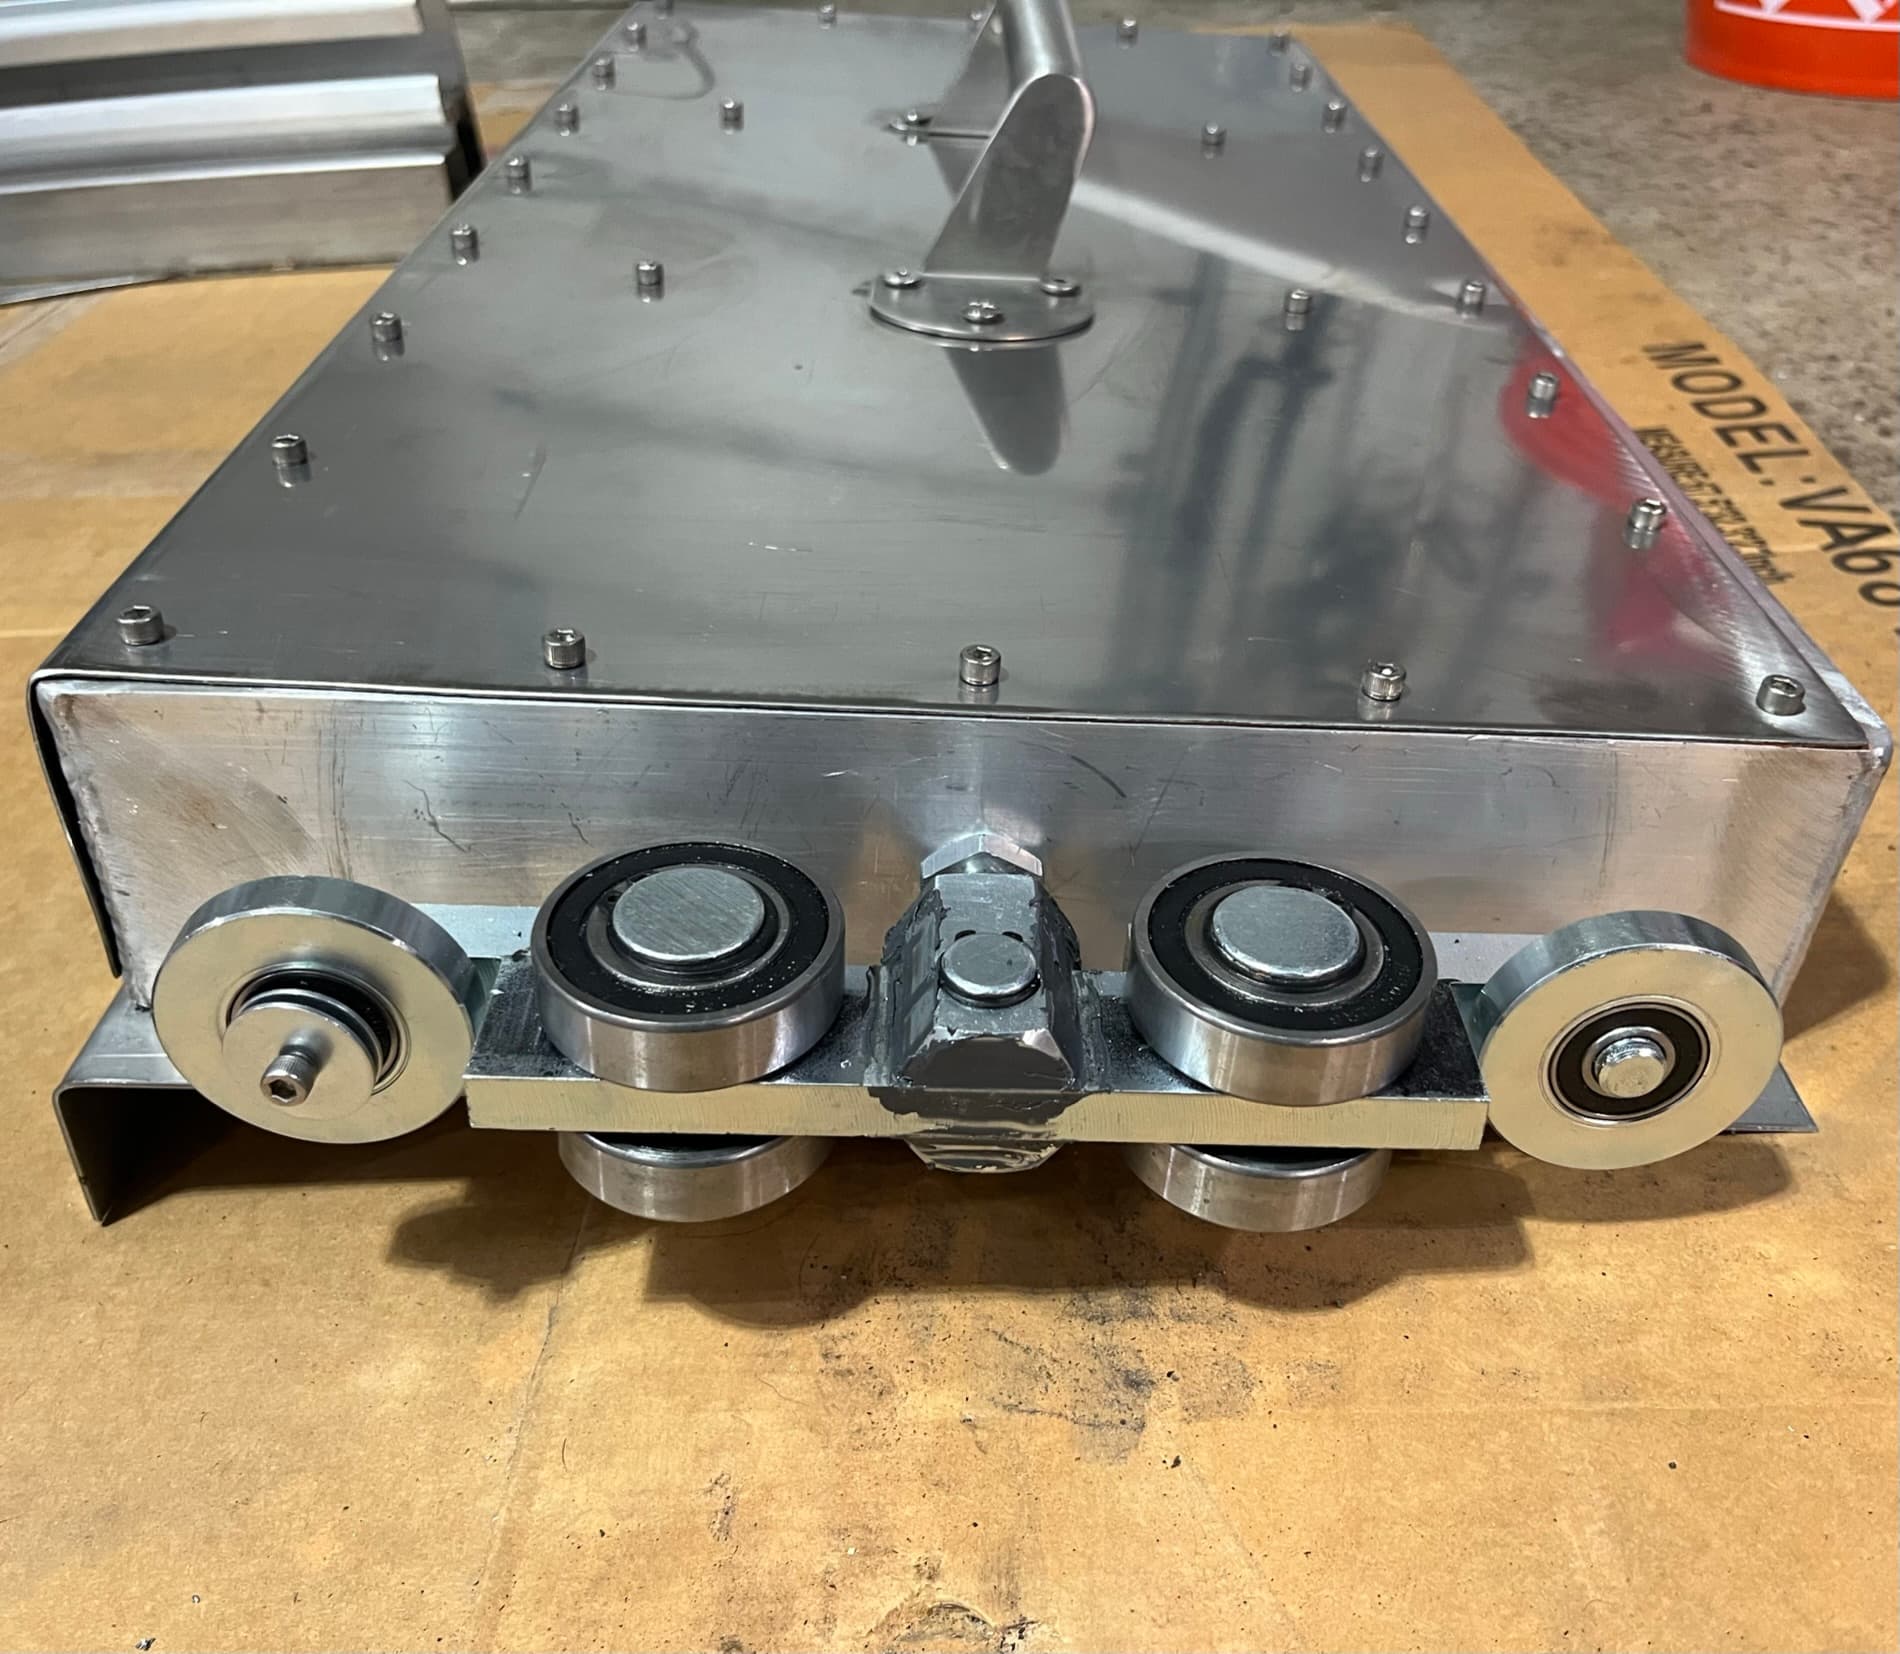
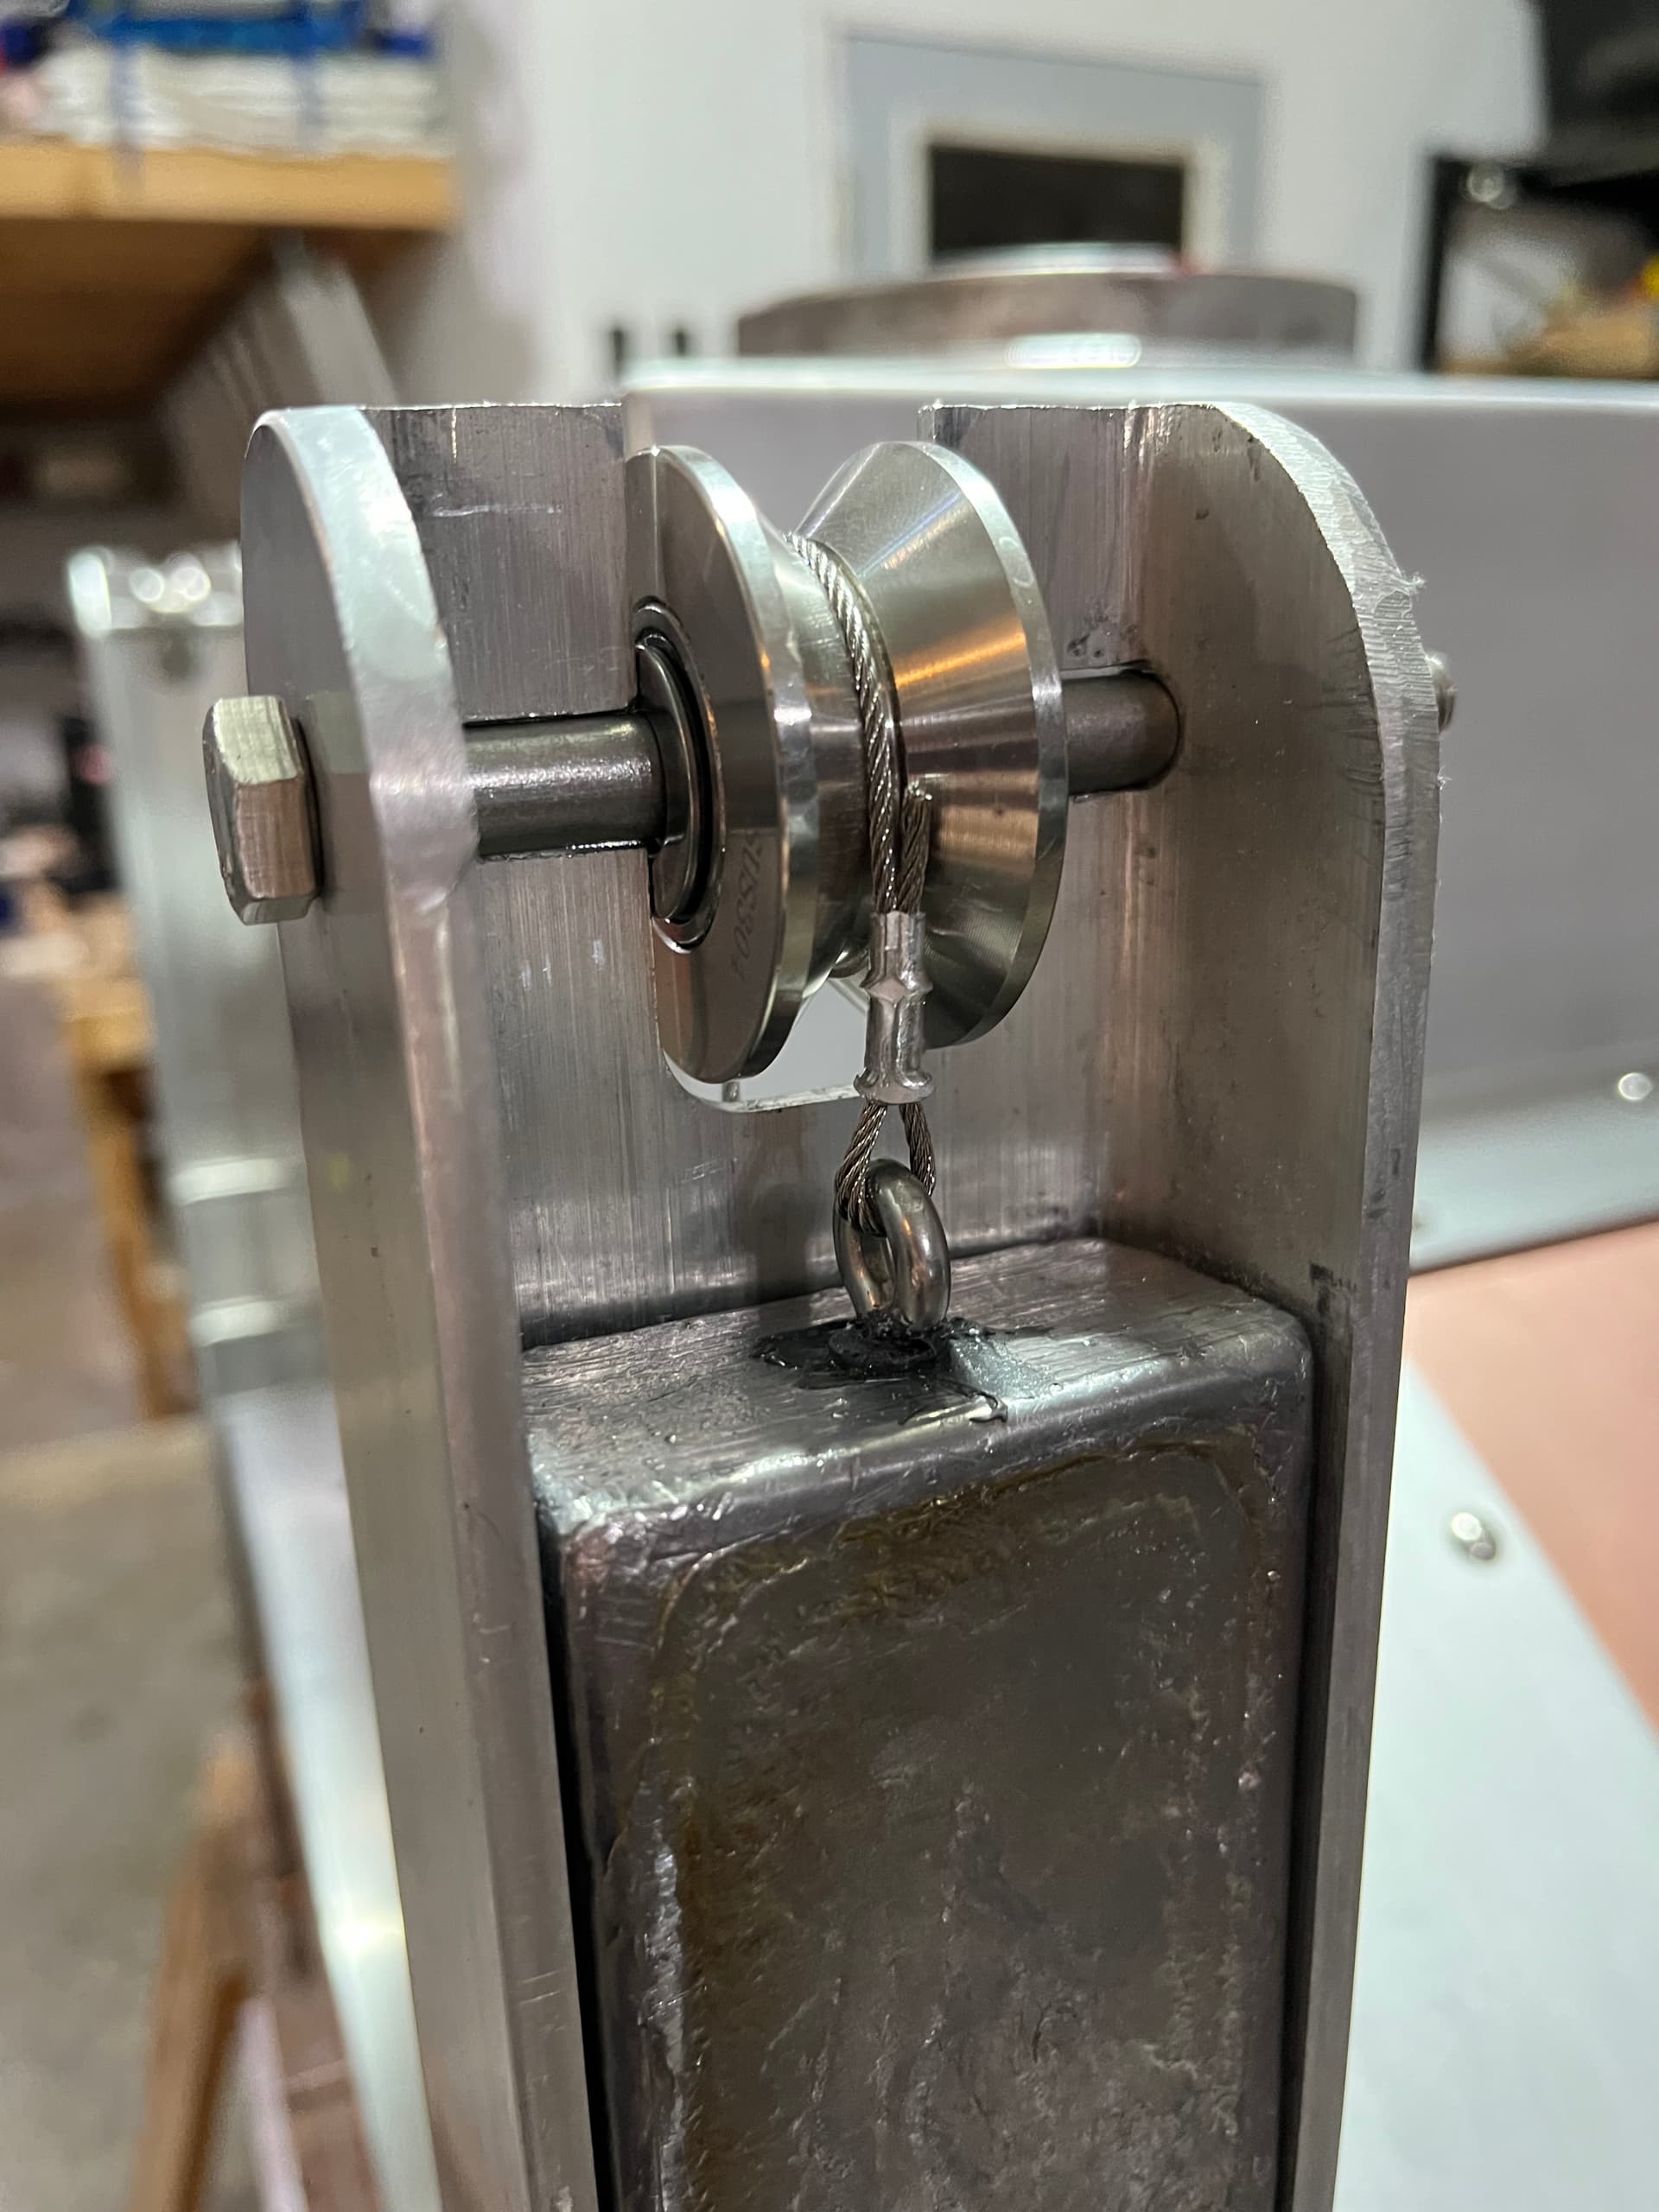
The final engineering conundrum was how to allow free movement of the now quite heavy door within the H-channels while also allowing me to stop the door anywhere in its vertical path without the need to secure it mechanically. Early on I decided I would either install rollers in the door itself or within the H-beams. I settled on installing rollers in the H-beams that would always stay in contact with both sides of the door. I used 1/8” stainless rod, 1/8”x1/4” sleeve bearings, and 5/16” o.d. stainless tubing to construct twelve rollers that I installed, six to a side, on the inside channels of each H-beam. The next issue was building a counterweight system that made the door effectively weightless. The most important factor in the counterweight design was the height of the H-beams. My door needed to lift around 16” in the air to create the opening I wanted, and the H-beams are 30” high. After deducting 1” for the pullies, I was left with a maximum height for my counterweights of 13”. I realized I had to utilize the limited area within the outside channels of the H-beams as efficiently as possible to make my 30lb door immune to gravity.
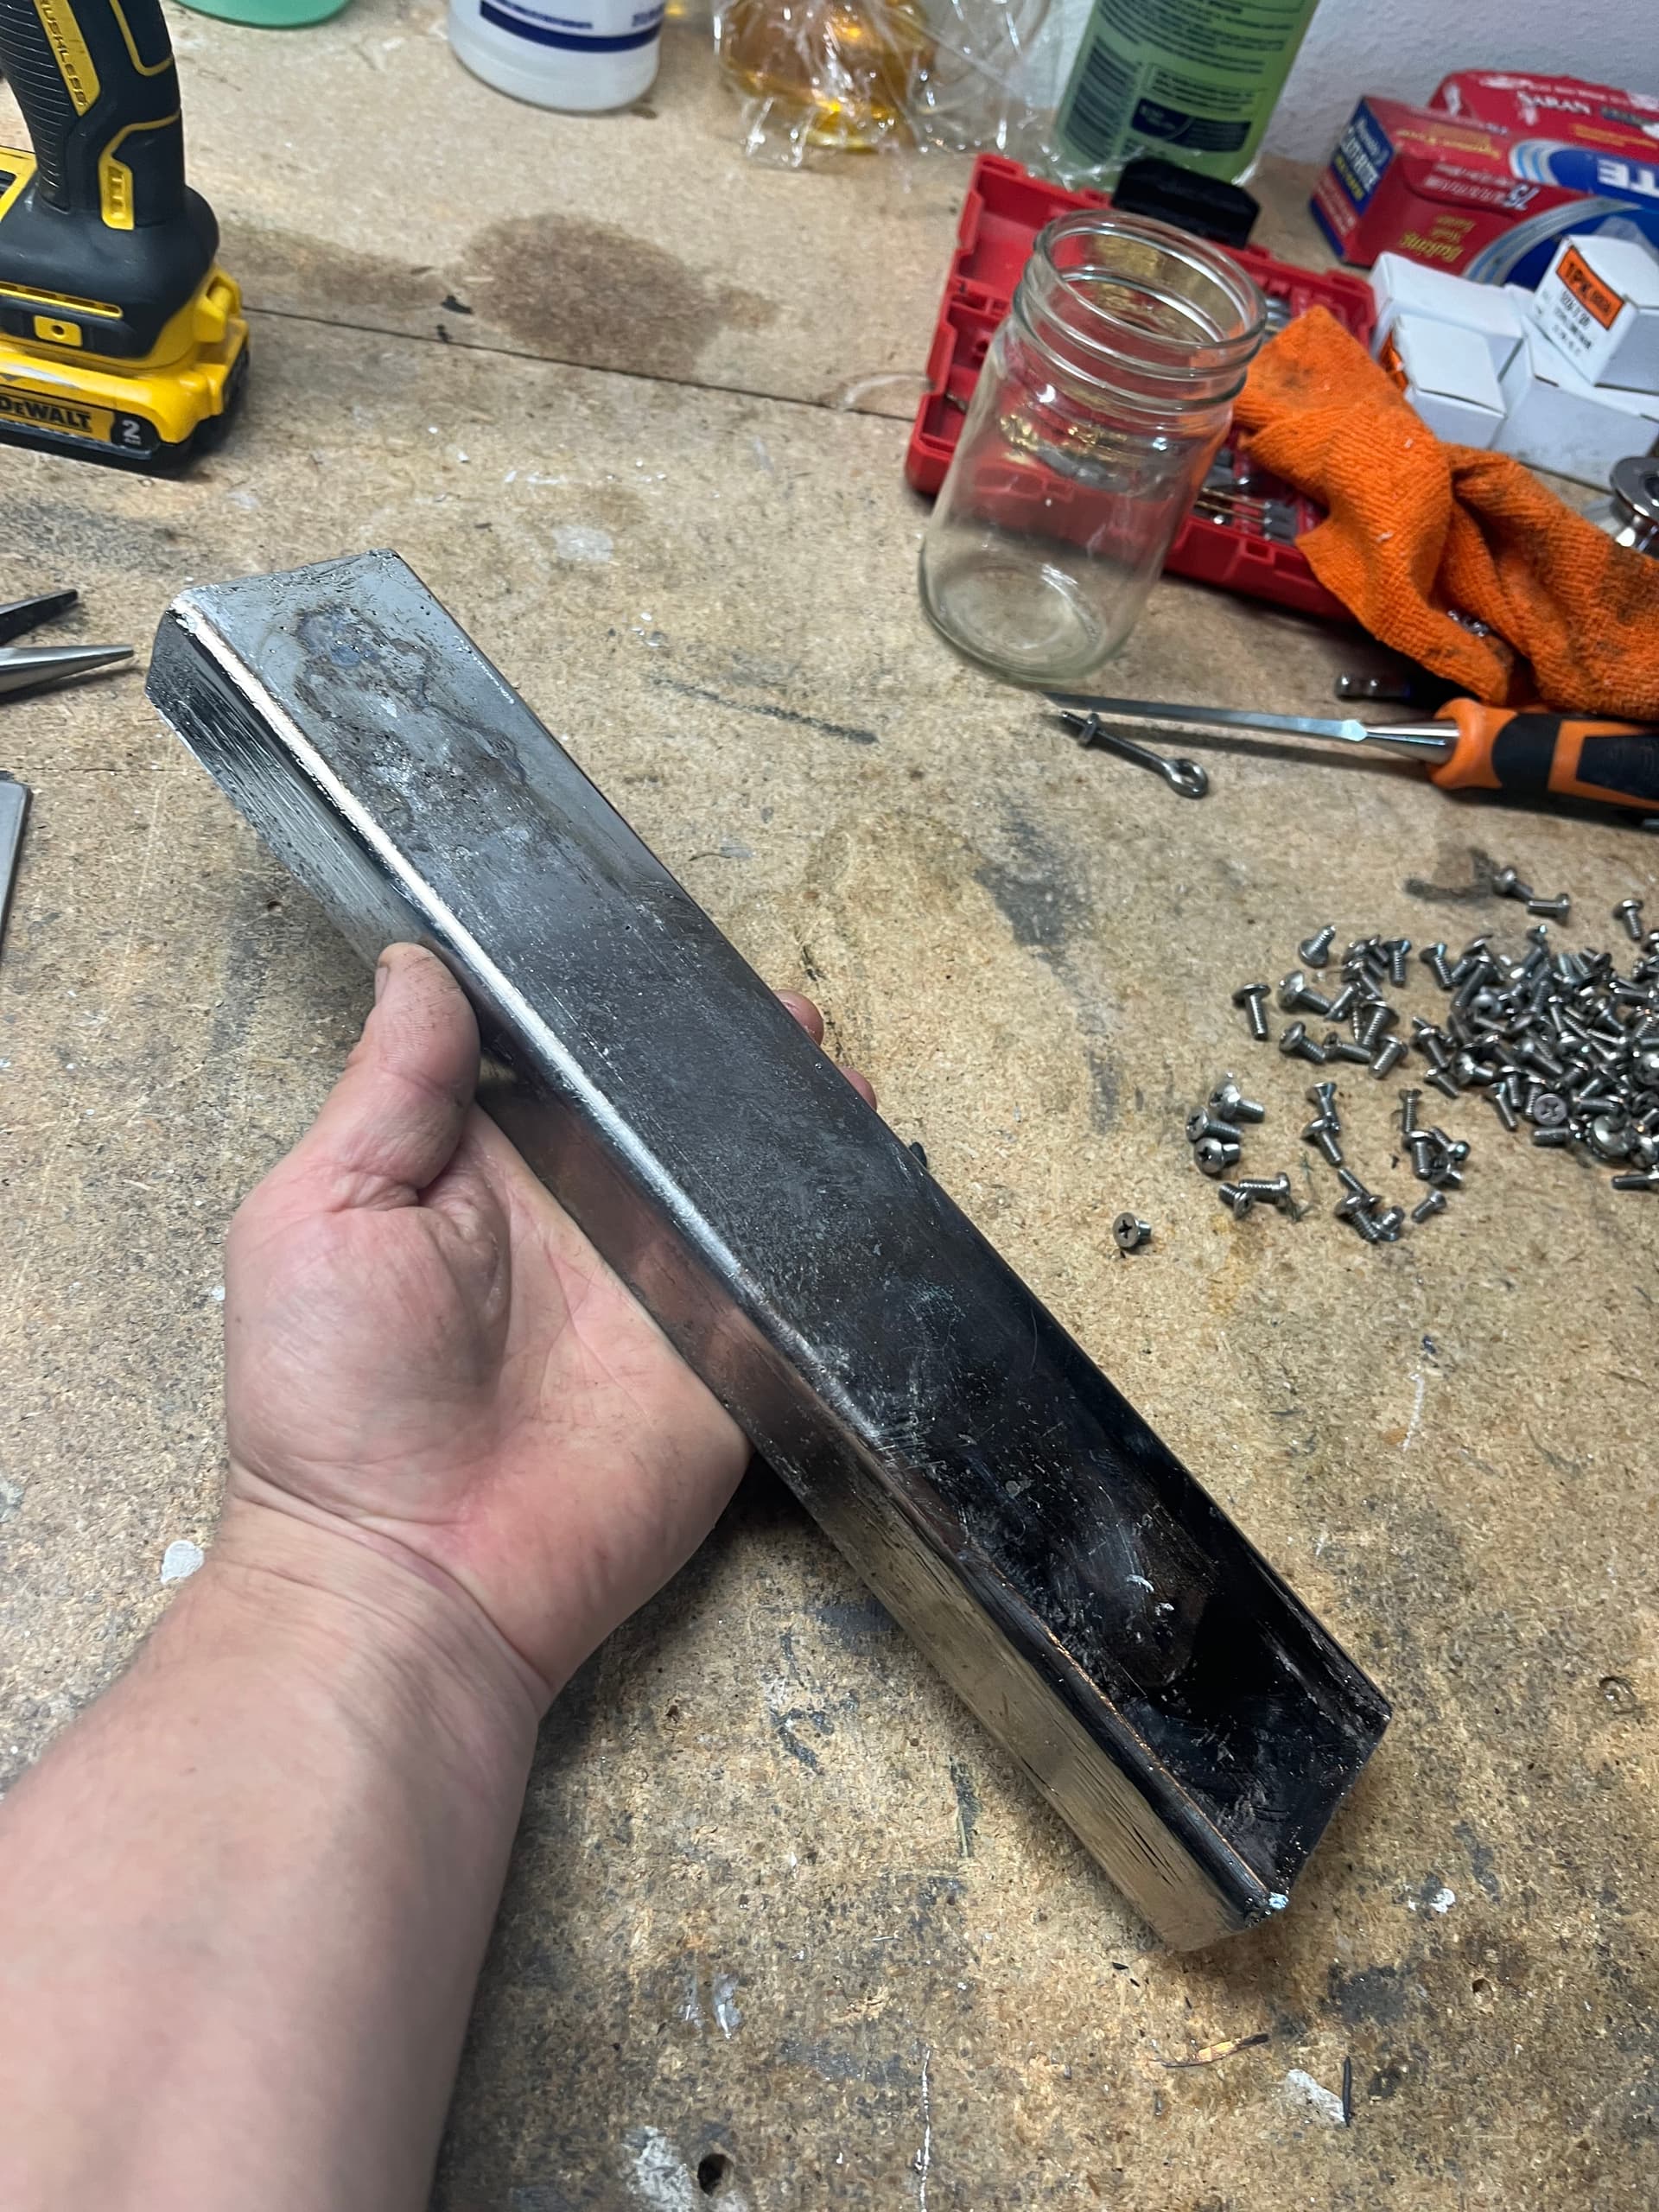
This is the part where I learned how to cast lead. I took a chunk of H-beam, cut it down to 13” long and capped both ends creating a mold to pour my lead in. Once again, the Patron Saint of Shoddy Workmanship and Morons was generous, and it turned out that the volume within the 13” H-beam mold I made was sufficient to hold exactly 15lbs of lead. I found this out by first filling the mold with paraffin wax, de-molding it, then using water displacement to calculate the volume of my mold. A quick google search to find out what a milliliter of lead weighs, and voila, I had counterweights. Side note: Flip-flops are a poor choice of footwear when working with molten metal.
Once my counterweights were cast, I connected them to the door using 1/16” stainless steel cable and crimped on ferrules. The pulleys are stainless steel V-groove wheels I found on Amazon. After assembling everything I realized that the rollers in the H-channels were redundant. The door is so heavy and since everything is plumb and level, the door moved up and down with little resistance. After removing the rollers I installed a pair of sleeve bearings on either side of the door just inside both H-beams thereby preventing the door from any movement other than straight up and down.
That pretty much covers the build out. I plan to cover the outside channels on both H-beams so that the lead counterweights are hidden at some point. I’ll also do some more work on the bottom of the door. I’d like to install a thin strip of silicone weatherstripping to prevent any potential water infiltration between the door and the skirt. I’m also going to play around with the height of the flue. It isn’t tall enough to create a draft that prevents smoke from exiting out the door opening. I’ve also been playing around with using a high-volume, low-pressure air pump to inject air into the oven so that I can close the door most of the way and still have enough oxygen to keep the fire burning hot and clean. Most likely I’ll end up building a manifold out of stainless steel tubing that enters through the back of the oven. I’m also going to install a thermometer in the door below the handle. Possibly a window in the door as well.
Overall, I’m very happy with the finished product. The one thing that I completely overlooked was the inevitable expansion metals undergo when heated. I built the door without factoring in any room for thermal expansion and after having the door all the way open and heating the oven for a few hours, the door was stuck open. As soon as the oven cooled down below ‘seventh circle of hell’ hot, the door resumed its normal function. Math is hard, and I’m not an engineer, so I’ll just have to wing it when I rebuild the door and hope that I leave enough wiggle room for thermal expansion, while still maintaining a tight enough fit to seal the oven from the elements when cool. Maybe I’ll work on that next Summer…
Cheers,
Nathan