Glad to hear your projects are turning out well. I had to put construction on “hold” after I started a new job in October. I have the base completed and ready to continue in the spring. I’m encouraged, Peter, to know that the damper seems to be working out well for you. I bought it when they were in stock again; I’m figuring that the combination of damper, an extra layer of insulation, and the closed-off mouth will let me use the oven year-round in snowy and icy Connecticut. Hope you and everyone gathered around your ovens are enjoying your Christmas pizza!
Hello Everyone!
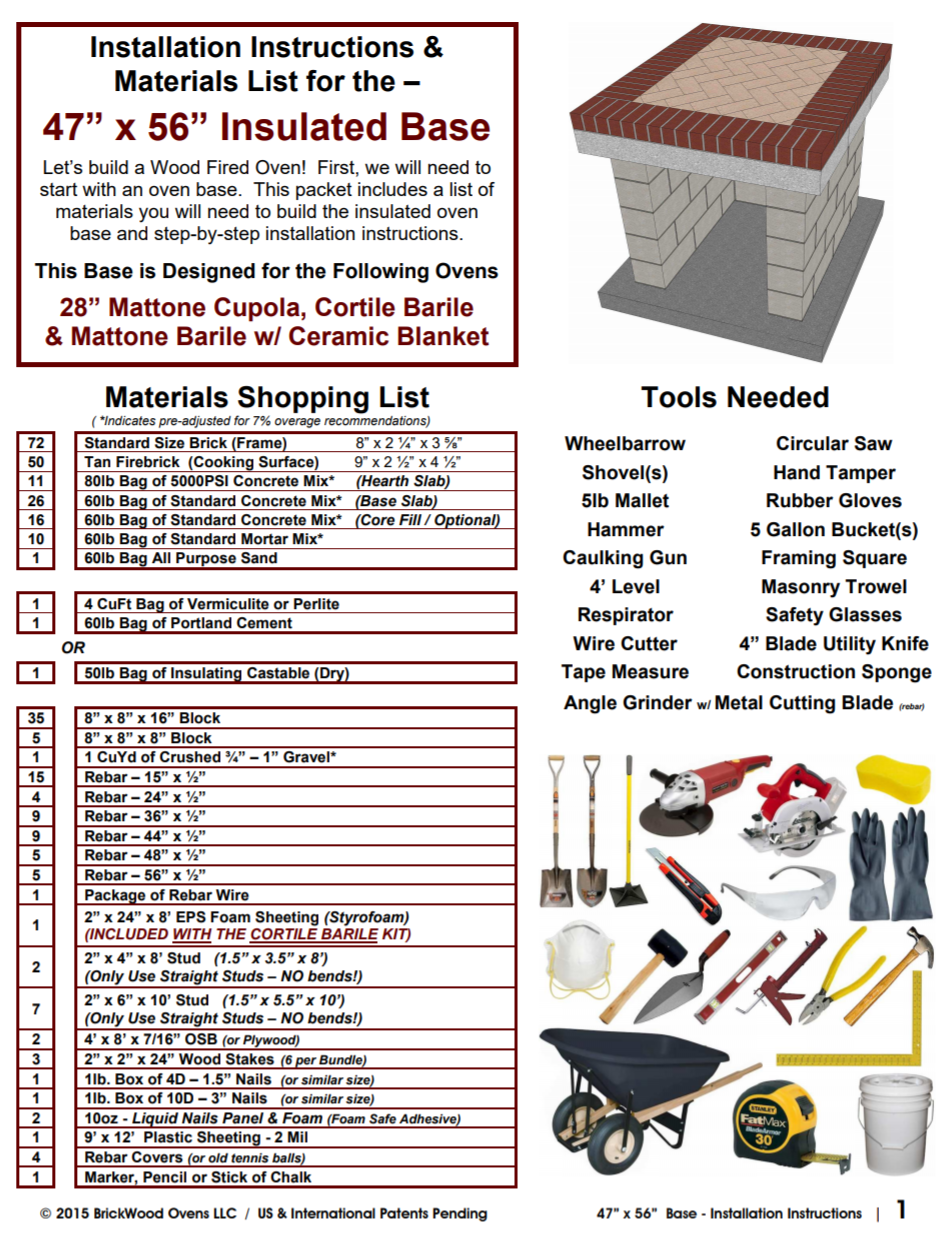
New to the forum, Just ordered my Mattone Barile Grande kit today. The Slab was put in last week and i lay the first block tomorrow morning!!! So excited!
I have been reading all the forum entries and wanted to ask how long it took for the Portland/Perlite mixture to cure? Reading your post, it seems like using Perlite is the way to go, and if it cures faster, i can move on to the next step quicker.
Any help or advice would be greatly appreciated!!!
Hi Mike, and welcome to the forum! I’m sure you’re eager to get going.
As far as the Perlite mixture goes, it took about a day to cure. As you’ve already read, Vermiculite and Perlite have similar structures, but Perlite doesn’t hold on to water the same way Vermiculite does.
The mix therefore cures in about the same time as a Portland cement mixed with stone.
Hope this helps, and good luck with your build! (A camera of some kind is not listed in the “Tools” manifest, but it should be. Take lots of pictures and share them with us if you can!)
I am in the planning stage now and since my build is a custom one I have some questions and any help guidance is greatly appreciated.
The oven is going to be the Barile Grande. It is the base that is the custom one since it will also include a Santa Maria style grill on the side. As such, the top that is cast in three pieces normally has to be poured in place. My concern is the 2" cavity for the insulating mix. I am not sure I can place the foam precisely so I was thinking of just doubling up the refractory brick on the floor. Would that work as well? Or if someone has a good pointer how to place and hols the styrofoam insert precisely and firmly in place they I could do that.
Thanks for any input.
The cavity in the slab is going to be filled w/ Vermiculite or Perlite (whichever is available in your area). While it’s called an “insulation layer” - it basically acts as a buffer between the hearth firebrick and that cold, cold, cold hearth slab.
When you create a fire inside your oven, you are heating those hearth firebrick to 1000°+ temps. The firebrick is designed to hold that heat for long periods of time.
As an example - Imagine placing a 1000° firebrick on a big block of ice. That ice is going to melt pretty quick. But if you put a 2" layer of vermiculite or perlite insulation between that block of ice and your 1000° firebrick, the ice is going to melt at a much, much slower rate. The insulation layer acts as a buffer between the block of ice and the hot firebrick to slow the heat transfer process.
Now, let’s say that block of ice is actually your concrete hearth slab - even with 2 layers of firebrick as you mentioned… It’s going to take a long time to heat your oven / oven floor as that cold, cold concrete hearth slab is just stealing the heat from your hearth firebrick like a sponge! And you will never get your oven as hot as it could / should be - and let’s not even mention the additional refirings you’ll need to do to get the oven back to temp. The insulation layer (which is airy when dry) prevents the cold slab from sucking the heat from your 1000°+ hearth firebrick.
As for pouring a monolithic slab w/ styrofoam - I don’t have instructions (yet), but its easy to do. After you build your concrete slab frame, cut out a 2" piece of foam to the exact size you want your insulation layer void to be (L" x W"). Simply grab a couple of 2" x 4" x 5’ - and lay parallel on the garage floor… about 2’ apart. Then GORILLA GLUE the foam panel to the CENTER of those 2’ x 4’s so it looks like a giant letter H. Only use Gorilla Glue as all other glues melt foam.
When the foam / wood combo is dry, simply place it on top of the wood concrete slab frame and center / position to your preferred measurements. Mark the position on the frame w/ a sharpie and remove.
Then fill the frame w/ 3.5" of concrete (better to be less than over) - then place the 2x4 / foam form on top - then fill open sides w/ concrete.
Be sure to take pics - sounds like an AWESOME build! Love those Santa Maria grills!
Thank you so much for the welcome and the quick reply. It is greatly appreciated.
I was not entirely sure of the purpose of that insulating layer, but now it is clear so I will act accordingly.
Another question. Since the refractory bricks are only placed on the floor of the oven without any binding mortar, why not use high temp adhesive between them to “secure” them? Some available adhesives can withstand up to 2000 degrees?
The project is my retirement bucket list so it is a bit out yet but I like to plan in advance. I will take pictures of the entire process of the build and post. That is how I refined my idea, by looking at so many wonderful builds by others.
[Edit: I got interrupted while I was typing this, and posted it before I saw that @BrickWood had posted a much more detailed response! And, as always, I learned something helpful from his post.]
I like what you’re planning. I’m not sure I’d want to simply double up on firebrick.
One of the jobs that the insulating layer under the hearth accomplishes is providing a “break” between the cold concrete slab and the very hot environment in your oven. The firebrick absorb heat energy, but they eventually pass it through. That’s the same reason you have mineral fiber insulation around the arch of the oven, rather than extra layers of firebrick.
It’s important to keep your floor insulated because you want that sizzling 800°F+ heat underneath a pizza crust—or otherwise why bother building?
It’s totally doable to build a frame to suspend your void form on top of your concrete pour. I’ll leave the details to others who have experience with it.
I am so eager to see photos of your progress and the final outcome. Glad you’re here!
The firebrick are secured by the brick frame built around them. The idea is that if a refractory brick cracks (it happens), it’s easy to remove the pieces and replace it with a new brick.
The sand underneath the firebrick are used to level and set them without the use of any kind of adhesive. I know it’s not intuitive, because we’re so used to thinking of brick being associated with mortar, but it works.
You’re welcome! (Sounds a little redundant, I know, but we mean it.)
I’m working on that very step right now. The sand cushions each firebrick and keeps it level. The herringbone pattern does a number of good things: if a brick were to rise, a pizza peel wouldn’t get caught on it; a more subtle benefit is that the horizontal force on each row of bricks does not ever go linearly from one side of the frame to the other. With firebrick reaching their heat potential, that means you’re not setting up a row of little jacks pushing outward.
Any gaps get filled up quickly with the ash from your curing fires; ashes don’t crack, and they let the brick move just enough to relieve stress. I believe that @BrickWood used to recommend spreading all-purpose flour over the hearth and working it into the small gaps, but it turns out the ashes from your fire work better for the purpose.
Having seen your inspiration photo on another thread, I know this is a dream working its way out. Bucket lists are a good thing, and may that bucket be a long way down the road for you.
IMPORTANT NOTICE! On the Materials List for the 47" x 56" Base, we listed (1) 50lb Bag of Insulating Casable (Dry). THIS NEEDS TO BE CHANGED TO (2) BAGS!
At the moment, we are unable to make the change to our website / directions, but if you run into this issue, please add an extra bag of Insulating Castable. If you choose to use Vermiculte or Perlite and Portland Cement, the numbers are correct.
I apologize about the error and we are working hard to get the necessary changes made!
Thanks for posting this. I ran into this in my build and thought it was just me. Could you also verify the amount of high temp mortar recommended for the mattone barile? I purchased 400 lbs as recommended and only used half. Thanks for your insight.
That seems like a very economical use of the mortar. My build is the slightly larger Grande, and among the brick border hearth frame, the barrel itself, the back wall, and the face, I’ve used well more than 400 lbs.
There are some variances, but wondering if you used regular mortar for any of those areas.
Hi Matt. I used regular mortar around the hearth frame as I could only get my hands on 400 lbs of high heat. Had I been able to get more I would have done the brick hearth frame too. I used high heat everywhere else except for the veneer. The only places I used high heat on the veneer was the oven opening and chimney. I thought it was odd but I have no gaps between the fire bricks and followed the instructions to a T.
I have to say, I love my oven! We have used it multiple times a week since I finished. We’ve made lots of pizza and what my kids call a smizza or a smores pizza.
That would more than account for the difference. It’s ideal to use the high-temp mortar in that frame because it comes into direct contact with the hearth. I can’t speak to long-term durability because I don’t know.
It sounds like in general you paid very careful attention to the areas where you’ll get direct heat and flame.
A “smizza” sounds like the perfect end to a summertime meal! I’m really happy for you!
Congratulations, and may you have many satisfying pizzas in your future.
So, to clarify (since I am doing the hearth frame today and hoping to start the barrel tomorrow): will I have enough materials for the diy high-temp mortar mix if I bought what’s on the materials list? Or should I scramble today to get more fireclay before tomorrow? Thanks! Serena
You should be fine. Checking back on my build, I recall now that I needed more high temp mortar for a specific reason. I had to redo my hearth frame because I learned the reclaimed bricks I used the first time had been doused with an herbicide. So the entire frame had to be chiseled off and replaced with new bricks.
You should be within the allowance, as @Newman says.
Hi all. Before step 51 in the base instructions it says that standard mortar is listed in materials list but can be substituted with fire mortar but that you will need 70lbs extra. I could only get my hands on 400 for the oven so I used standard mortar for the hearth frame. I ended up with 4 full bags of high temp mortar left over. And now wish I had used high temp for the hearth frame. I’m just drawing attention to my situation with 4 bags left over at a high cost. I’ve got plenty of people asking me to build them an oven so the materials will not go to waste!